Table of Contents
File Restriction Add-On allows you to restrict access to files in the WordPress Media Library based on subscription plans and login status. This ensures that sensitive files are only accessible to authorized users.
File Restriction Add-on is available only with a Paid Member Subscriptions Pro, or Agency license.
After purchasing a premium version of Paid Member Subscriptions, you can check the following guide on how to install Paid Member Subscriptions.
After you install and activate the File Restriction add-on, new settings will be available to protect your files within your Media Library.
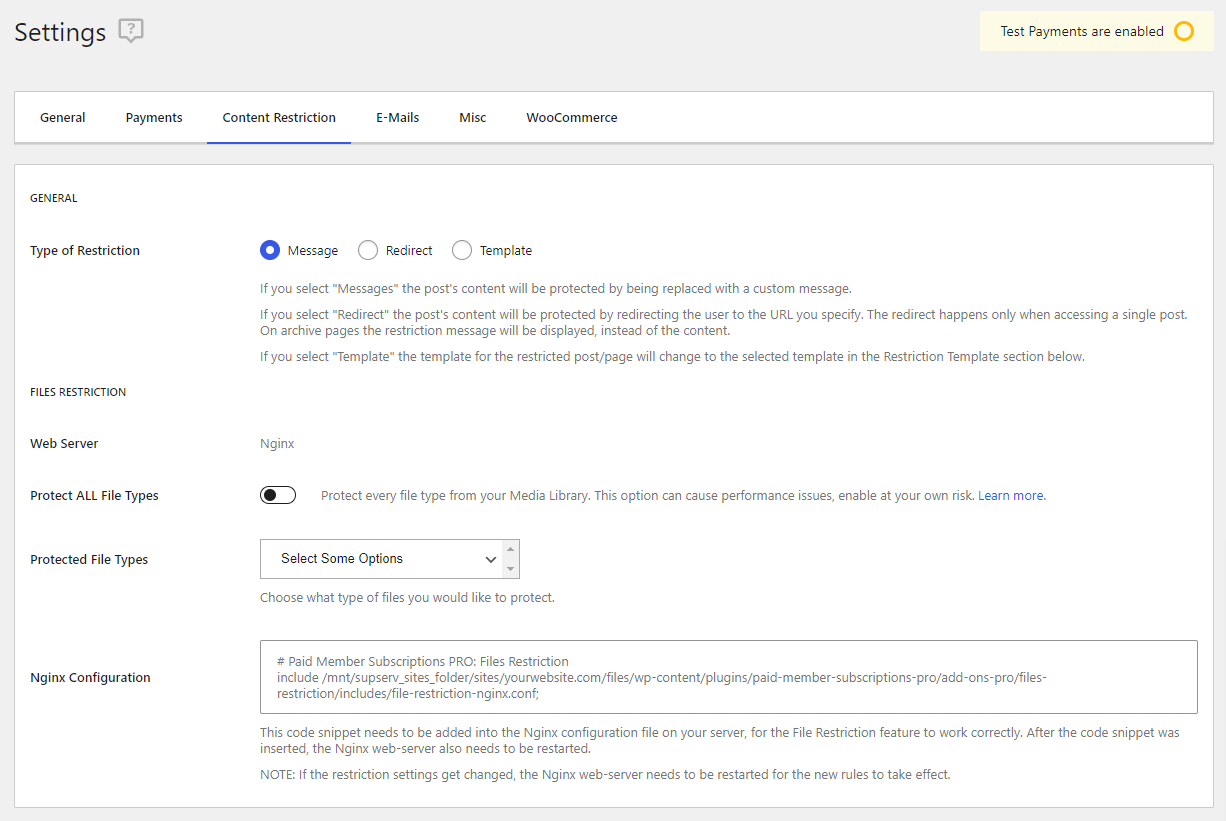
File Restriction Settings are available under Paid Member Subscriptions → Settings → Content Restriction.
These settings allow you to choose to protect all files in the Media Library, regardless of their type, or only specific file types.
After you have selected which file types to protect, you will need to establish Content Restriction rules that determine whether files can or cannot be accessed.

This is an informational field only. It displays the current web server in use.
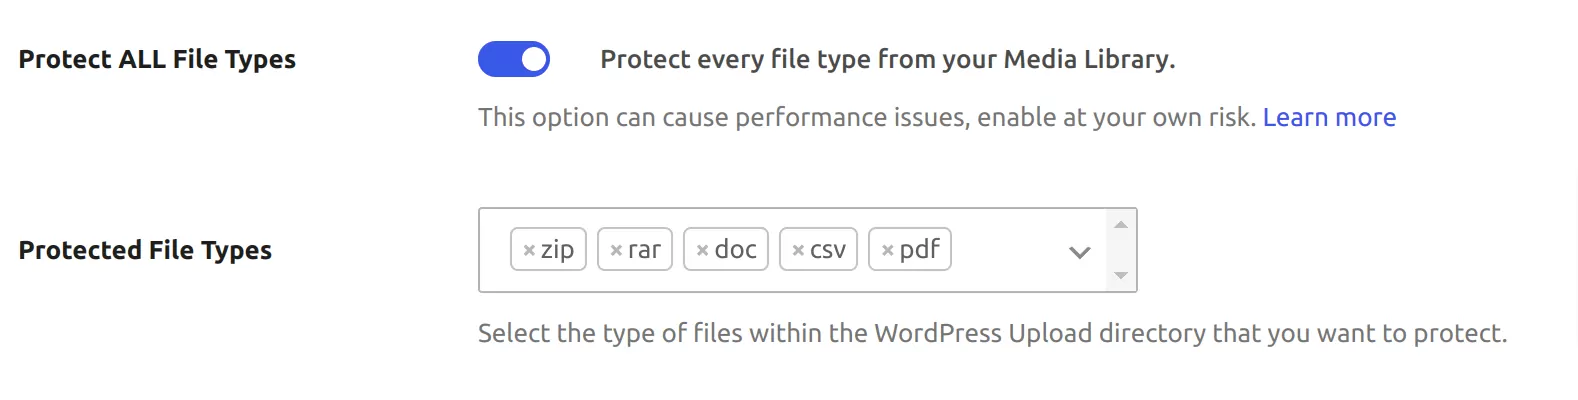
When enabled, all files in the WordPress Media Library, regardless of their type, will be subject to access restrictions based on the Content Restriction settings on the file attachment page.
Additionally, the Protected File Types field will be disabled, and the options specified there will not be taken into account.
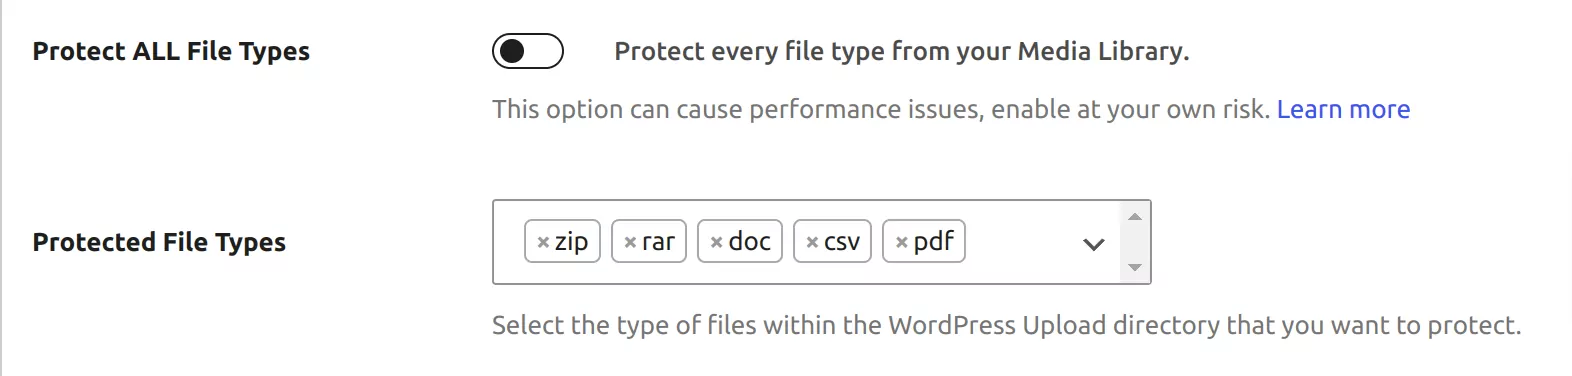
When disabled, only the file types specified in Protected File Types will be subject to access restrictions. Any other file type not included in the selected types will not be subject to these restrictions.
NOTE: This option may cause performance issues in large Media Libraries due to the high volume of files being processed.

You can use this option to specify which types of files from the WordPress Media Library will be subject to access restrictions based on the Content Restriction settings on their respective file attachment pages.
There is a list of file types selected by default. You can change this selection by removing a file type from the list or choosing a new one from the drop-down menu. If you want to add a file type to the restricted list but can’t find it in the drop-down, you can type the desired file extension and press Enter key.

This option is visible only when the Nginx web server is in use.
You’ll notice an Nginx include directive and a brief description of the steps required for the file restriction rules to take effect, ensuring this feature works properly.
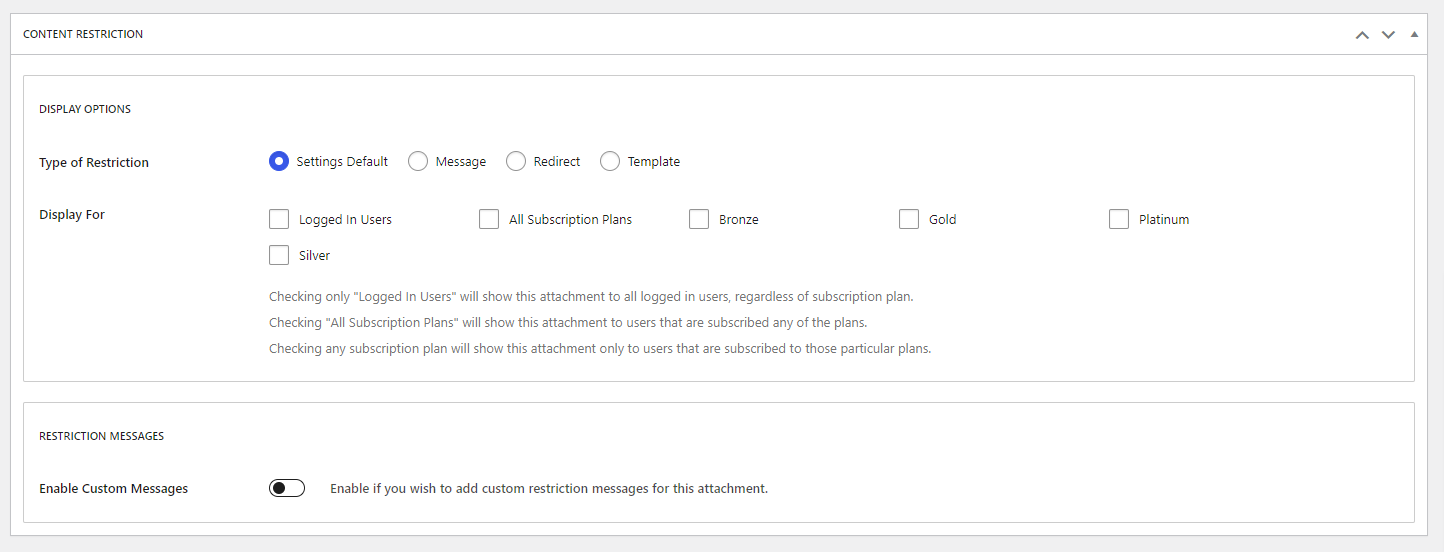
You can manage the Content Restriction rules by navigating to Media → Library, opening the desired file, clicking on “Edit more details” in the sidebar on the right, and scrolling down to the Content Restriction meta-box where you can set restrictions as needed.
To ensure the File Restriction Add-on functions correctly and updates the restriction rules accurately, additional steps may be necessary based on the web server being used (Apache or Nginx).
When the Apache web server is in use, no additional setup or configuration is required.
The necessary directive is automatically inserted into the .htaccess file and updated whenever the File Restriction Settings are changed or the File Restriction Add-on is activated or deactivated.
When the Nginx web server is in use, additional steps are required to ensure proper functionality of the File Restriction Add-on.
The additional steps — Insert Nginx Directive and Restart Nginx Web Server — can be performed either Using Web-based Control Panels or Using the Terminal.
Both Web-based Control Panels and the Terminal provide effective means to manage Nginx configurations and restart the server. The choice between these methods often depends on your familiarity with the tools, the complexity of the changes you need to make, and the specific features offered by your hosting environment or server setup.
1. Insert Nginx Directive
include directive needs to be added to the Nginx configuration file on your server.2. Restart Nginx Web Server
NOTE: The Nginx web server must be restarted whenever changes are made to the File Restriction Settings or when activating/deactivating the File Restriction Add-on.

A notification will appear on the WordPress Dashboard whenever the Nginx web server requires a restart. If this notification is dismissed without restarting the web server, it will not reappear until necessary changes are made and the web server needs to be restarted again.
1. Access the Control Panel
Log in to your server’s control panel. Common control panels include:
2. Edit Nginx Configurations
Navigate to the appropriate section or menu within the control panel to edit Nginx configurations. Typically found under domain or server settings.
Look for options labeled Nginx Settings or Web Server Configuration.
Add or modify directives as needed directly within the interface.
3. Save Changes
After adding directives, save the changes through the control panel’s interface. Usually involves clicking a Save or Apply Changes button.
4. Restart Nginx
Some control panels offer the ability to restart Nginx directly from the interface.
Look for a button labeled Restart Server or Apply Configuration. Clicking this will restart Nginx and apply your new configuration.
1. Access the Terminal
SSH Access: Open a terminal on your local machine (Windows users may use tools like PuTTY or Windows Subsystem for Linux).
<em>ssh username@server_ip_address</em>Replace username with your server username and server_ip_address with your server’s IP address or domain name.
2. Edit Nginx Configurations
Navigate to the Nginx configuration directory. For example:
<em>cd /etc/nginx/</em>Use a text editor like nano, vim, or emacs to edit the Nginx configuration file (nginx.conf or other relevant files).
<em>sudo nano nginx.conf</em>Add your directive in the appropriate location within the configuration file. For example:
3. Save Changes
Save the file and exit the text editor (Ctrl+X, then Y to confirm changes in nano).
4. Check Configuration
Validate the Nginx configuration for syntax errors before restarting:
<em>sudo nginx -t</em>If errors are found, correct them in the configuration file.
5. Restart Nginx
Once the configuration is validated, restart Nginx to apply the changes:
<em>sudo systemctl restart nginx</em>On some systems, you may use service instead of systemctl:
<em>sudo service nginx restart</em>Accept (recurring) payments, create subscription plans and restrict content on your website. Easily setup a WordPress membership site using Paid Member Subscriptions.
Get Paid Member SubscriptionsCombine the power of Profile Builder with Paid Member Subscriptions to set up user registration, memberships, and recurring revenue.
Get 25% off with the bundle
