
Table of Contents
- 1 Why are Multiple Currencies Beneficial for your WordPress Site?
- 2 Introducing the Paid Member Subscriptions Multiple Currencies Add-On
- 3 How To Implement Multiple Currencies On Your WordPress Website
- 4 Expand Your Reach Outside Borders
With the growth of e-commerce, businesses are no longer constrained by geographical boundaries. Whether you are a small online retailer or a large global brand, reaching customers in different countries has never been easier.
However, there are challenges that come with international selling, and one of the most prevalent is currency differences. Customers prefer shopping in their own currency, as it provides clarity and no need for manual conversion. In this case, providing a seamless shopping experience for international customers is essential. Among the features that can help your website reach out to an audience with diversity, like personalized and multilingual content, support for multiple currencies is one of the most essential upgrades you need for your website.
Over time, many of our users and readers have consistently requested a feature like this. In response, we’re excited to introduce the Multiple Currencies add-on for Paid Member Subscriptions, a solution designed specifically with your needs in mind. This article will discuss why multi-currency matters and how to set up the best WordPress multiple currencies for your website.
Why are Multiple Currencies Beneficial for your WordPress Site?
The reasons for implementing WordPress multiple currencies certainly go beyond convenience; it’s a strategic move. Displaying pricing in a shopper’s currency of choice can build trust, streamline the buying process, and ultimately increase your sales. Without it, you’ll have abandoned carts because your audience may not know the real price of your
Here are the main benefits of implementing a WordPress multiple currencies setup:
- Improved Conversion Rates: The probability of customers checking out increases when prices are presented in local currency. Shoppers feel more confident, knowing exactly how much they pay without needing to calculate exchange rates, reducing friction at checkout.
- Reduced Cart Abandonment: Transparent pricing in familiar currencies builds trust and minimizes confusion. When prices are displayed in a currency that one doesn’t recognize, many buyers will hesitate or second-guess the purchase.
- Enhanced Customer Experience: A user-friendly, localized shopping experience promotes loyalty and satisfaction. By adjusting your website to international shoppers, your store becomes more accessible and attractive to a broader audience.
Multi-currency support sets your WordPress site up for success in most parts of the world by meeting customer expectations and reaching new markets.
Introducing the Paid Member Subscriptions Multiple Currencies Add-On
To make implementing WordPress multiple currencies easy, the premium version of the plugin now includes the Multiple Currencies add-on. This tool has been designed based on user feedback to simplify selling memberships in various currencies.
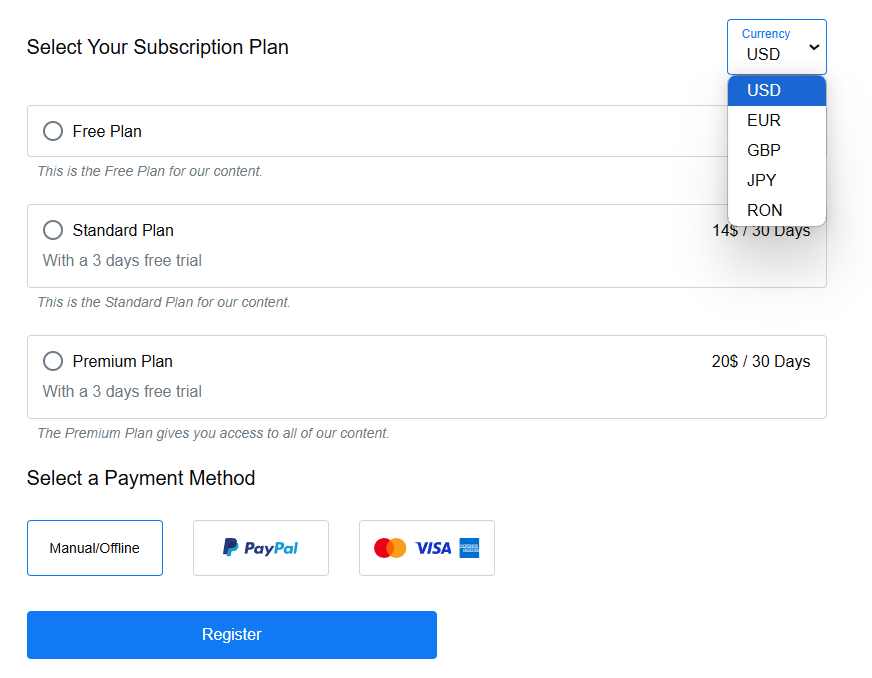
Some of its key features are:
- A built-in currency switcher for your membership plans, allowing your customers to choose their desired currency before buying.
- Allowing users to select their preferred currency in just one simple step during checkout makes the transaction seamless.
- Customizable settings to fit the needs of your business, so you can configure this add-on to suit your specific strategies.
How To Implement Multiple Currencies On Your WordPress Website
1. Get a Paid Member Subscriptions license
As we’ve mentioned before, the Multiple Currencies add-on is included in the Paid Member Subscriptions Pro and Agency licenses.
To get your own, simply choose the right plan for you and purchase it. After that, you will find your license in your account.

After purchasing a premium version of Paid Member Subscriptions, you can check the following guide on how to install Paid Member Subscriptions in just a few easy steps.
Paid Member Subscriptions Pro
Effortless Subscriptions and Recurring Revenue for Membership Sites
Get Paid Member Subscriptions2. Create Subscription Plans and Registration Page
If your membership website is already published, you can skip straign to the next step of this tutorial. Skip >>
But if not, before implementing the WordPress multiple currencies add-on, make sure to set up your membership site and create your subscription plans.
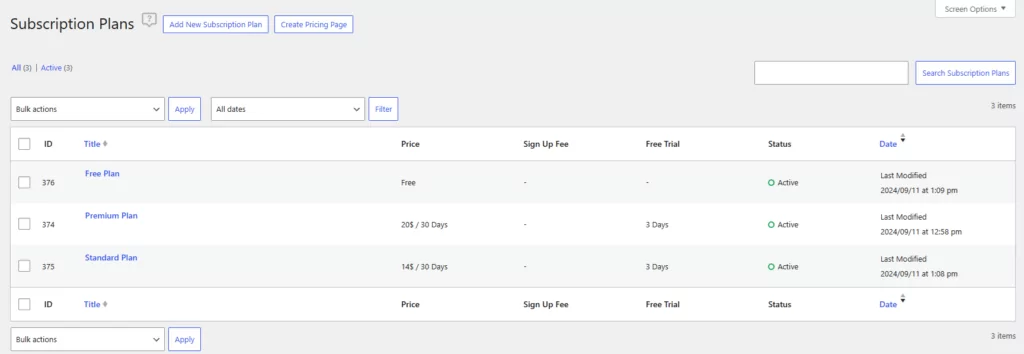
To create your first plan, go to your WordPress admin dashboard and head over to Paid Member Subscription → Subscription Plans → Add New Subscription Plan. After going through all the necessary details that you want to include in your plan, repeat the process for all additional plans you offer, ensuring each is tailored to your audience’s needs.
You should end up with something like this:
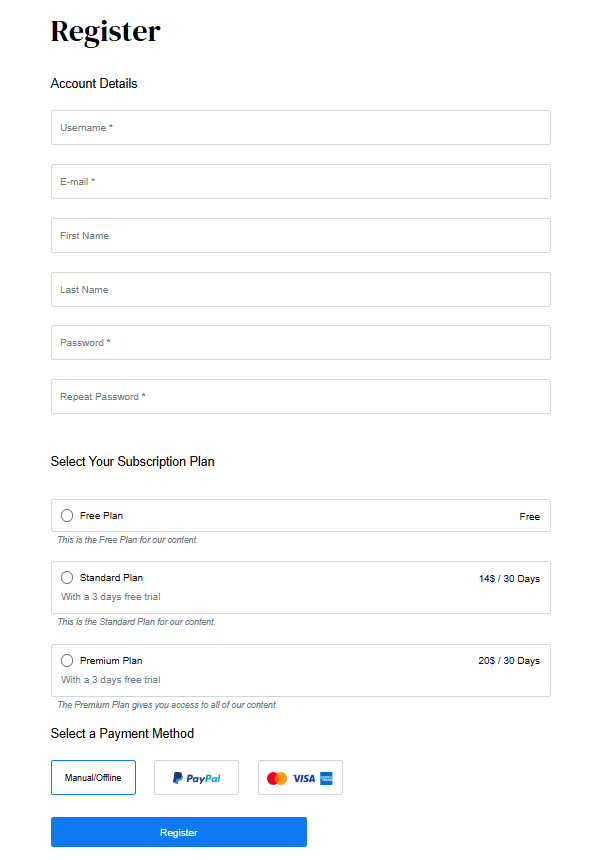
Now, you need to implement a registration form so your audience is able to choose one of your plans. There are only three easy steps for that:
- Create a new page and name it appropriately, for example Register or Registration.
- Add the PMS Register block to your page. You can also use the [[pms-register]] shortcode instead if you prefer.
- Click on Publish and your registration form is done.
Here you can find a more detailed tutorial on how to create tiered plans for your membership website.
3. Activate the Multiple Currencies Add-On
Once you have installed your plugin, it’s time to activate the WordPress Multiple Currencies add-on. The steps that you need to take are:
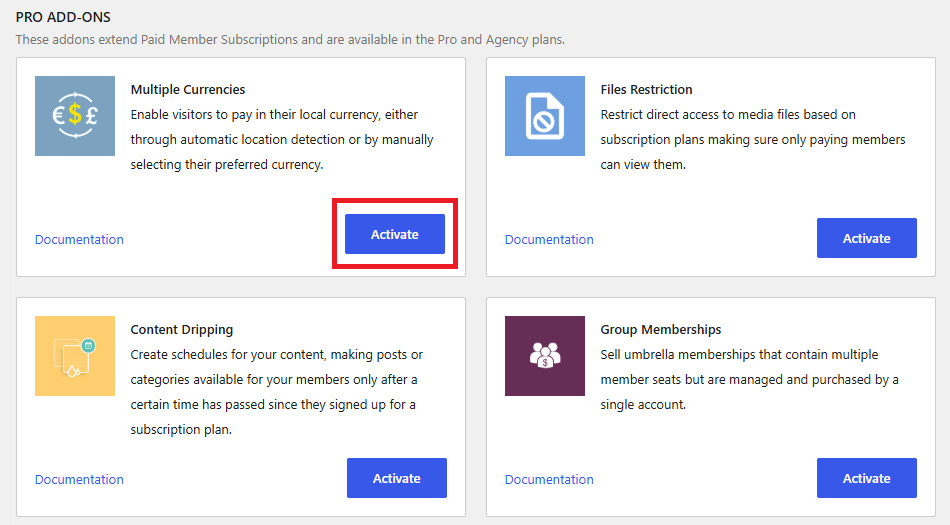
- Navigate to Paid Member Subscriptions → Add-Ons in your WordPress admin dashboard.
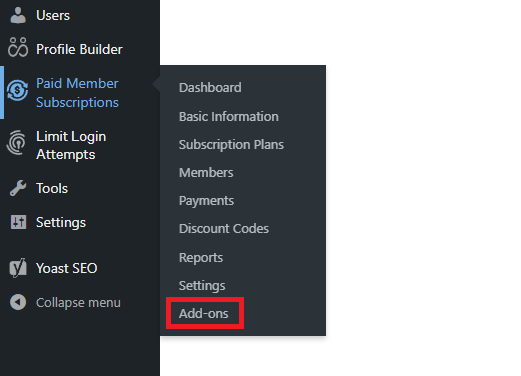
- Find the “Multiple Currencies” add-on in the list and click the Activate button to enable it.
4. Configure Multiple Currencies Settings
After activating the add-on, it’s time to properly implement it on your website.
Access the Paid Member Subscriptions menu in your WordPress admin dashboard and select Settings. Here, under the Payments section, you’ll see a submenu for Multiple Currencies.

Here you can implement and adjust any relevant details you want included for your WordPress multiple currencies options. In order to make it easier for you to understand each setting, let’s take them one by one and see what they do.
Multiple Currencies Basic Settings
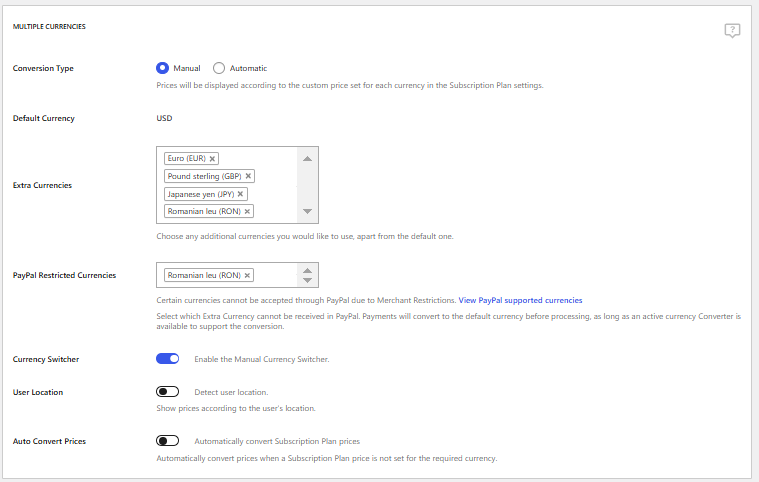
In the Multiple Currencies category, first you have to decide which Conversion Type is more suited for your website.
You have two options in this matter. The first one is manual, where the prices will show the custom amounts configured by the Administrator in the Subscription Plan settings; and automatic, where the prices will be automatically converted from the default currency to the selected currency based on current real-time exchange rates.
Next, the Default Currency will be chosen based on what you have previously set up in the General Payments Settings tab. To set that up, navigate to Paid Member Subscriptions → Settings → Payments → General.
In the Extra Currencies section, you can choose the additional currencies you want to work with, excluding the default currency, from the provided list.
The PayPal Restricted Currencies setting allows you to select which extra currencies cannot be received via PayPal. Payments in these currencies will be converted to the default currency before processing, provided an active currency converter is available and a conversion rate exists for the selected currency.
If you want to include a Currency Switcher on the front-end of your website, enabling this setting will do the trick. In this way, users can select their preferred currency before payment. This feature is particularly useful, as it also improves the user’s experience on your website. Besides that, if this setting is enabled, you also have the option to use the User Location option in order to automatically set the default currency for each user.
When it comes to the Auto Convert Prices, this setting appears only with the Manual conversion type and automatically converts prices when a Subscription Plan price is not set for the required currency, using the selected converter.
Currency Conversion Settings

In the Converter section, you have three types to choose from: Exchange Converter, Frankfurter Converter, Alpha Vantage. Each of them has both advantages and disadvantages of their own. Here is a more detailed comparison between them.
Next, you can define how often the conversion rates should be updated. Before selecting your preferences in the Update Interval section, check the update frequency of the chosen converter to avoid unnecessary requests.
Currency Labels Settings

This section is activated once you have added currencies in the Extra Currencies setting under the Multiple Currencies section, mentioned previously. Here, you can set a custom label or symbol for each of the currencies you have added.
5. Configure Additional Settings
After all the main configurations are done, there are some additional things you can look at if you want to go the extra mile.
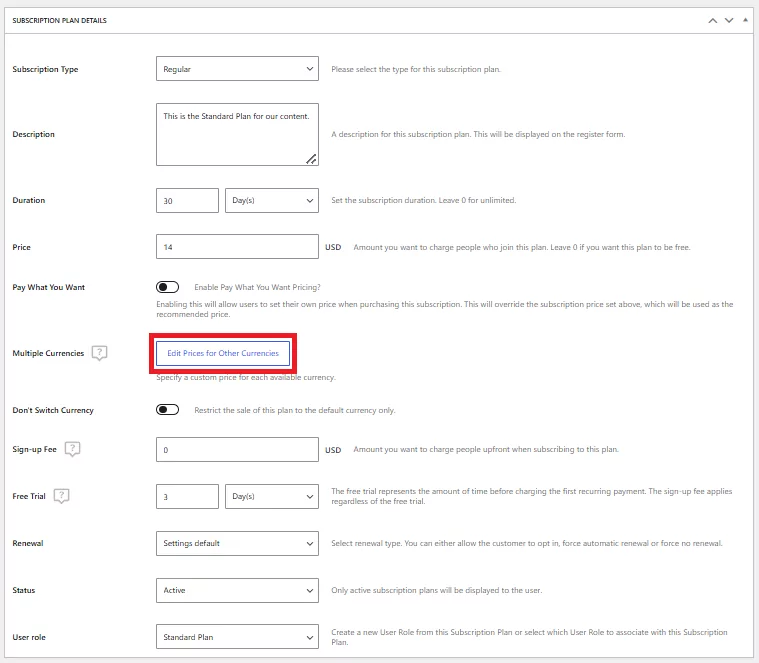
As mentioned previously, if you have chosen the manual conversion type, you have to configure each subscription plan’s settings. Simply go to Paid Member Subscriptions → Subscription Plans and click Edit under the first subscription plan you would like to configure. Next, click on Edit Prices for Other Currencies and manually input the custom prices for each one.
If you would like to take it a step further, the Multiple Currencies add-on has another setting that could be useful during your promotion campaigns.
When you create a discount code or edit an existing one, a new setting called Currency Availability will be available at the bottom of the page.
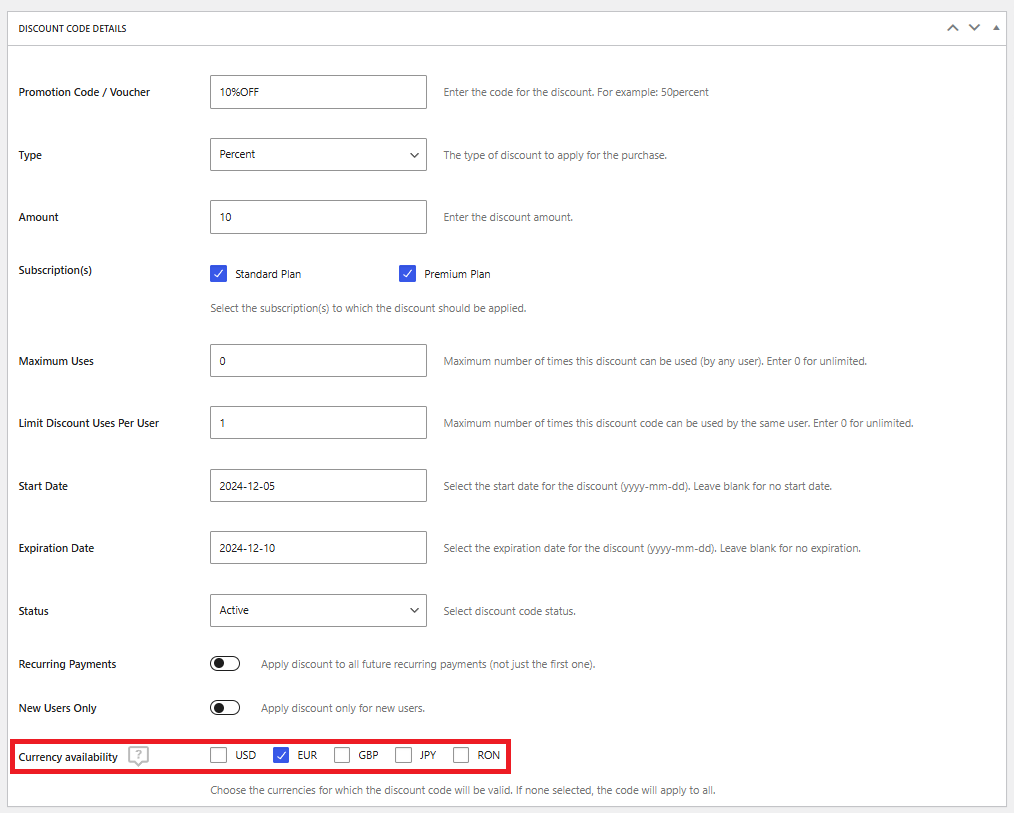
This setting allows you to select the currencies for which the discount code will be valid. If you choose to not select any, the discount code will apply to all available currencies.
6. Review Your Registration Page
In the end, depending on the settings that you have selected, your registration page should look similar to this:

Before going live, any additional changes or updates should always be previewed to ensure an error-free experience for your users.
Expand Your Reach Outside Borders
Offering WordPress multiple currencies is crucial in helping your business expand its horizons and improve customer experiences. With the newest Paid Member Subscription add-on, enabling multi-currency support is a whole lot easier, making it the best multi-currency WordPress plugin. Featuring real-time updates, custom converters, and user-friendly settings, this add-on is a must-have for any WordPress site targeting an international audience.
Don’t miss out on the opportunity to enhance your website’s user experience, reduce cart abandonment, and boost conversions.
Paid Member Subscriptions Pro
Effortless Subscriptions and Recurring Revenue for Membership Sites
Get Paid Member SubscriptionsRelated Articles

How To Create a Divi Membership Site
If you’re thinking of building a membership site in WordPress, you’ll need a solid theme and a membership plugin that pairs well with it. In this complete guide, we’ll show you how to create a Divi membership site using the popular Divi theme in combination with the Paid Member Subscriptions plugin.
Continue Reading
Membership Blog: Why Start One, Popular Examples and How To
I think you will agree starting a membership blog seems daunting, especially for a first-timer. Talk to just about any beginner who has never created a membership blog (or even a simple website), and they will field questions such as: Why should I start a membership blog? What kind of content, products, or services should […]
Continue Reading
How to Build an Elementor Membership Site with Paid Member Subscriptions
Are you looking to add membership functionality to your Elementor site in WordPress? Perhaps you want to create subscription plans, restrict access to premium content, and accept payments within the popular page builder. The good news is that you can use Paid Member Subscriptions to do all this and more. For example, you can customize restriction […]
Continue Reading

