
Table of Contents
Interested in WordPress automation but not sure where to begin?
In this post, we’re going to cover everything that you need to know about automating WordPress.
We’ll start with some of the different reasons to consider using automations. After that, we’ll give you a generalized tutorial on how to use a WordPress automation plugin named WP Webhooks to set up your own custom WordPress workflow automation sequences – no technical knowledge needed.
Then, to make this post even more useful, we’ll give you more specific instructions on setting up some common types of automations, including WordPress email automation, content creation, and user role management.
Let’s get into it…
How Can WordPress Automation Help You?
Before we get to the tutorials, let’s quickly run over some of the main ways that you can use WordPress workflow automation to improve your site.
Improve Your Productivity
One of the top uses for automation is to improve your productivity.
With smart workflow automation, you can eliminate a lot of the manual tasks that you might be performing now. This can eliminate a lot of repetitive tasks and improve your efficiency.
For example, let’s say that you currently need to manually set up a new CRM profile and apply tags when someone joins your online course. With automation workflows, you can just automate the entire process so that you never need to lift a finger.
What’s more, automation will eliminate the chance of any errors. If you’re doing something manually, it’s always possible to make an error. But when you’re using automation rules, you can be confident that there won’t be any errors (as long as you set up the automation correctly, of course).
Integrate All Of Your Tools
Another big benefit of automation is that it lets you integrate all of the different plugins and tools that you’re using.
In one way, this is another example of automation improving productivity. The same example applies – instead of manually adding new customers to your customer relationship manager (CRM), you can just automatically add them using an automation rule.
But beyond that, it also just flat-out lets you access new functionality. For example, you could connect your forum plugin to your online course/LMS plugin so that students automatically get access to a dedicated course forum when they join a class.
Create Better Experiences for Users
The last big benefit of automation that we want to highlight is the ability to create better experiences for your visitors. By setting up automations, you can eliminate waiting time for users and give them access to new functionality.
Let’s continue with the same example and say you have an online course and then also a dedicated forum for the community to discuss that course. If a person joins the course, they can also access the forum.
Without automation, you would need to manually give users access to the forum after they join the course. This means that there could be a delay between them joining the course and them being able to access the forum, which isn’t the best user experience possible.
With automation, you could build a workflow so that users get access to the forum as soon as they purchase the course. That way, they can jump right into discussing everything.
As you read through the tutorials below, you might get some ideas for how you can improve the user experience on your own site using automation.
How to Automate WordPress Using WP Webhooks
Now, let’s get into some actual step-by-step tutorials for how you can automate WordPress.
For these tutorials, we’re going to use the WP Webhooks plugin, which is a comprehensive WordPress automation tool.
Unlike a lot of other WordPress automation plugins, WP Webhooks actually gives you two different options for how to automate WordPress:
- Visual automation builder interface – you can easily set up automations using the “trigger → action” model, which is how most automation tools work. Think “Zapier”, but inside your WordPress dashboard. If you’re not a very technical person, this is probably what you’ll want to use.
- Webhooks – you can set up flexible automations to send and receive data using webhooks (a webhook is a way to transmit data over HTTP).
The free version of WP Webhooks lets you set up automations using webhooks. Then, you can purchase WP Webhooks Pro to use the graphical automation builder interface.
Trigger → Action Model
The automation builder interface in WP Webhooks Pro offers the simplest solution for how to automate WordPress. If you’ve ever used a tool like Zapier, you should feel right at home in WP Webhooks because it uses the same basic approach.
To access this interface, make sure to purchase WP Webhooks Pro and install the plugin on your site.
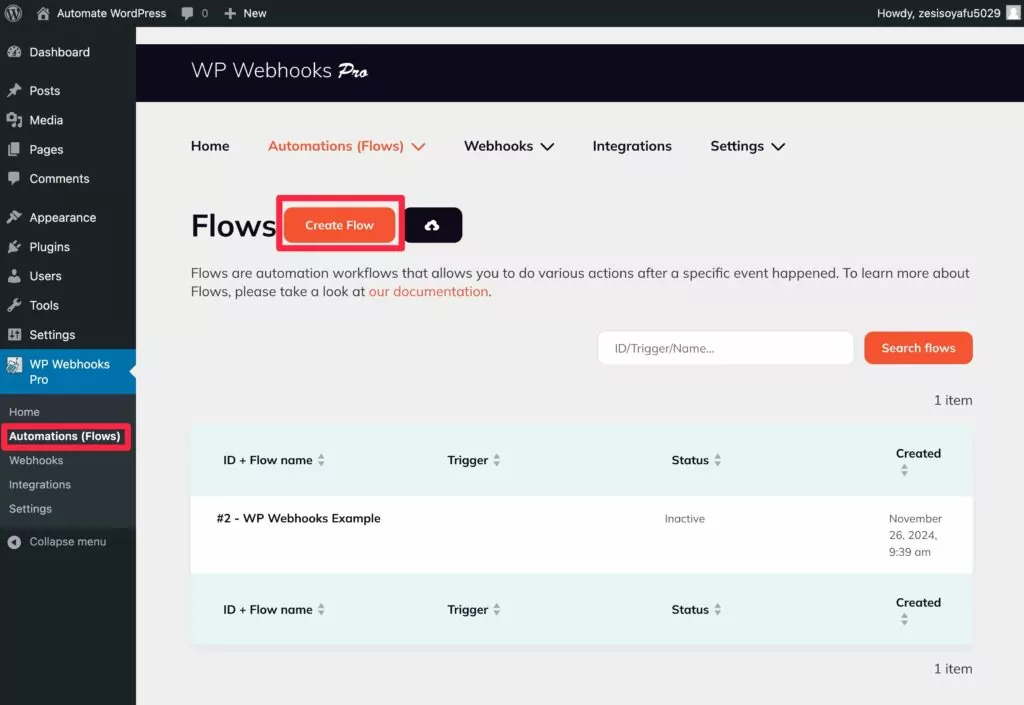
Then, you can go to WP Webhooks Pro → Automations (Flows) → Create Flow to get started. Give your automation a name and then edit it to set up your “trigger → action” rules.
Choose a Trigger
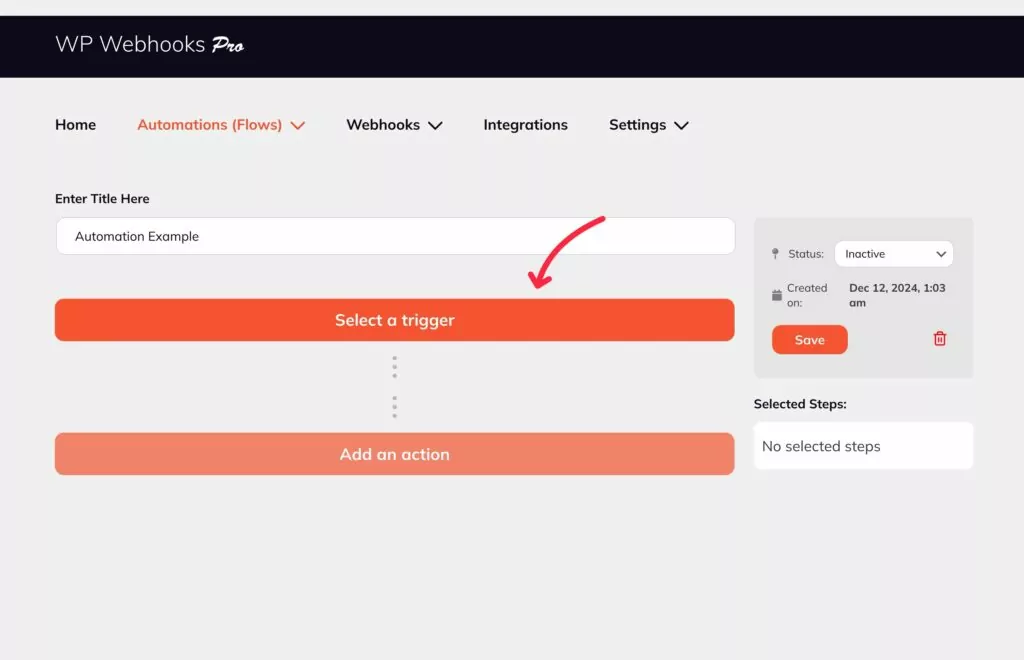
Your workflow’s “trigger” is what starts the automation.
To choose the trigger, you can click the orange Select a trigger button.
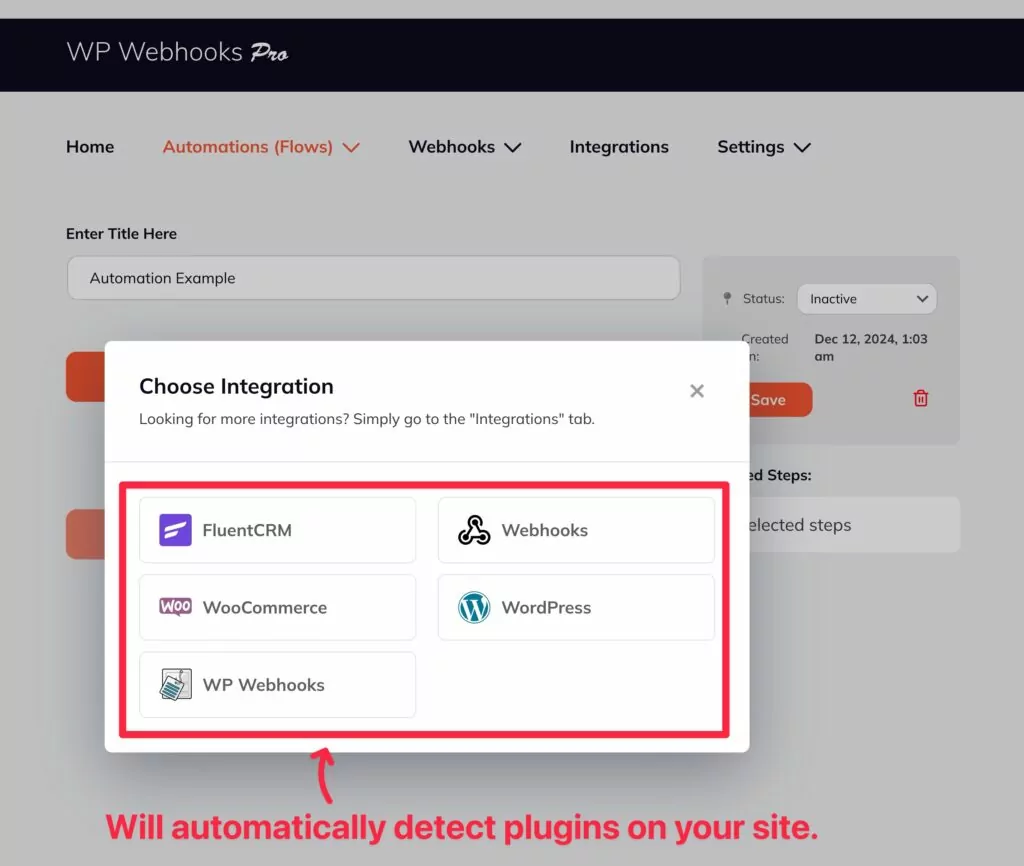
You can then choose the integration that you want to use as a trigger. This could be…
- Core WordPress software
- A webhook
- Another plugin on your site
- A third-party service
WP Webhooks will automatically detect supported plugins on your site. For example, if you have WooCommerce installed, you’ll see WooCommerce appear as an integration option. You would then see lots of specific actions in WooCommerce, such as a person viewing a specific product, an admin creating a coupon, and so on.
You can also add more third-party integrations by going to WP Webhooks Pro → Integrations.
You can check out all of the integrations here.
For this example, we’ll use WooCommerce and trigger our automation when someone adds a product to their cart.
After selecting WooCommerce as the trigger source, you would choose Product added to cart from the Select a trigger drop-down.
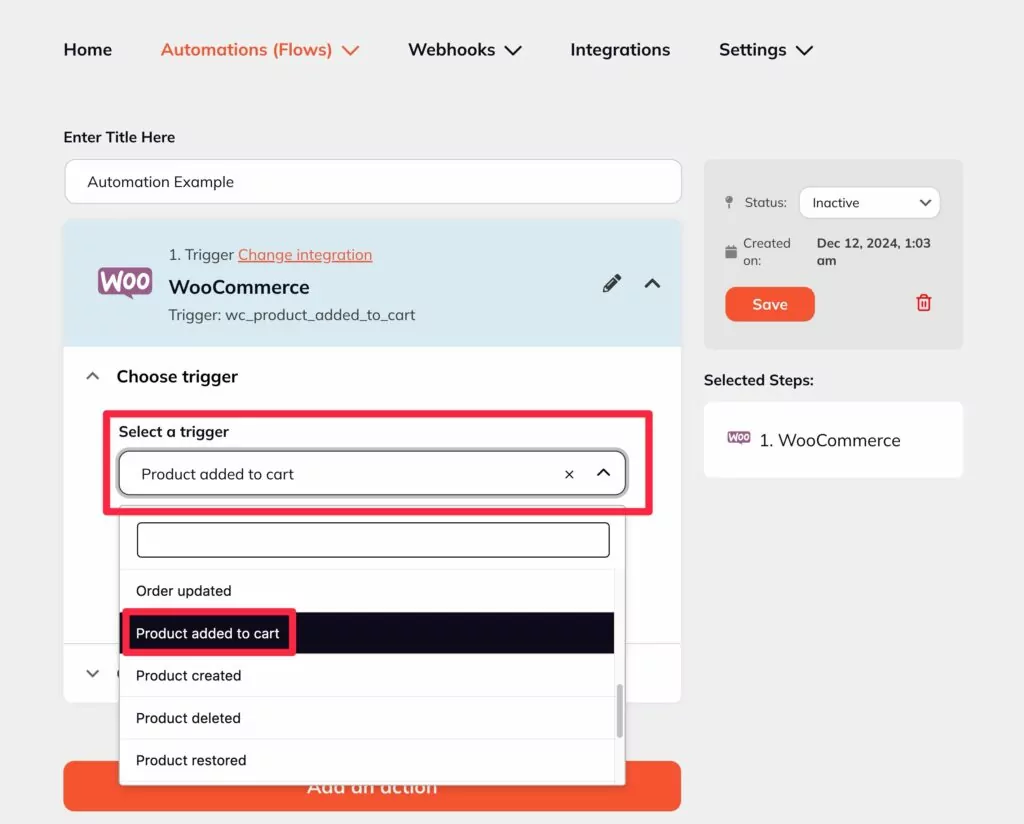
You can then click Continue to set up the trigger, such as choosing specific products or adding other conditions like requiring the person to be logged in.
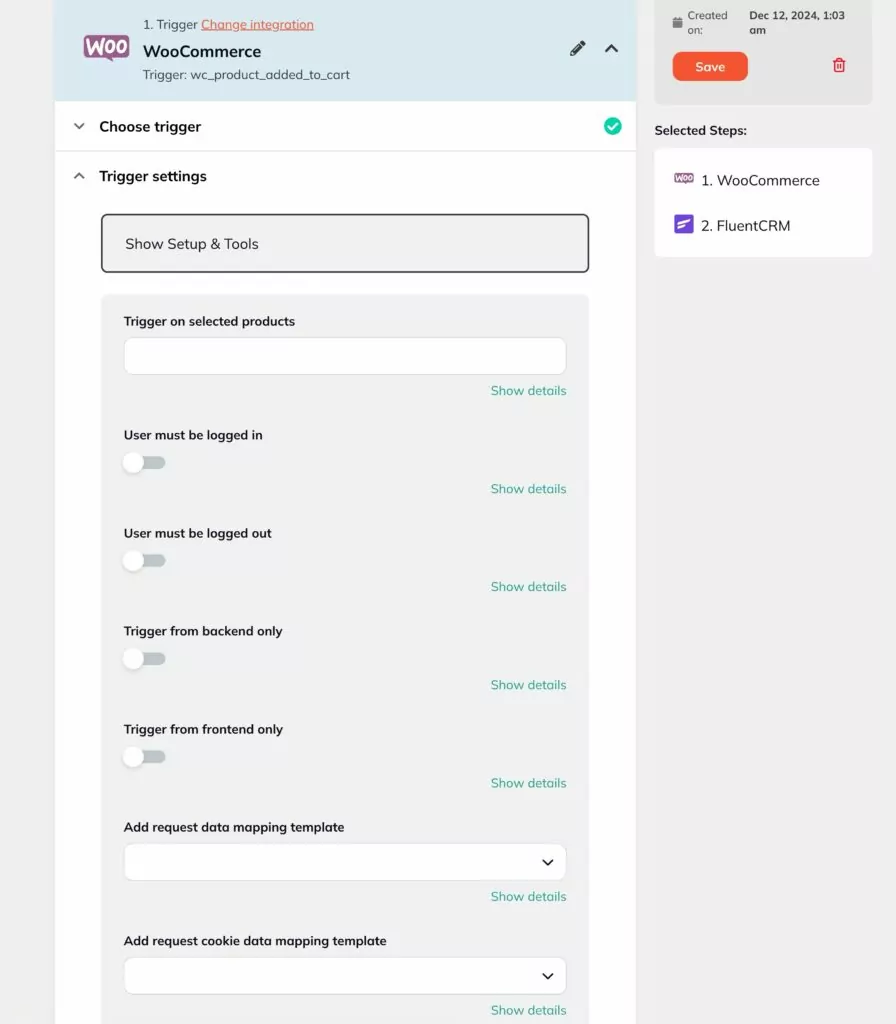
You can then test the trigger to make sure it works properly.
If you want even more control, you could also use the Conditions area to only run the automation if additional conditions are met.
Choose an Action
Once you’ve set up your automation trigger, you can add the “action”. This is what you want to happen when the trigger rule is met.
You might have just one action or you could create multiple actions – WP Webhooks will let you add as many actions as you want to your automation.
As with triggers, you get multiple options for where to perform the automation including the following:
- Core WordPress software
- Sending data to a webhook
- Another plugin on your site
- A third-party service
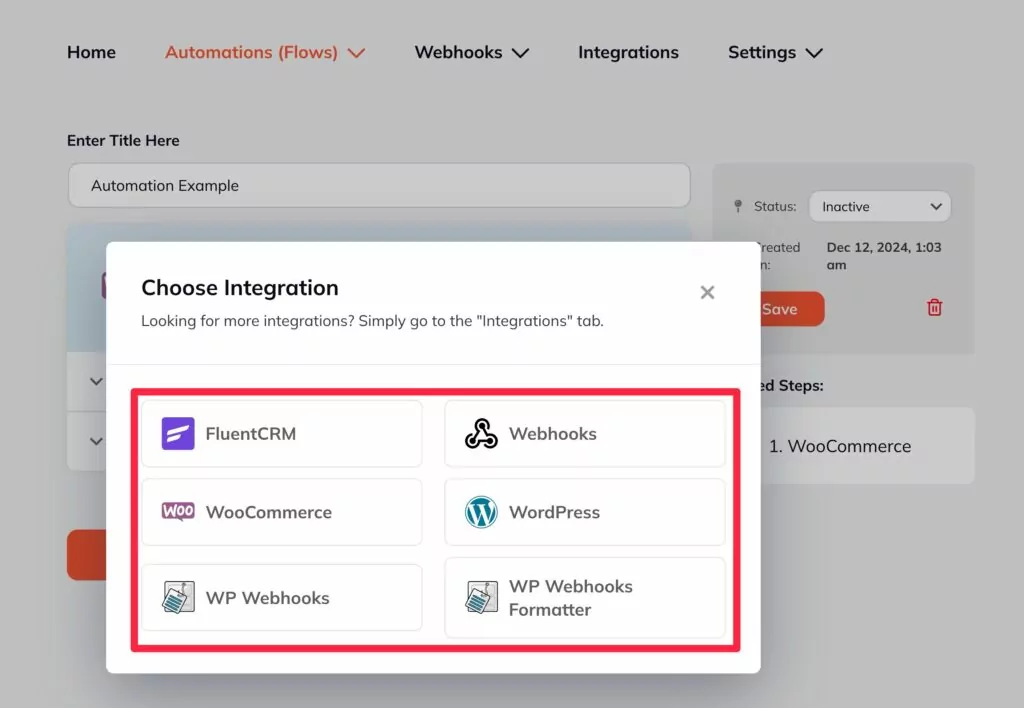
For this example, we’ll say that we want to create a coupon for the user who added the item to their cart.
You would select WooCommerce again and then choose Create coupon as the action.
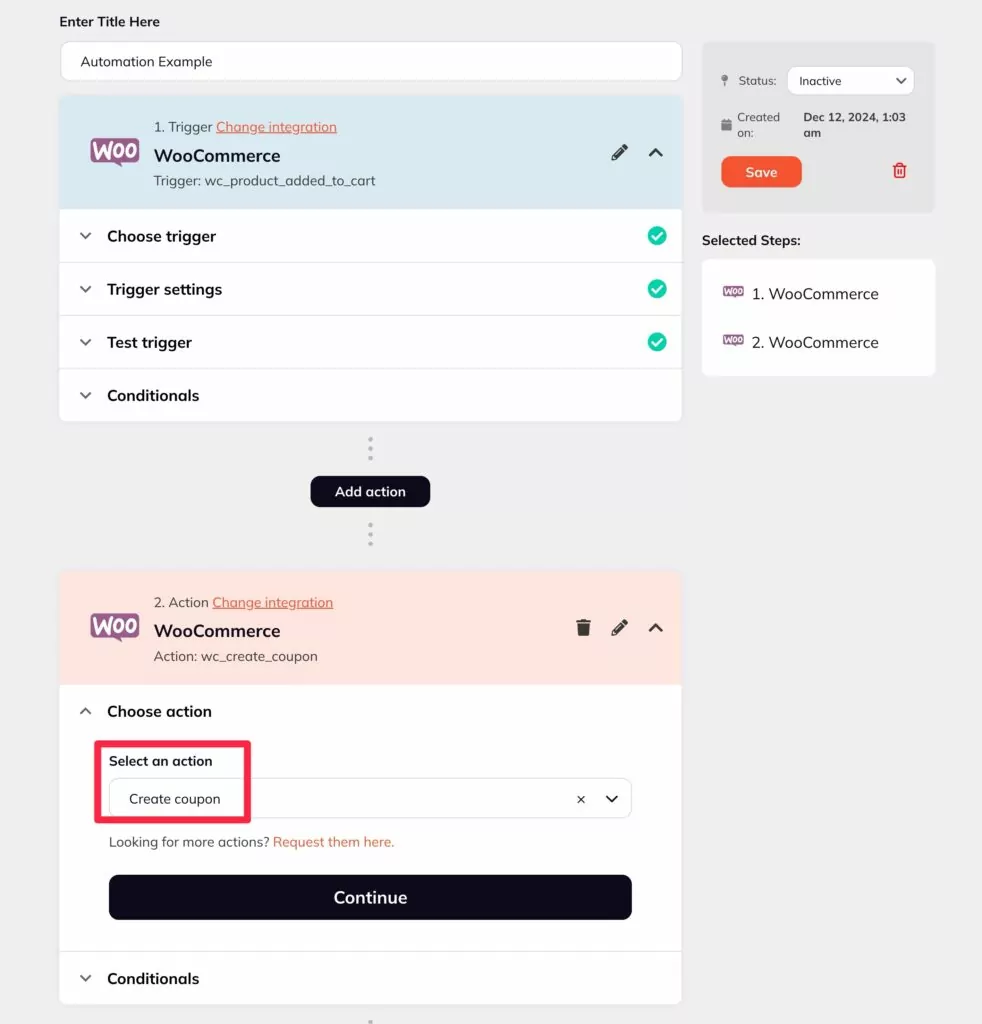
When you click Continue, you can set up the coupon, including using tags to dynamically insert information.
For example, you could make it “[CUSTOMER_NAME]10OFF”.
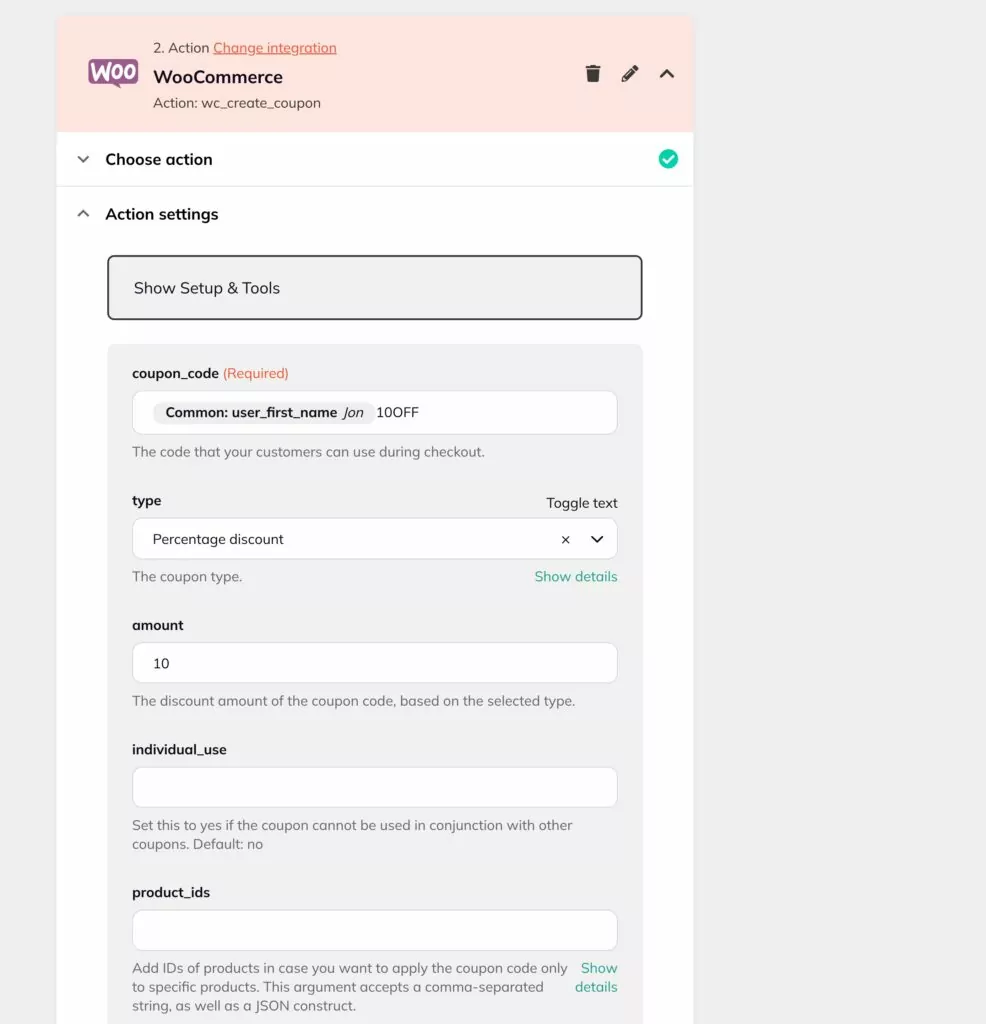
Then, you can save it and test it to make sure it works.
At this point, you have a working automation – all you need to do is set its status to Active.
However, you’re also free to add multiple actions if you want.
For this automation example, you might want to also send an email to the shopper letting them know about the coupon. You could do this by selecting Send email under the Core WordPress automations.
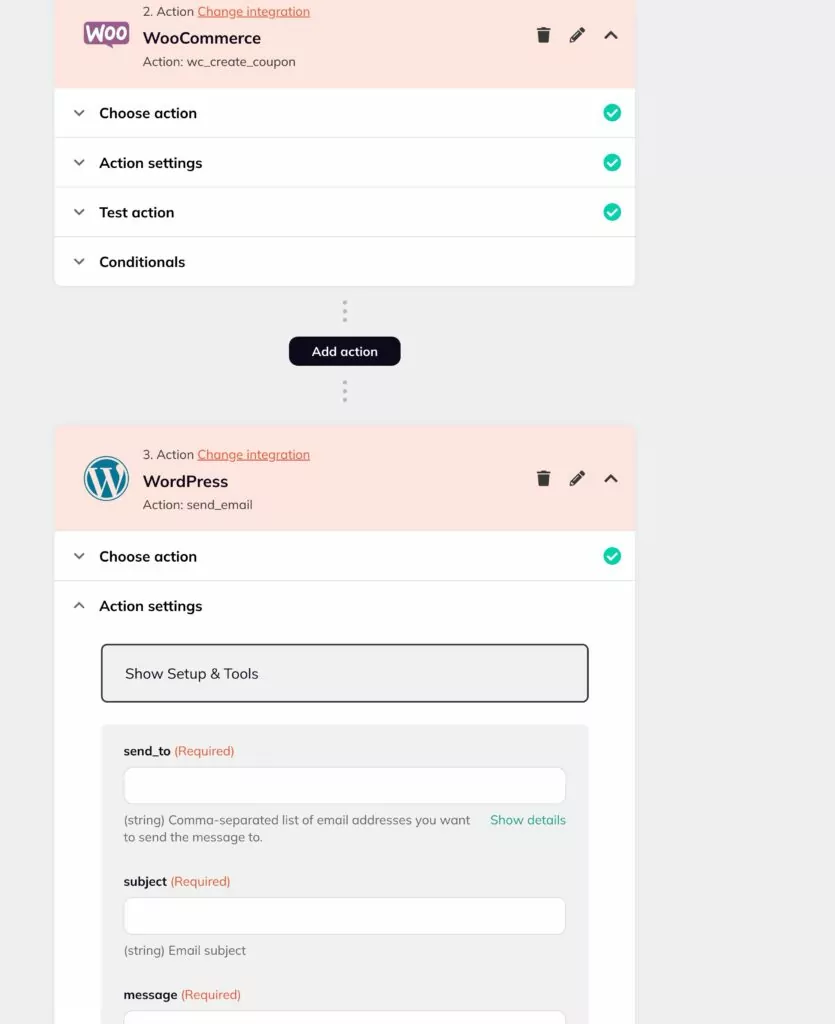
And that’s it! You just created your first WordPress automation. You can repeat these same steps to create as many automations as you need.
WP Webhooks will also store all automation actions in a log, which lets you track how/when automations are being executed on your site.
Webhooks
In addition to the workflow automation builder in WP Webhooks Pro, WP Webhooks also lets you directly send and receive data using webhooks.
Setting up automations with webhooks directly is a little more complicated, but it still gives you a lot of power. Plus, you can access these automations even with the free version.
We won’t go as in-depth here because we think most people will be better suited with using the visual automation builder in WP Webhooks Pro, but we will quickly go through how it works.
There are two main ways to use webhooks for WordPress automations:
- Send Data (triggers) – you can send data using webhooks when there’s a certain trigger event on your site.
- Receive data (actions) – you can receive data from a webhook and use that information to perform an action.
Sending Data
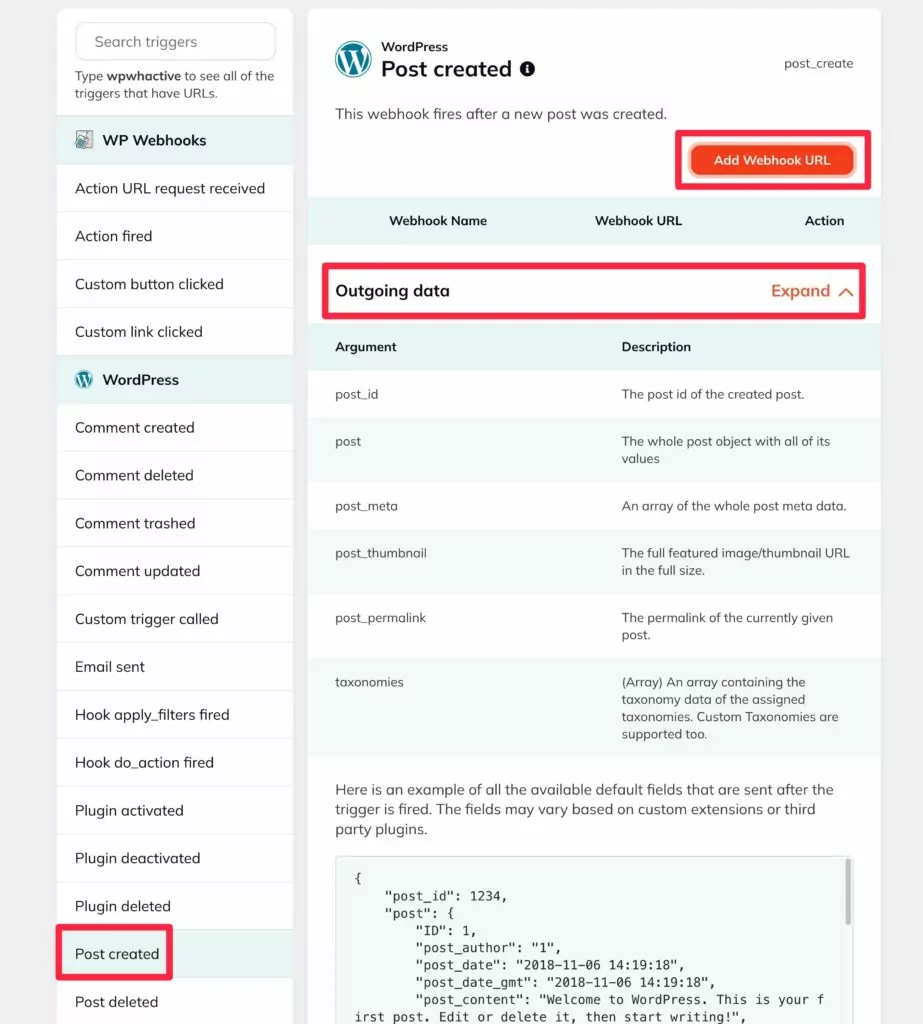
To create a webhook to send data, you can go to WP Webhooks → Webhooks and then select Send Data (Triggers) from the Webhooks drop-down.
You’ll then see a list of potential webhook triggers on the left side of the interface, including core WordPress triggers and triggers from plugins that you’re using.
When you select the trigger that you want to use, you can expand the Outgoing data accordion section to see all the data that your webhook will transmit.
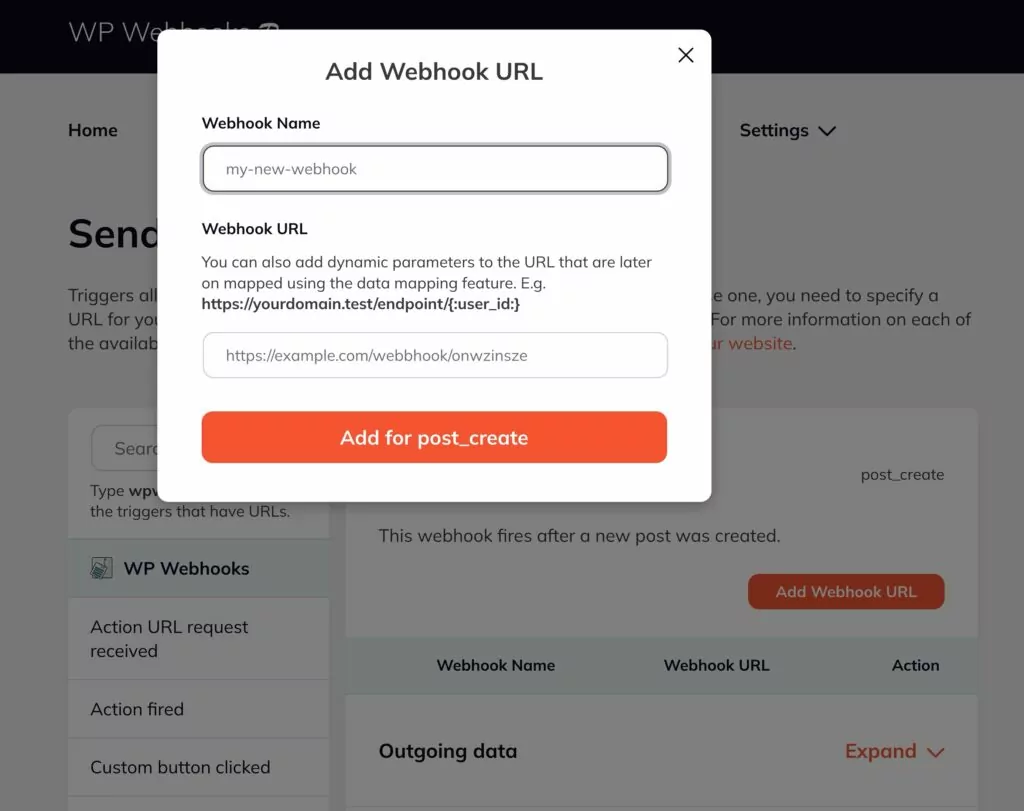
Then, you can click the Add Webhook URL button to actually create your webhook URL.
When setting up the URL, you can also include dynamic parameters in the URL, such as including the actual user ID of the person that triggered the webhook.
Receiving Data
To perform an action based on receiving a webhook, you can go to Webhooks → Receive Data (Actions).
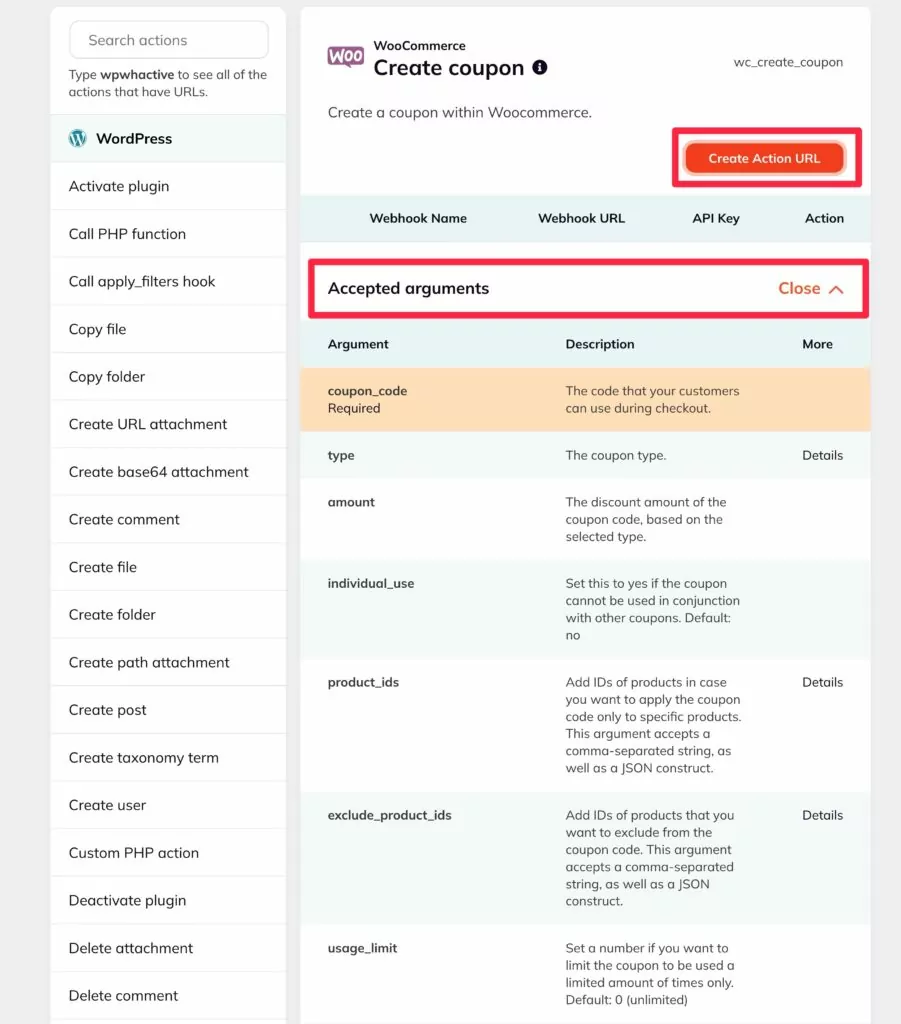
In the sidebar, choose the action that you want to perform. For example, if you have WooCommerce installed, you would be able to create a new coupon based on receiving a webhook.
You can then expand the various accordion sections to see what type of data you can receive and other important information.
To create the URL to receive webhook data from the trigger source, you can then click Create Action URL.
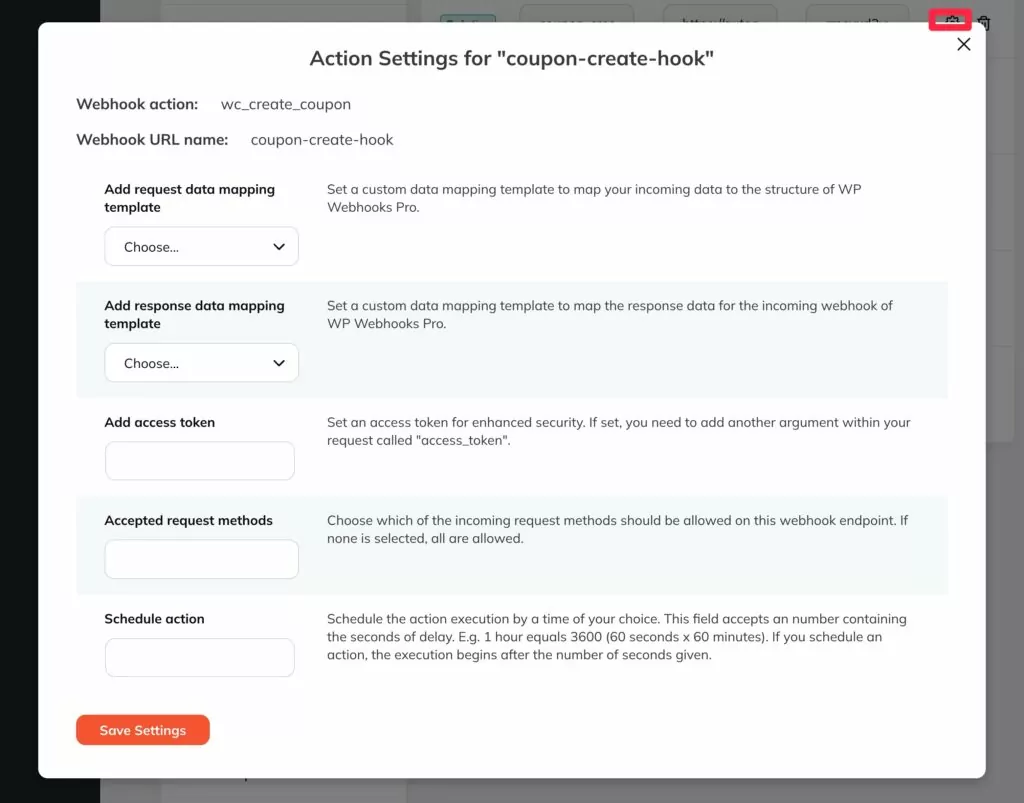
You’ll then see the URL appear and you can open its settings for additional options, such as setting up templates to map data.
Need Help? Check Out the Documentation
As we mentioned earlier, using webhooks directly like this is a little more complex than the visual automation builder interface, so it’s probably more suited to people with some development knowledge.
If you want to dig into this topic in more detail, we highly recommend reading the documentation.
How to Implement Three Specific WordPress Workflow Automation Scenarios
Now that you have a general idea of how to automate WordPress using the WP Webhooks plugin, let’s get a little more specific and go through some quick tutorials on different types of WordPress automation.
We’ll share quick guides for three different scenarios:
- Content creation
- WordPress email automation
- User role management
Content Creation and Publishing Posts
WP Webhooks can easily help you automate content creation, including publishing blog posts or any other custom post type on your site.
First, you need to choose what event should trigger creating a post. This could be receiving a webhook, a user action, another plugin, a third-party service, something in the core WordPress software, and so on.
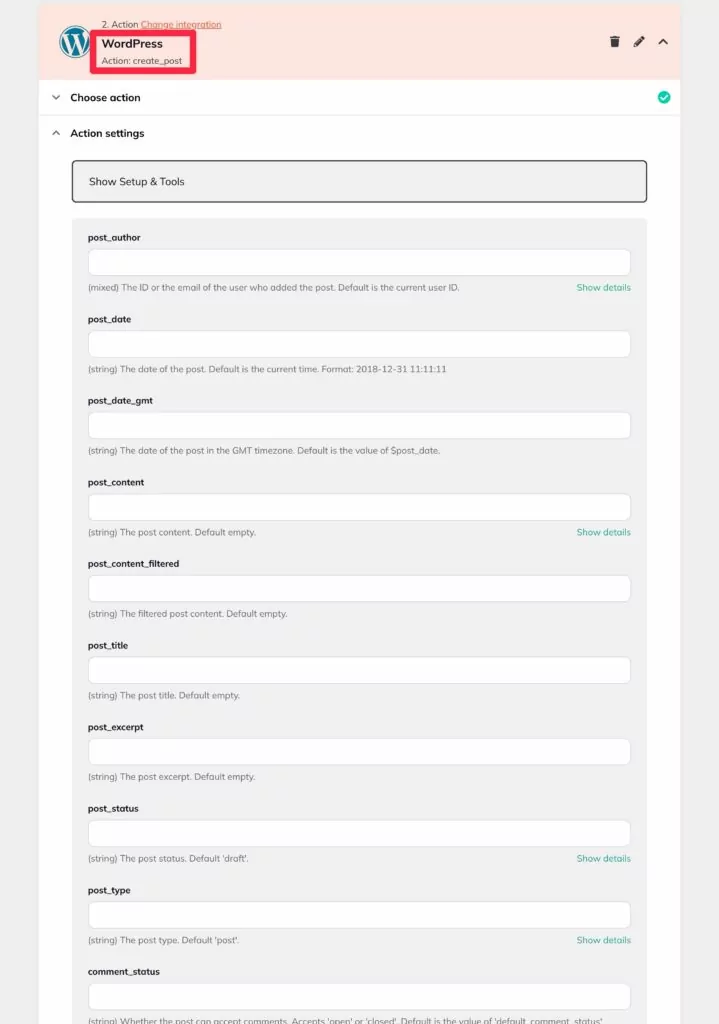
To create a post (or custom post type) based on that trigger, you can choose WordPress as your action and then select “Create post“.
You can then fill in the post information using static or dynamic information.
WordPress Email Automation
With WP Webhooks, you can set up all different kinds of WordPress email automation workflows.
You can use pretty much any event to trigger an email, including triggers from the following sources:
- Core WordPress software
- Receiving a webhook
- Another plugin on your site
- A third-party service
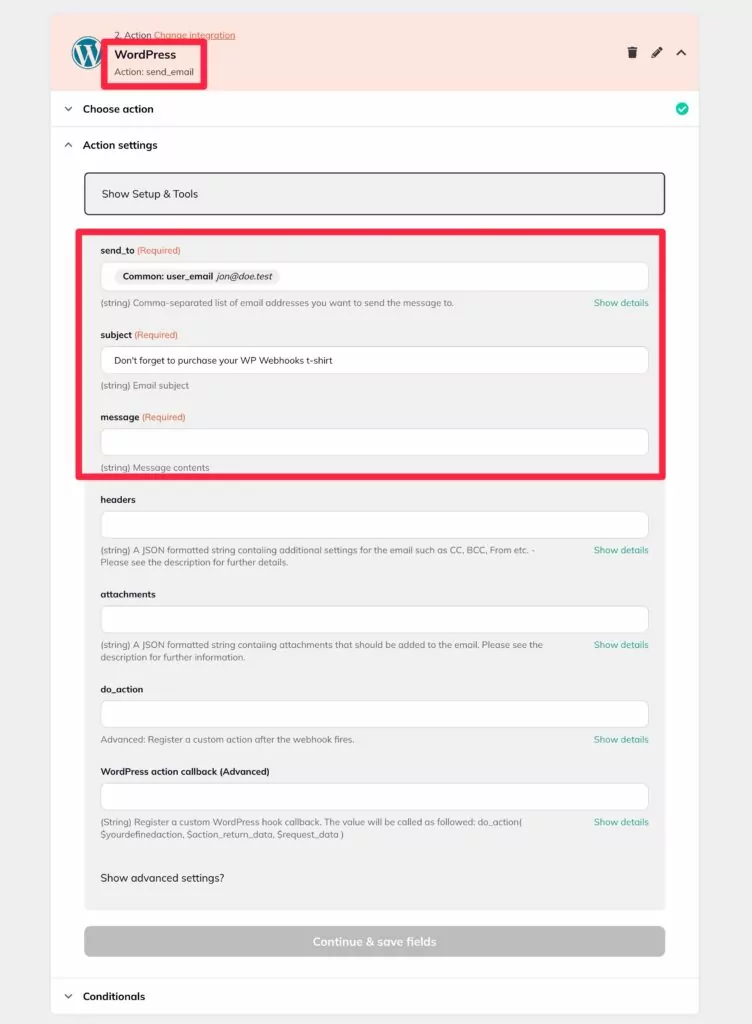
To send the email, choose WordPress for the action and then select Send email. You can then add the content of the email, including using tags to dynamically insert information.
Note – to ensure that emails get delivered reliably, we recommend also using a WordPress SMTP plugin and a dedicated email sending service.
User Role Management
Automations can be really helpful for managing WordPress user roles.
For example, let’s say you want to update a user’s role when you apply a certain tag to that user in your CRM.
To do this, you would use your CRM as the trigger. Then, you could set the specific trigger equal to applying a tag.
Then, to change that user’s role when you apply the tag, you could choose WordPress as the action integration and then select Update user and change the user role.
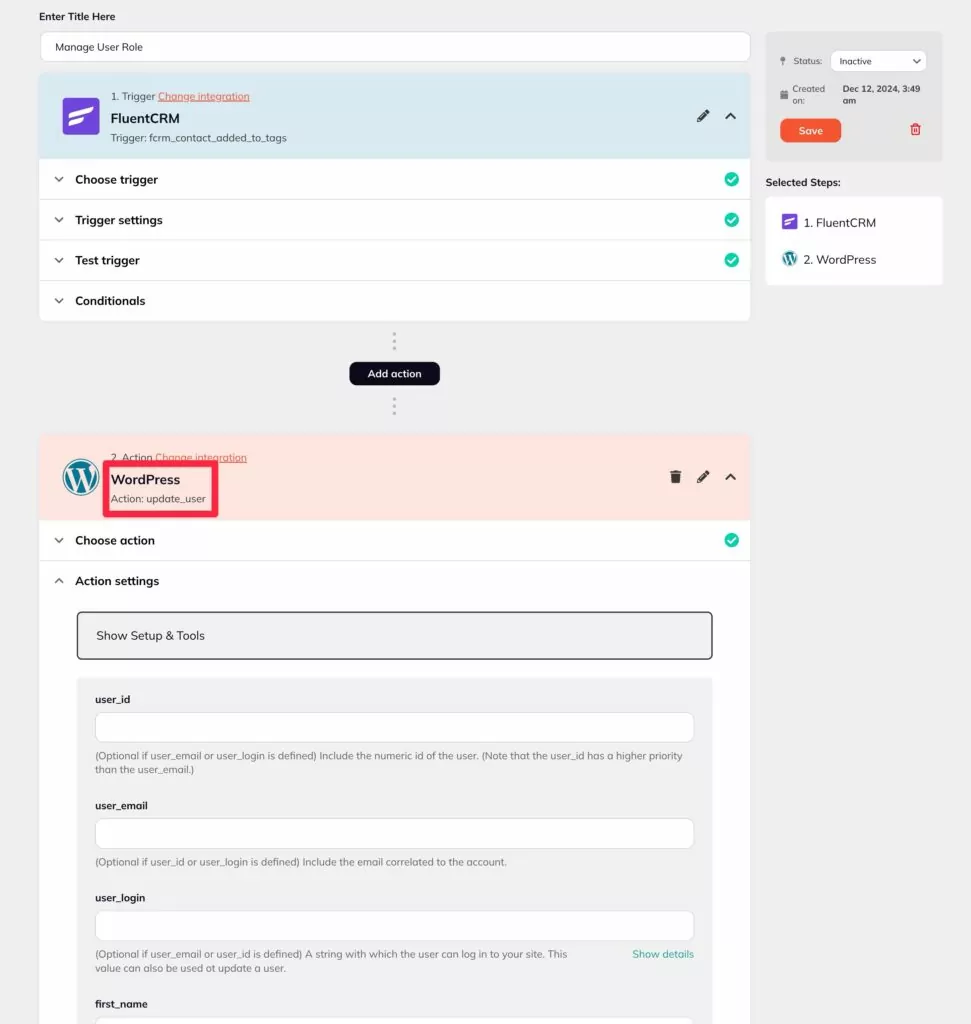
This type of user role automation can also be really helpful for online courses and membership sites. For example, when someone submits a form to join a certain membership level, you can automatically update that user’s role to reflect that.
Get Started With WordPress Automation Today
That wraps up our guide on how to automate WordPress using the WP Webhooks plugin.
If you’re searching for a WordPress workflow automation tool, WP Webhooks gives you a lot of flexibility because it offers two different ways to automate your site:
- You can build custom workflows using the “trigger → action” model and a visual interface, which is how most automation plugins work.
- You can send and receive data using webhooks directly, which gives you the flexibility to integrate your site with pretty much any tool. You can also use webhooks inside the visual automation builder.
If you want to get started, purchase WP Webhooks Pro today to access all of the automation functionality and integrations.
Or, if you’re fine with working directly with webhooks, you can try the free version of WP Webhooks before you buy.
Related Articles

Roundup of WordPress ecosystem #1 – January 2017
After writing the article "Overview of the WordPress Community in 2016" and getting feedback for the article on various platforms, I decided to continue writing them, but I changed its name into "Roundup of WordPress ecosystem". This is the first article from a monthly series that will showcase what happened around the whole ecosystem in […]
Continue Reading
How to Create a Website for Affiliate Marketing
If you’re looking for a side hustle or want to create a passive income stream, affiliate marketing can be a good option. This involves promoting products by other companies, which can lead to commissions on sales and leads. But to get started, you’ll need to set up a website. Thanks to WordPress, creating a website […]
Continue Reading
Roundup of WordPress ecosystem #4 – May 2017
There have been a lot of interesting things happening around the WordPress Community lately and we are now all curious about the WordPress 4.8 and this year's Edition of WordCamp Europe. Read about these topics and much more, on what happened around the WordPress ecosystem below. News & Updates Community News At the end of […]
Continue Reading
