
Table of Contents
Do you struggle to retain customers and secure repeat purchases? If so, VIP programs can be a great solution. They enable you to cultivate a loyal audience and keep people engaged with your brand. However, you may think it requires technical skills or knowledge.
The good news is that setting up a VIP program can be relatively straightforward using the right tools. It can be the perfect addition to all website types including blogs, membership sites, or ecommerce stores. And, you can even create paid VIP programs to set up a recurring revenue stream.
In this post, we’ll take a closer look at VIP programs and the benefits of creating one. Then, we’ll explore some of the best VIP examples before showing you how to create your own system. Let’s get started!
What Are VIP Programs?
A VIP program works in a similar way to a loyalty initiative whereby customers receive perks (like discounts or premium content) as a reward for completing certain actions on your website.
The best VIP loyalty programs consist of various tiers, with each tier unlocking more coveted rewards that might include free shipping or early access to sales. In order to progress through the tiers, some companies allow customers to pay a subscription fee.
However, plenty of VIP programs are based on purchase history. For example, the most well-known loyalty schemes reward shoppers with points every time they make a purchase. Eventually, the customer earns enough points to receive a free item (or access some other benefit).
That said, your loyalty scheme can be contingent on other metrics such as engagement levels, brand advocacy, or customer reviews. You might reward people for signing up for an account on your website, renewing a membership, or returning an item in exchange for something new.
To implement this kind of program, there are tons of reward types that you can offer. Typically, ecommerce stores tend to reward purchases with points and badges. But you could also provide free trials, free shipping, exclusive shopping sessions, coupons, or members-only communities.
The Benefits of Creating a VIP Program
Typically, VIP programs offer rewards/perks that function as incentives for users to complete a desired action on your site. You could provide a free trial to your membership blog when readers leave a comment or share a post on social media.
Or, you might allow shoppers to collect points when they purchase an item in your store. Some websites (like LMS websites) also provide badges when students complete a quiz or advance to the next lesson in a course.
VIP programs are great for improving retention rates and keeping people engaged with your brand. Naturally, you can target all kinds of members, but it’s the perfect opportunity to reward existing customers, which can help you maintain lasting relationships.
Although VIP programs are a form of loyalty program, there are some differences. While you can elevate customers to VIP status through actions taken or money spent, most programs allow people to buy into VIP tiers (using a subscription membership model).
This tends to be effective if you offer very appealing perks/benefits (such as early access to sales, product launches, limited-edition products, etc). It has the additional advantage of lending a feeling of exclusivity to your program. Plus, it enables you to earn recurring revenue to stabilize your income.
Best Examples of VIP Programs
Before we show you how to set up your own VIP program, let’s take a look at some of the best examples to inspire your efforts.
It makes sense to start with one of the most well-known loyalty programs. Amazon Prime gives members access to benefits like fast shipping, video streaming, and exclusive Prime Day deals:

However, this is a paid VIP program, so members are charged an annual fee in exchange for these perks.
On the other hand, Starbucks Rewards is a points-based VIP program where customers earn stars on every purchase they make:

This rewards system is split into three levels, which members can progress through in order to obtain more lucrative perks. For instance, members can redeem stars for free coffee and food, but more exclusive benefits include faster ordering and pick-up.
Sephora Beauty Insider is another tiered VIP program that offers tailored experiences to certain groups of customers:
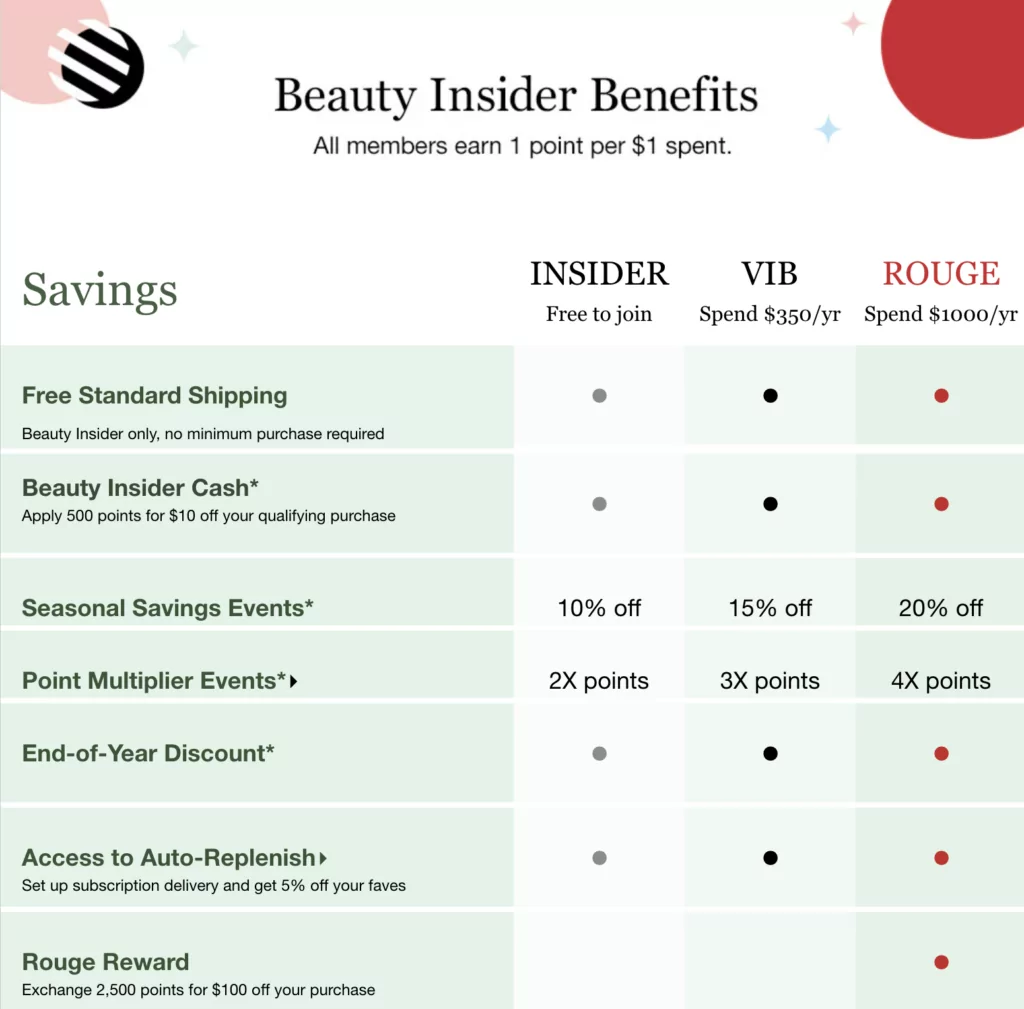
While the lowest level provides member benefits like free shipping and end-of-year discounts, the Rouge tier unlocks additional perks like first access to products and exclusive gifts.
How to Set Up a VIP Loyalty Program in WordPress (In 5 Steps)
WordPress is the go-to solution for most business owners since it’s a very practical, flexible, and rather cheap solution. So, we’re going to start from the presumption that you already have a domain and a WordPress website to start from.
We’ll also use Paid Member Subscriptions, the plugin that will help us build all the extra functionalities we need for a VIP program on top of the basic website setup. It will give you the ability to configure your own membership plans. Plus, you can easily restrict access to premium content like blog posts and products. This is particularly useful if that’s one of the perks you plan on offering in your VIP program.
Not only that, but you’re also able to create membership-based discounts to reward people for signing up for your program. However, you can also configure discounted renewal rates to retain existing customers. Plus, you can combine the plugin with other reward systems for even greater flexibility.
Step 1: Install Paid Member Subscriptions
The first step to set up your VIP loyalty program is to install a WordPress plugin that offers the functionality you need. Paid Member Subscriptions is a full membership and payment solution.
Paid Member Subscriptions Pro
Accept (recurring) payments, create subscription plans and restrict content on your website. Easily setup a WordPress membership site using Paid Member Subscriptions.
Get Paid Member SubscriptionsIt’s completely free to install unless you want access to a range of add-ons and advanced features. It also integrates seamlessly with other popular plugins like WooCommerce.
You can find the free version of the plugin in the WordPress repository or by searching for it from your admin dashboard. Simply go to Plugins → Add New and then search for it in the search bar.
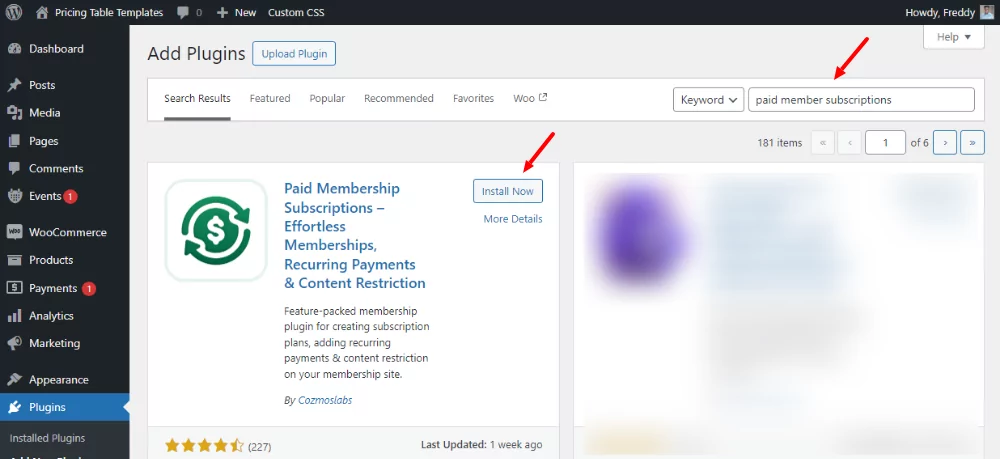
You’ll need to click the Install Now button and then activate the plugin.
Step 2: Create Program Tiers
Once you’ve successfully installed Paid Member Subscriptions, you’re ready to create the tiers that will make up your VIP program. To do this, head to Paid Member Subscriptions → Subscription Plans → Add New.
Here, give your first VIP tier a name that makes it obvious to members where the tier sits in relation to other program levels (e.g. Gold, Silver, Bronze):
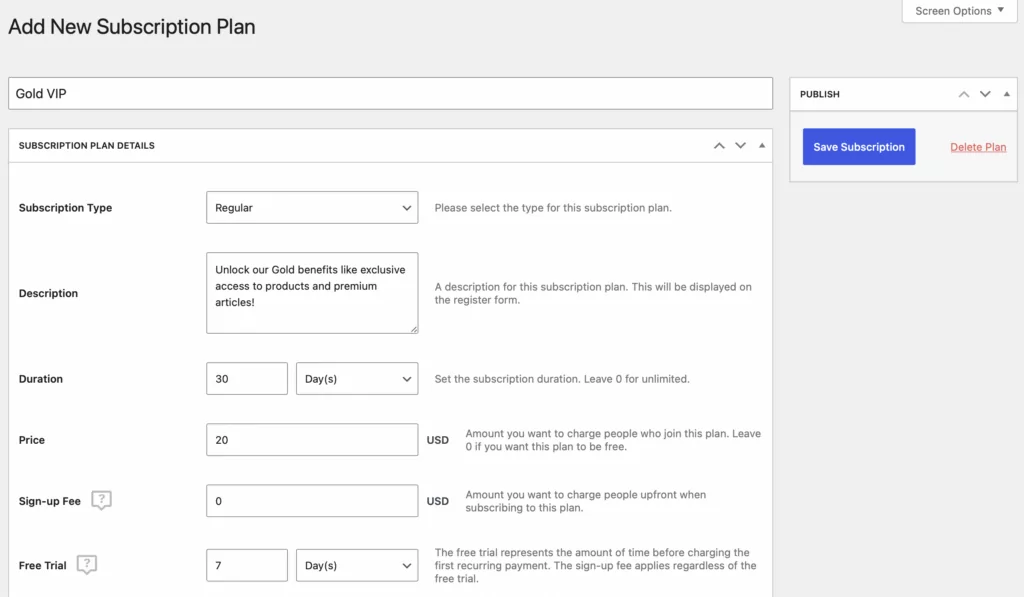
You can also add a brief description for each of your tiers which highlights the main benefits and perks. Next, set a duration (e.g. 30 days) and define the price that VIP members will pay to access the member benefits.
Naturally, you have the option to configure free VIP tiers (if you’d rather customers earn loyalty points as opposed to paying a fee). If this is the case, simply enter “0”.
After that, you can charge a sign-up fee or enable a free trial for the chosen VIP tier. You’ll also need to turn your attention towards the Renewal options if you want to enable automatic membership renewals:
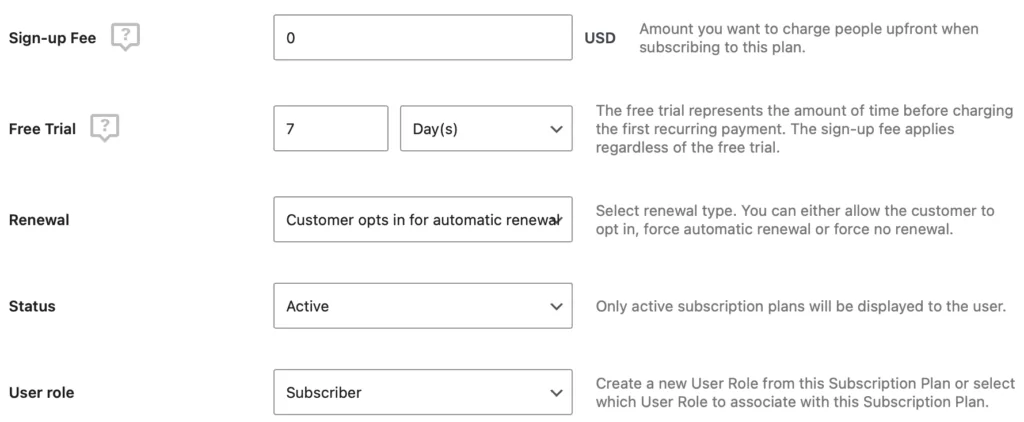
Then, you can activate the plan using the Status dropdown. Plus, you can determine which users can register for the program using the User role menu.
Once you’ve completed all the fields, click on Save Subscription. It’s also easy to add related tiers using the Add Upgrade or Add Downgrade button at the top of the page.
Step 3: Create a Registration Page
Next, you’ll need a way for people to sign up for your loyalty program. Paid Member Subscriptions automatically creates the basic user pages that you need for your website.
If you visit the Pages tab in your admin dashboard, you will see a newly created Login page, Registration page, Account page, and Password Recovery page.
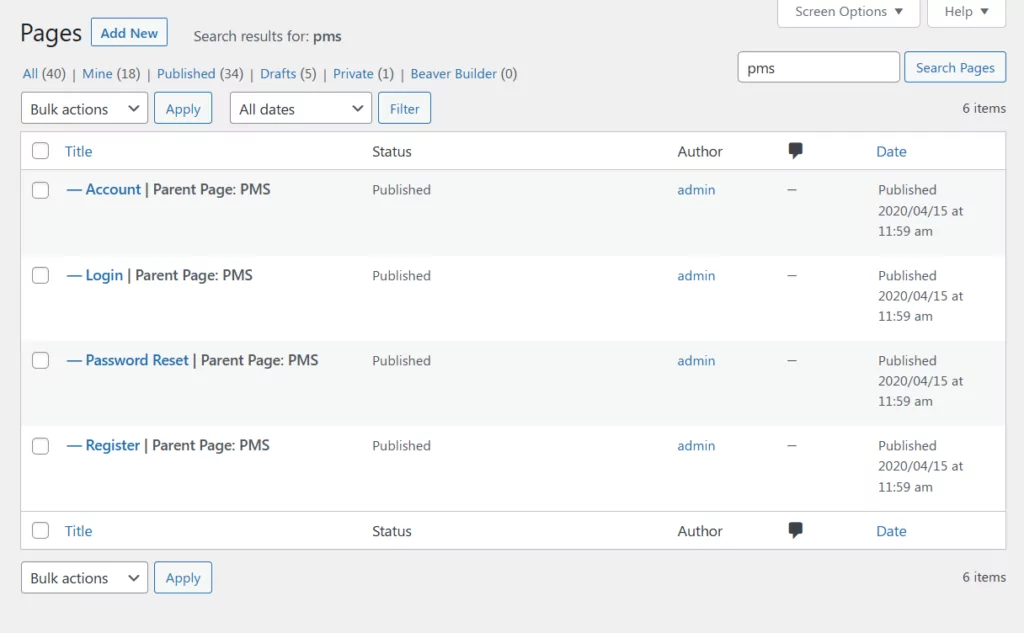
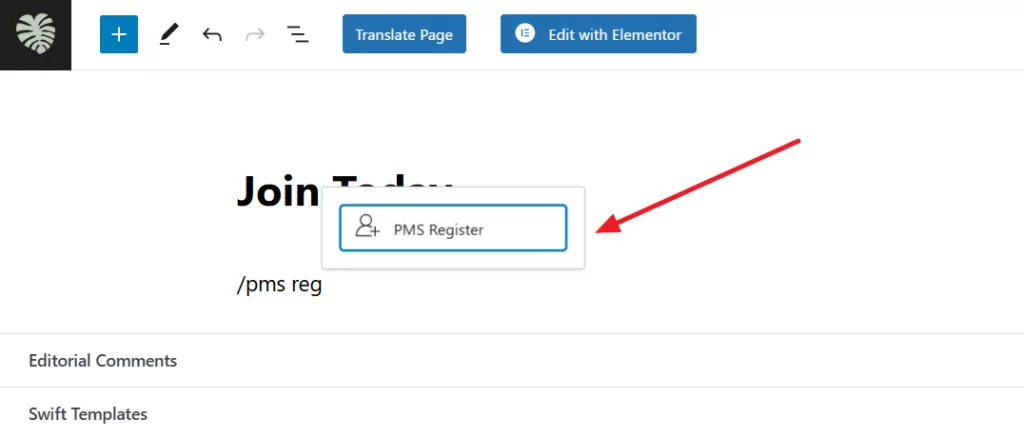
You can edit your Registration page to your liking from here. Or you can even create a new one from scratch, but you’ll have to add the Register block if you want to go with this method.
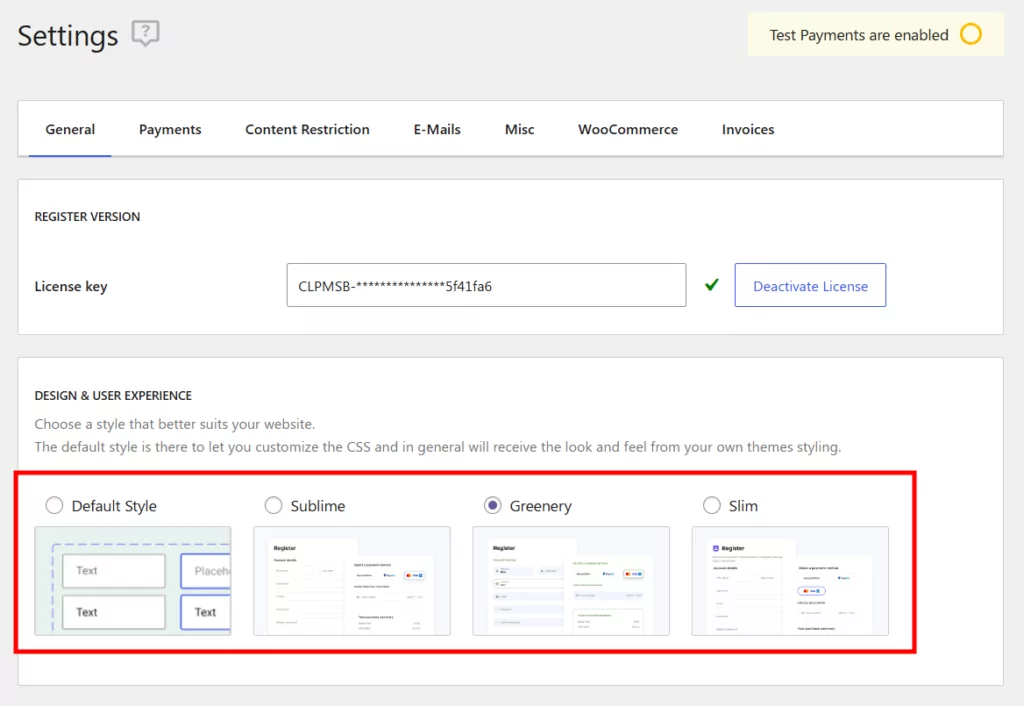
With the premium version of the plugin, you can customize the way your form looks on the front end using pre-made templates.
You can choose one from the Settings page of the plugin, in the General tab with an active premium license.
This is how your registration form could look like on the front end:

Step 3: Restrict Access to Premium Content
If one of the advantages of signing up for your VIP loyalty program is premium content access, then you’ll need to protect the relevant WordPress pages or posts.
For example, if you run a blog website, you may have posts of a certain category that you want to reserve for VIP members. This is much easier to do with the premium Paid Member Subscription plugin since you can use the Global Content Restriction add-on.
However, with the free plugin, you’ll need to do this individually. So go ahead and open the page or post that you’re going to make exclusive to VIP members. Scroll right to the bottom of the editor:
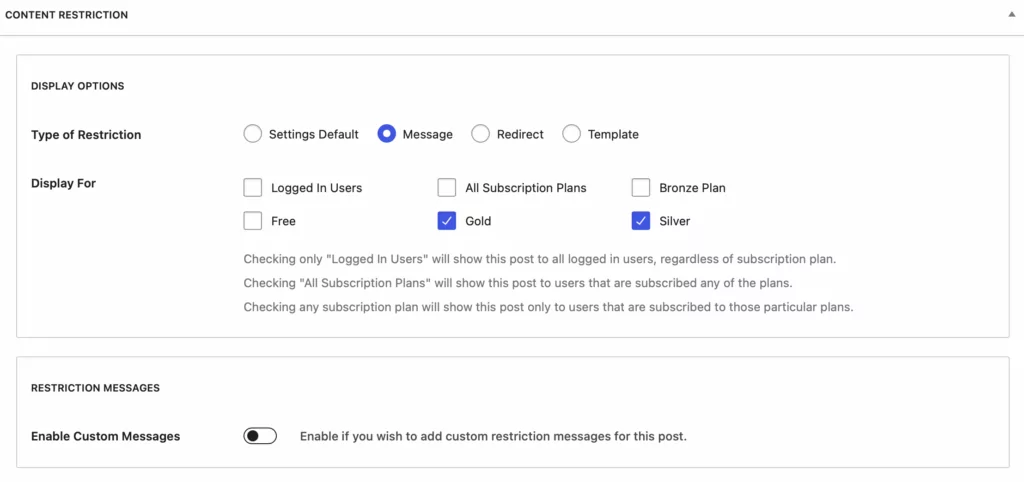
As you can see in the image above, you should find a dedicated Content Restriction section. Here, you can choose which tiers can view your page/post. You also have the option to make it accessible to all logged-in users or all subscription plans.
Additionally, you can configure the type of restriction that you want to enforce (e.g. display a restriction message or redirect unauthorized users). For example, it can be a good idea to redirect non-members to a custom registration page where they can sign up for your VIP program.
Note that if you manage an ecommerce website, you can also make products exclusive to VIP members. When you add/edit a WooCommerce product, you’ll find the same Content Restriction settings at the bottom of the product editor.
Step 4: Set Up Member Discounts
One of the best ways to reward VIP members is to offer exclusive discounts. If you run a blog, you can give members access to premium articles (as we discussed above).
However, you can also offer discounted renewal rates on your memberships to increase customer retention. Meanwhile, ecommerce websites may want to provide member discounts on certain WooCommerce products.
To set this up in Paid Member Subscriptions, navigate to Discount Codes → Add New:
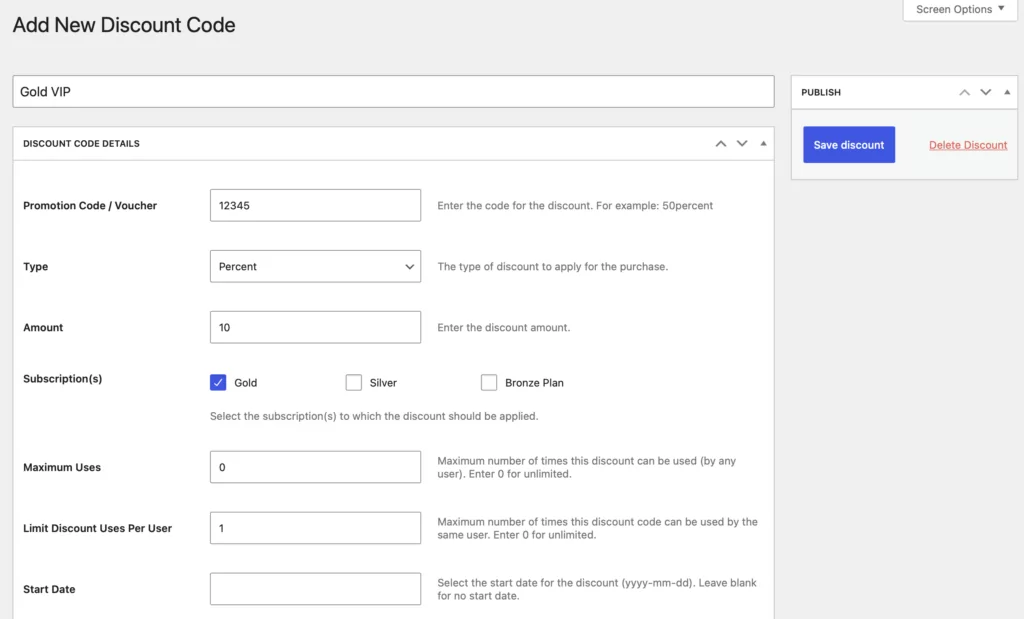
Here, give your promotion a memorable name and enter a unique code in the Promotion Code/ Voucher box. You can choose between a Percent or Fixed amount discount type and then enter the discount amount.
After that, you’re able to apply the discount to the VIP tiers you created earlier. You can also limit usage of the discount, configure start and end dates, and apply the promotion to new users/recurring payments.
Note that you can also add discounts within your subscription plans. Simply edit one of the VIP tiers (that you configured in Step 2). If you scroll to the bottom, you should find a Product Discounts section:
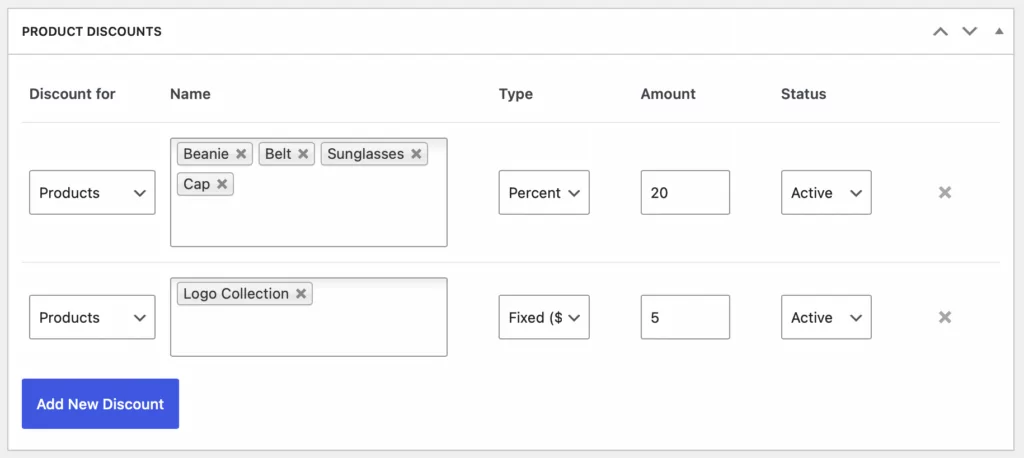
Here, click on the Add New Discount button. This way, you can offer member discounts for specific products or product categories.
For example, you may give all Gold VIP members a 20 percent discount on all accessories in your shop, or provide discounts on certain product collections. You can also configure these discounts when you add/edit your WooCommerce products.
Step 5: Add More Flexibility with MyRewards
If the rewards we’ve discussed so far in this article don’t offer enough flexibility for your liking, you can install an additional plugin like MyRewards.
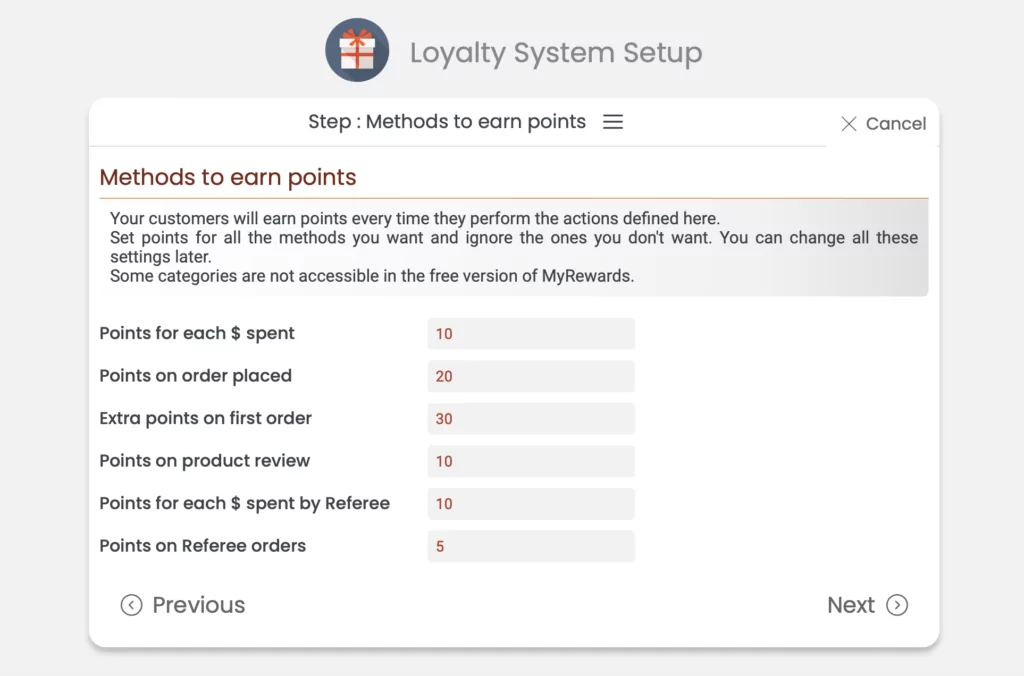
This way, you can allow customers to earn points every time they place an order on your website. But you can also dole out reward points for other actions like product reviews or referrals.
When you install the plugin, the setup wizard prompts you to provide a loyalty system name. Then, you can specify the number of points allocated to customers when they perform various actions:
In the next screen, you can select a reward (note that this is limited to Points on Cart with the free version). But you can also choose from free shipping, free products, discounts, and even a dedicated VIP membership option with the premium solution.
The advantage of combining a plugin like MyRewards with your membership plugin is that you can set up a range of different programs including referral or affiliate programs. Besides offering member discounts and premium content, you can also configure event-based reward points.
Conclusion
VIP programs are a great way to motivate customers to renew their memberships and purchase products in your store. That said, they also allow you to establish brand loyalty, reward long-standing members, and earn recurring revenue.
To recap, here are five steps to set up a VIP program in WordPress:
- Install Paid Member Subscriptions.
- Create program tiers.
- Restrict access to premium content.
- Set up member discounts.
- Add more flexibility with MyRewards.
Paid Member Subscriptions Pro
Accept (recurring) payments, create subscription plans and restrict content on your website. Easily setup a WordPress membership site using Paid Member Subscriptions.
Get Paid Member SubscriptionsDo you have any questions about how to set up a VIP program for your website? Let us know in the comments below!
Related Articles

How to Automate WordPress with a Workflow Automation Tool
Interested in WordPress automation but not sure where to begin? In this post, we're going to cover everything that you need to know about automating WordPress. We'll start with some of the different reasons to consider using automations. After that, we'll give you a generalized tutorial on how to use a WordPress automation plugin named […]
Continue Reading
How to Create a Website for Affiliate Marketing
If you’re looking for a side hustle or want to create a passive income stream, affiliate marketing can be a good option. This involves promoting products by other companies, which can lead to commissions on sales and leads. But to get started, you’ll need to set up a website. Thanks to WordPress, creating a website […]
Continue Reading
Roundup of WordPress ecosystem #1 – January 2017
After writing the article "Overview of the WordPress Community in 2016" and getting feedback for the article on various platforms, I decided to continue writing them, but I changed its name into "Roundup of WordPress ecosystem". This is the first article from a monthly series that will showcase what happened around the whole ecosystem in […]
Continue Reading

