Table of Contents
If you’re already a Profile Builder user, you might have noticed some changes around here in the past few weeks. And that’s especially if you’ve purchased the Hobbyist version of Profile Builder.
And you’d be right!
Some changes did take place within the plugin, and thus, that’s what we’ll talk about in this blog post, the latest Profile Builder update. No more confusion, no more mystery, let me clear the air.
What’s New
If you’ve been with us for some time now, you must already know that the Profile Builder plugin also offers some extra functionalities, with the help of a handful of free, pro, and advanced add-ons.
As you may know, in order to use these add-ons, you’d normally have to download them from your Account page on Cozmoslabs.com and install them as you would any other plugin. But having to do this with multiple add-ons could get a bit daunting. So, we decided to change that and make your life just a bit easier.
That’s why, starting with version 3.7.2 we’ve changed the way individual add-ons are used by simplifying the process and re-packaging all add-ons into 3 different premium versions of the plugin: Basic, Pro, and Unlimited.
What this means is that, instead of having to download, install and activate each individual add-on on its own, you now have a simple in-plugin interface where you can manage all of them at once. But don’t worry, I’ll show you where to find it in a minute.
Where’s Profile Builder Hobbyist?
Another thing you might have noticed is that Profile Builder Hobbyist is nowhere to be found. Or so it seems.
In reality, there’s no need to panic! If you’ve already purchased Profile Builder Hobbyist, you’ll see that in actuality, nothing has changed on your site.
The Hobbyist version of the plugin has now been renamed to Profile Builder Basic with this update. However, no functionality was changed, everything still remains the same, even the price point.
So, there’s no need to worry that your Profile Builder Hobbyist copy is gone, it only had a name change.
How to Update Profile Builder From an Older Version
Now, in this section, I want to chat with the current Profile Builder Pro users. The ones that already have their plugin installed, and only need a quick update for it.
If you’re a new user, and you’re just now installing your plugin for the first time, you can safely skip ahead to the next section, where we explain the installation process from scratch.
So, if you’re already a Profile Builder user and you’re only here to see what’s new, you’ll be happy to find out that this update, even if it’s a bigger one, won’t affect the functionalities you’ve set up on your site with Profile Builder thus far. The only thing you should notice is the previously mentioned name change for the Hobbyist version.
This means that the update process would be the exact same as it already was so far.
Step #1: Update the Premium Plugin to the Latest Version
To upgrade your pro plugin to the latest version, first, go to your site’s WordPress Admin Dashboard. Next, navigate to Plugins → Installed Plugins and search for “Profile Builder” in the search bar.
Once you identify your plugin—Basic, Pro, or Unlimited, depending on your purchase—, click on the update now button right under.
Once your premium version is updated, your old add-ons should be automatically deactivated as plugins, but the exact same add-ons should now be active within the new in-plugin Add-ons page. This means that your site setup should not be modified in any way.
Next, you can delete all of the old Profile Builder-related add-on plugins, as they won’t get any new updates moving forward. All of them are now bundled in the premium version of the plugin.
Again, you won’t lose any functionality or settings by deleting the old add-ons.
Step #2: Verify the Main Plugin Installation
When you update your pro plugin to this version, another thing that should happen is that the free (or main) version of the plugin—called simply Profile Builder—should be also automatically installed on your site.
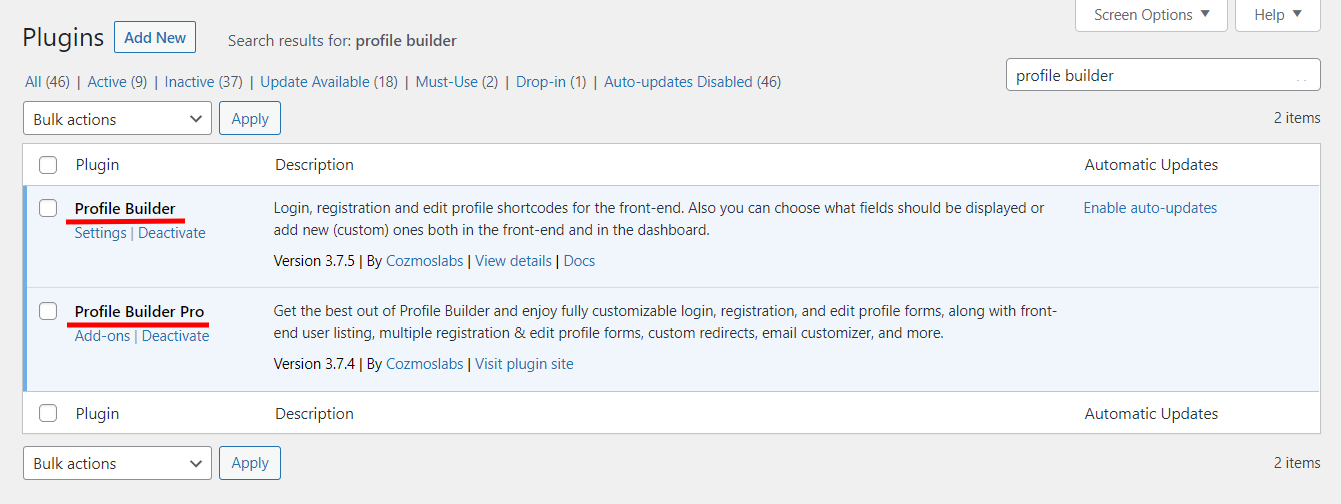
So, to make sure everything went well with your update, we recommend you look for that plugin and verify that it’s been correctly installed and activated. This is how your Installed Plugins section should look like when you search for Profile Builder after this update:
Therefore, you now should be seeing 2 plugins here:
- The main plugin, Profile Builder – version 3.7+
- And the premium plugin, Profile Builder Basic/Pro/Unlimited – version 3.7+
If, however, after the update, the free plugin has not been automatically added, you can still do it manually. If that is your case, you’ll be prompted with the message box below, in the Plugins area:
Simply click the Install & Activate button and your manual migration should be complete.
How to Install The New Version of Profile Builder
Now, if you’re a first-time Profile Builder user, this is how you install the plugin after purchase.
Step #1: Install and Activate Profile Builder
First, you’ll need to download both the main plugin and the premium version of your choosing and install them on your site.
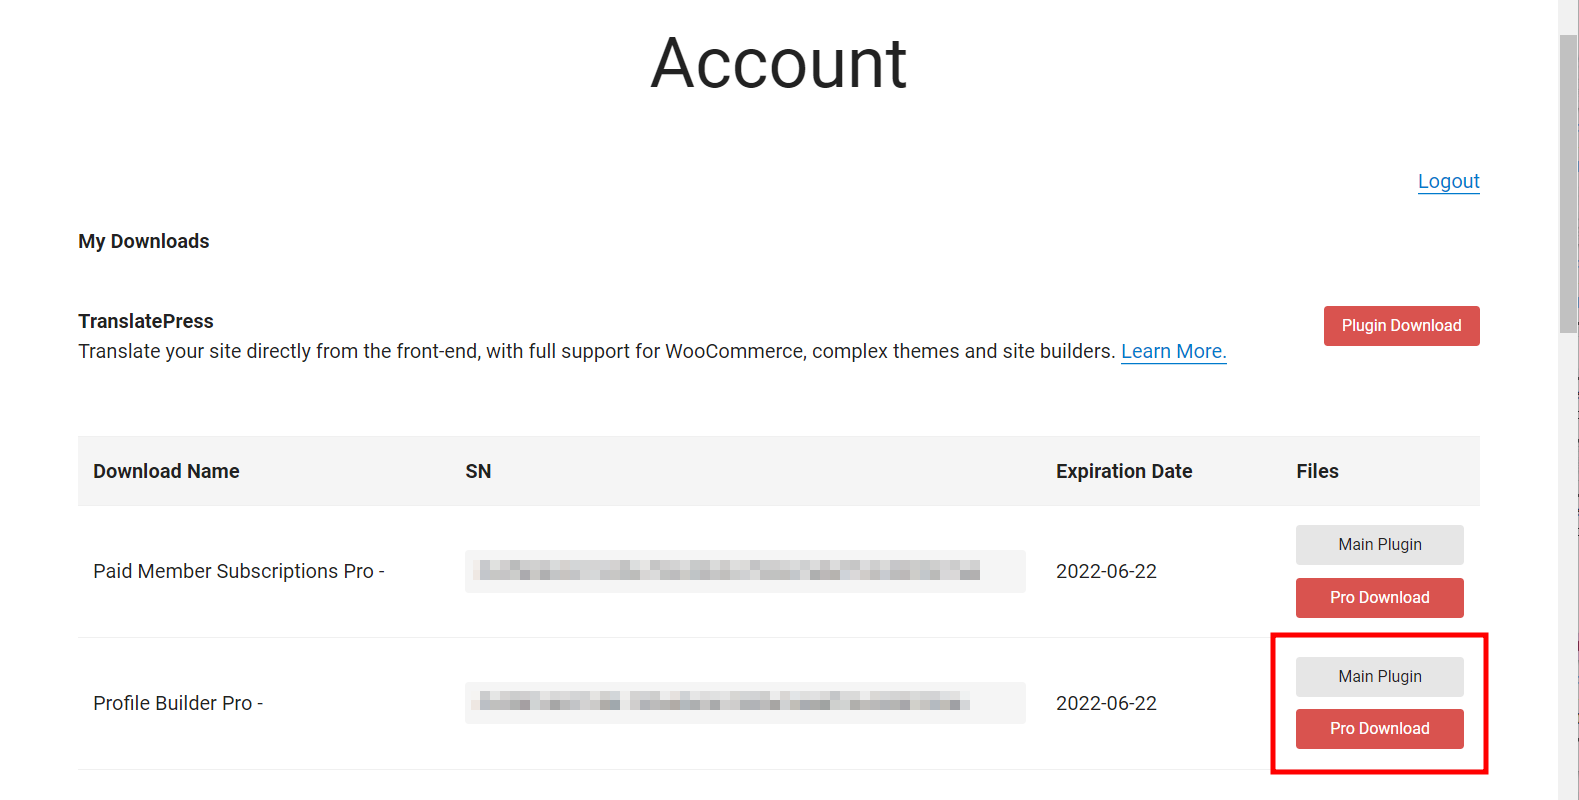
To download the plugins, log into your Cozmoslabs account. Here, you’ll see two download buttons:
- One for the main plugin;
- And one for the paid version you’ve purchased—Basic, Pro, or Unlimited.
Download both plugins and then go to your WordPress dashboard. Here, you’ll have to navigate to Plugins → Add New and then click the Upload Plugin button, followed by the Choose File button.
Upload the main plugin .zip file here, hit Install Now, and then don’t forget to Activate it. Next, do the same for the second archive.
In the end, you should have two plugins installed:
- Profile Builder – Downloaded from the “Main Plugin” button;
- Profile Builder Basic/Pro/Unlimited – Downloaded from the ” Basic/ Pro/ Unlimited Download” button.
Step #2: Register Your Version
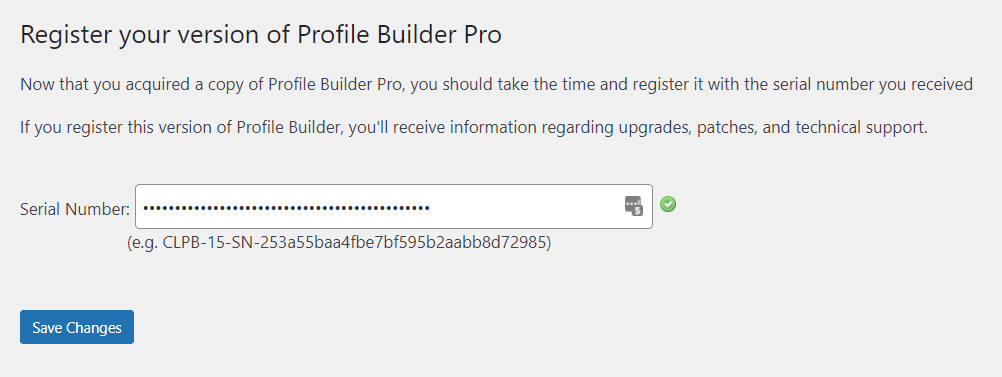
Now, in order to enjoy Profile Builder to its full potential, you’ll need to register your copy, using the serial number you’ve received upon purchase.
This is required in order for you to receive automatic updates, bug fixes, and premium support.
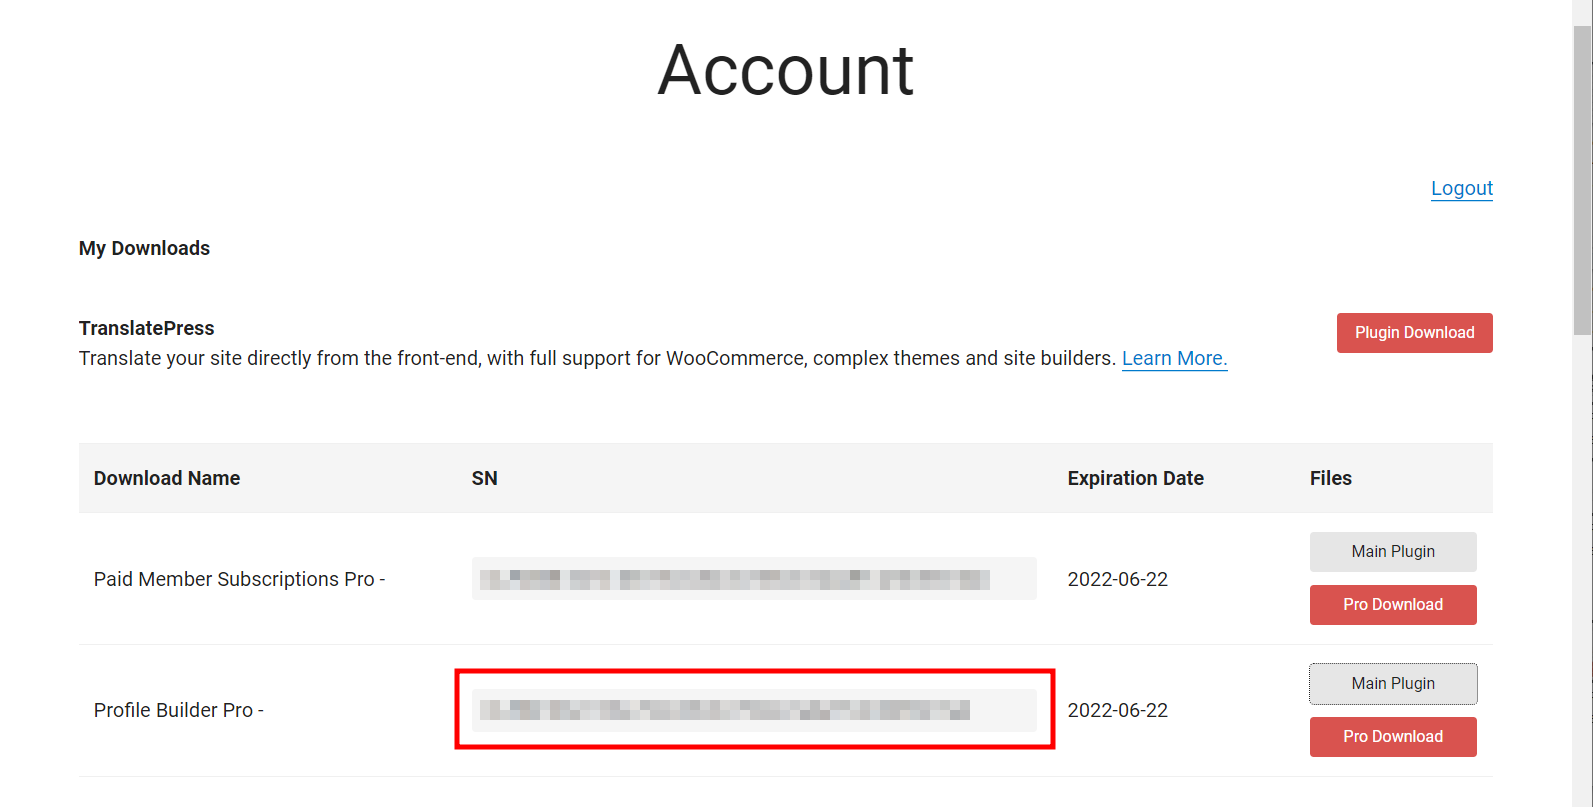
The registration number you’ll need is listed on your account page for each of the purchased downloads.
Copy it from here and then simply go to Profile Builder → Register Your Version from the WordPress dashboard and paste it there.
Don’t forget to hit Save Changes.
Step #3: Activate Add-ons
When you come from an older version, the add-ons that were previously active (before the update) will be automatically activated from the new Add-ons tab, as previously stated.
However, for new users, activating the add-ons is just as easy.
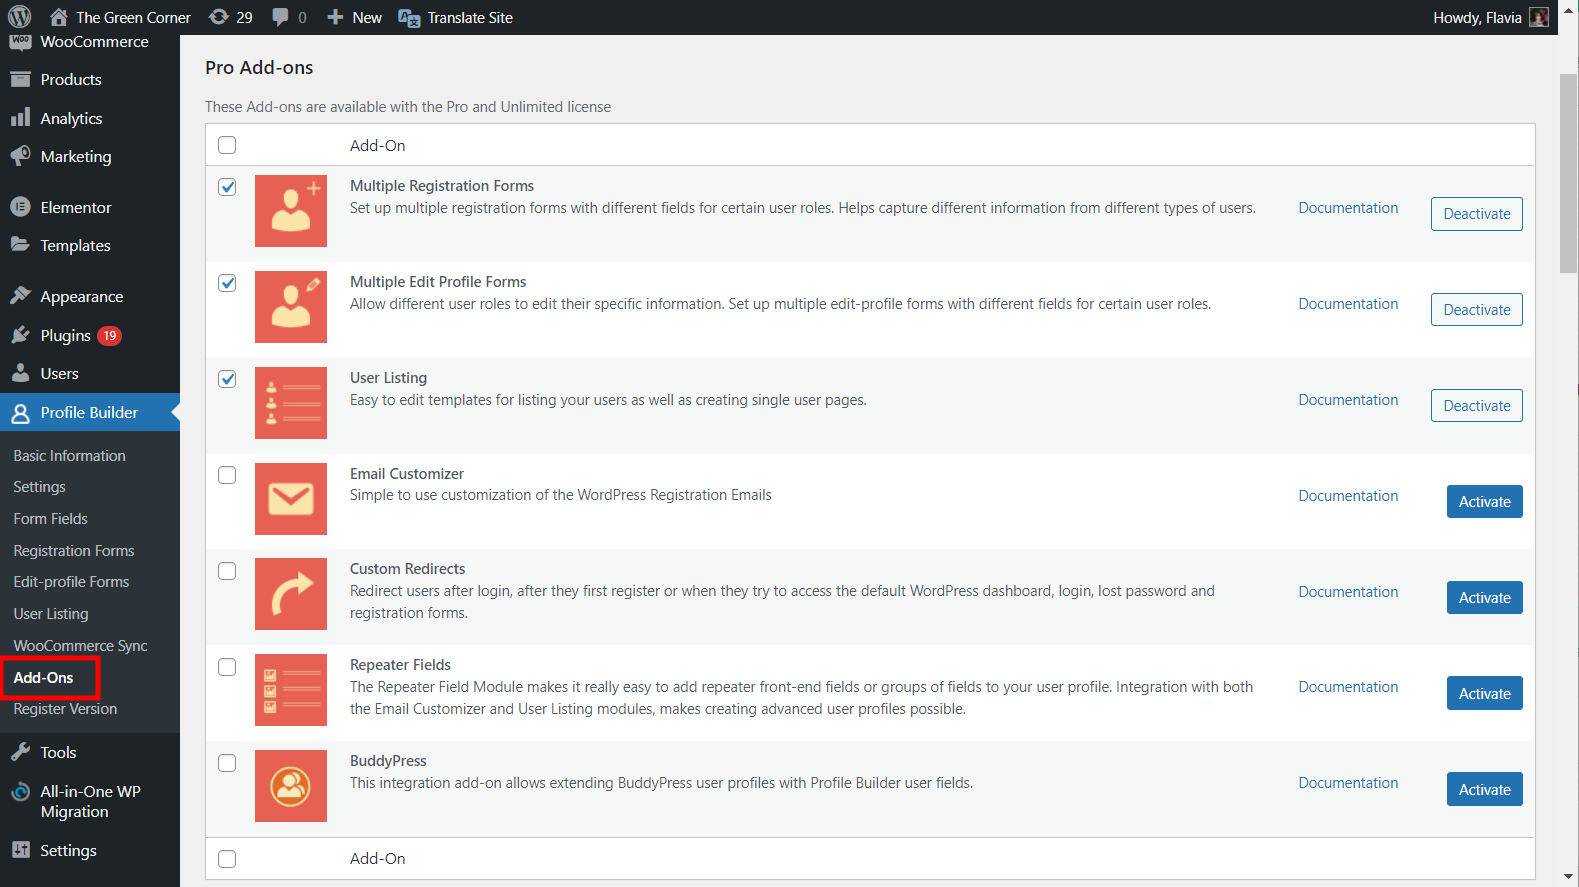
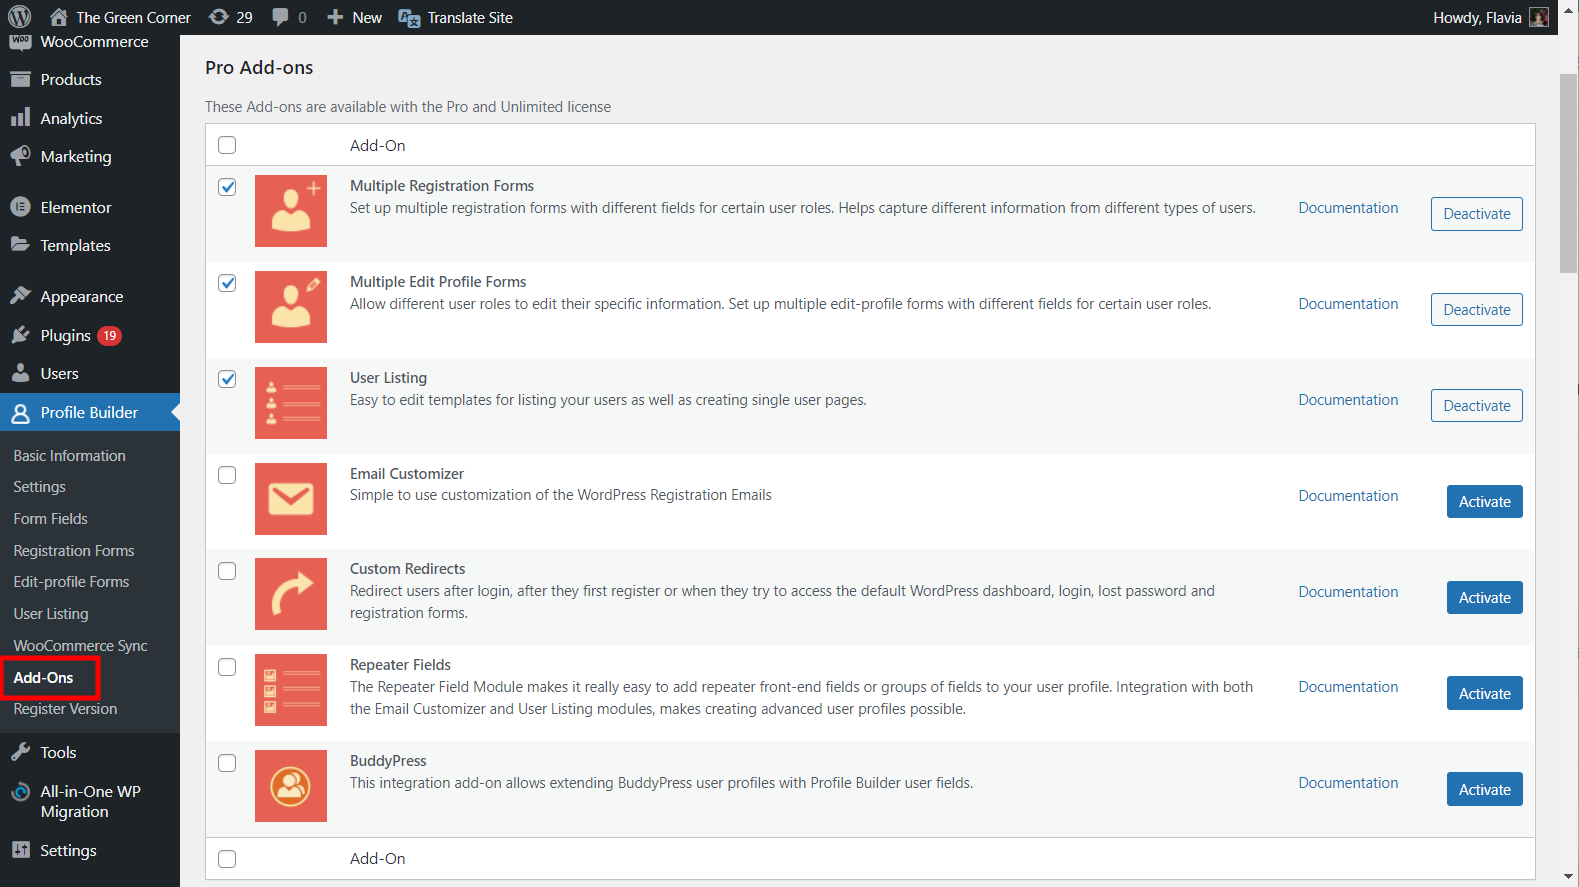
Just navigate to Profile Builder → Add-ons and you’ll see a list of all of the available add-ons. To activate one, simply click on the Activate button to its right. Do this for as many add-ons as you need to use.
If you know you’ll be using multiple add-ons, you can also batch-activate them by checking the box to each desired add-on’s left. Once you’ve checked all the add-ons you wish to activate, scroll either all the way to the top or to the bottom of the page and click the Save Add-ons button.
Enjoy the Latest Profile Builder Version Today
That’s it! You should now be the proud owner and user of the latest version of Profile Builder. Congrats!
Not only can you easily manage all of Profile Builder’s add-ons from one easy-to-access interface, but you’re now also ready to manage all your WordPress user roles, and registration processes, restrict content as you please, and much more.
The easiest way to manage registration, login, users and content restrictions.Profile Builder Pro
Do you still have questions on how to update your site to the latest version of Profile Builder? Ask them in the comments section below!
Related Articles
How To Create a Divi Membership Site
If you’re thinking of building a membership site in WordPress, you’ll need a solid theme and a membership plugin that pairs well with it. In this complete guide, we’ll show you how to create a Divi membership site using the popular Divi theme in combination with the Paid Member Subscriptions plugin.
Continue Reading
How to Hide Products by User Roles in WooCommerce?
Do you want to easily hide products by user roles in WooCommerce? Some WooCommerce store owners have a unique requirement where they want to hide certain products from all but a few specific groups of users. There may be many reasons for this, including selling exclusive products only to the more loyal customers, with a […]
Continue Reading
How to Create WordPress Redirects to Another Page, External URLs, or a Subdomain
There are different reasons WordPress site owners want to create WordPress redirects to another page, external URL, or a subdomain. The redirect can be based on an important user action or set up to redirect all users landing on a particular page. Whatever the type or need of your redirect, WordPress offers the flexibility to […]
Continue Reading





I can’t find “Register your version” under Profile Builder in my WordPress dashboard
Hello. The license information area can be found on the Settings -> General page now.