
Table of Contents
Do you want to easily hide products by user roles in WooCommerce?
Some WooCommerce store owners have a unique requirement where they want to hide certain products from all but a few specific groups of users. There may be many reasons for this, including selling exclusive products only to the more loyal customers, with a membership.
In fact, a more general use case of restricted product pages can also be when the store owner wants to run offers for their premium members only. They may want to sell some of their best products at a discounted price to them.
Whatever the reason, it’s important to be able to manage product visibility by user roles for WooCommerce.
Profile Builder Pro is designed to offer this functionality, along with many other useful features that help with the user management of your WooCommerce website. And it can do it for free!
Profile Builder Pro
Restrict product pages by user roles the way you want easily, quickly, and with all possible customizations.
Get Profile BuilderHow to Hide WooCommerce Products by User Roles Using Profile Builder
Now that we have revealed that Profile Builder is the solution you’re looking for to manage user-specific products on your WooCommerce website, let’s take a quick look at the steps involved in the process:
- Enabling content restriction functionality in Profile Builder;
- Choosing the type of restriction you want to use by default;
- Applying custom restriction settings to individual products. This is used when you might want a custom individual type of restriction instead of the default one.
So, let’s break these steps down into more actionable explanations so that you can follow along and hide specific products from the shop page on your WooCommerce site with ease.
Activate the Content Restriction Functionality
Before we get to hiding WooCommerce products, you’ll first need to install and activate the Profile Builder plugin on your WordPress site. You can download it for free from WordPress.org and then install it from Plugins → Add New → Upload Plugin in your WordPress dashboard.
The content restriction functionality is disabled by default in Profile Builder as not all websites are going to need it. So, in order to hide products by user role in your WooCommere store, you need to activate it first.
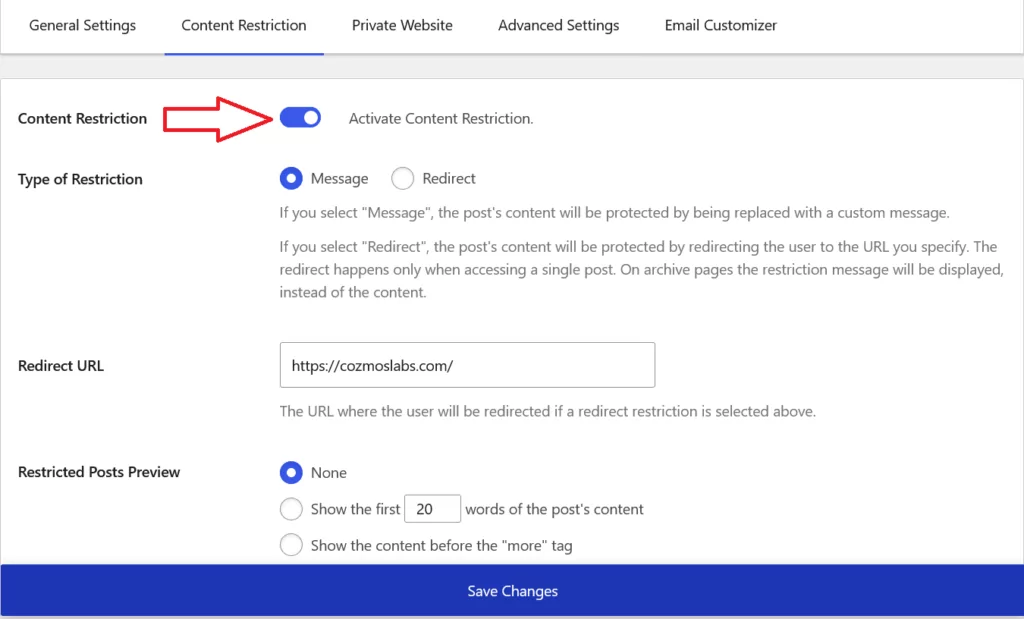
Click on the Settings option under the Profile Builder menu on your WordPress dashboard. Then click on the Content Restriction tab at the top. It’s the first option under that tab named Content Restriction.
Just click on the slider beside it and then click on the Save Changes button to enable the content restriction functionality on your WooCommerce store.
Set Up Default Content Restrictions
On this same page, you can also choose the type of content restriction that you want to be used by default. This content restriction type will be applied site-wide to all products/posts/post types where the functionality is enabled without any customization. This includes the product pages where you leave the Settings Default option selected. But we’ll get back to this later.
Now, if you choose Message as your preferred type of restriction, by default, Profile Builder will show a message on restricted product pages. However, you can customize this message and make it your own if you scroll down a bit on this page.
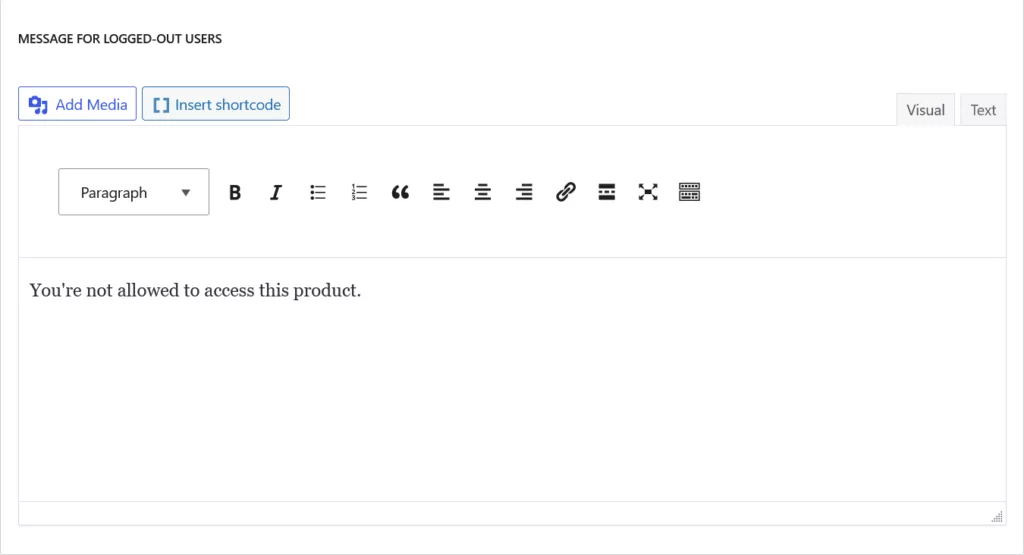
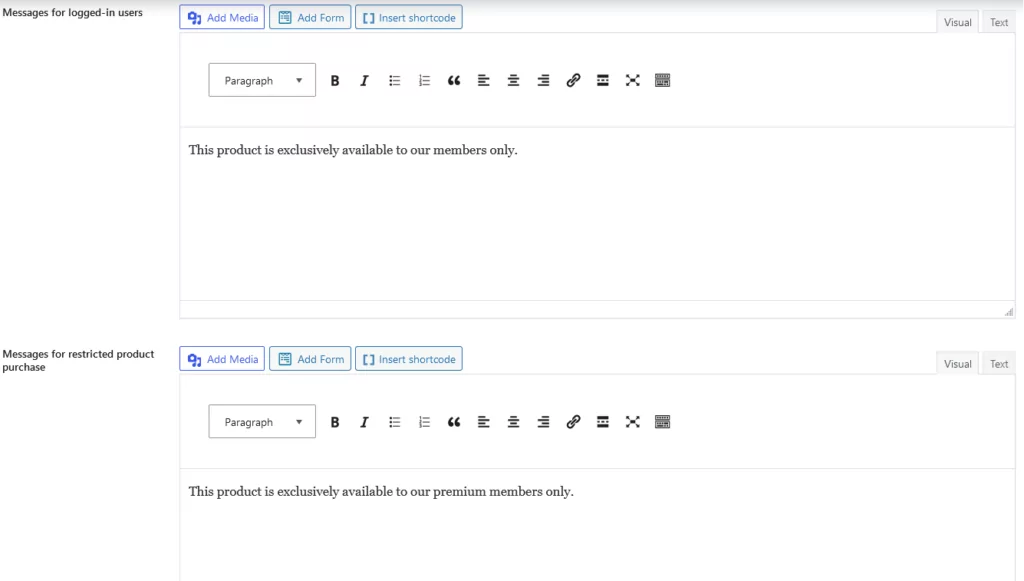
Profile Builder allows you to display different messages for different types of users, including logged-out users, logged-in users, as well as for users trying to purchase the restricted products on your store.
Alternatively, you can choose to redirect all visitors on restricted product pages to a page of your choice. It can be a membership page or pretty much anything you want it to be. Just click on the Redirect option and paste the URL of the page you want the visitors to be redirected to.
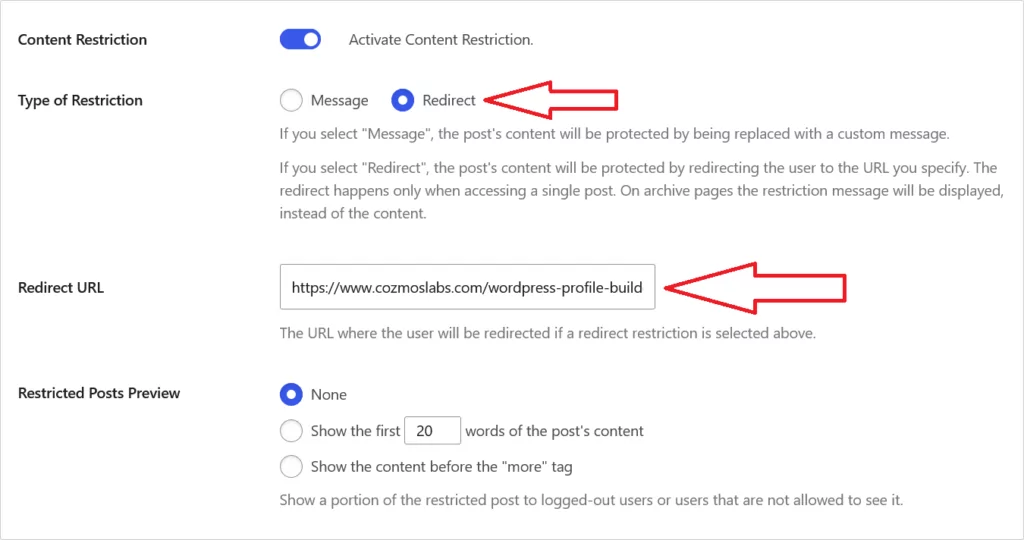
Once you’re done customizing the settings you want, you just need to click on the Save Changes button that appears at the end of your screen when you’re on the Settings page. This will enable the content restriction functionality on your WordPress website.
Now that you’re aware of how to manage the default content restriction settings, let us show you how to customize the restriction settings for individual products based on the user roles.
Hide Individual WooCommerce Products by User Roles
As I said above, Profile Builder is one of the most flexible user management plugins out there. It offers an incredible amount of customization and flexibility with pretty much all of its features.
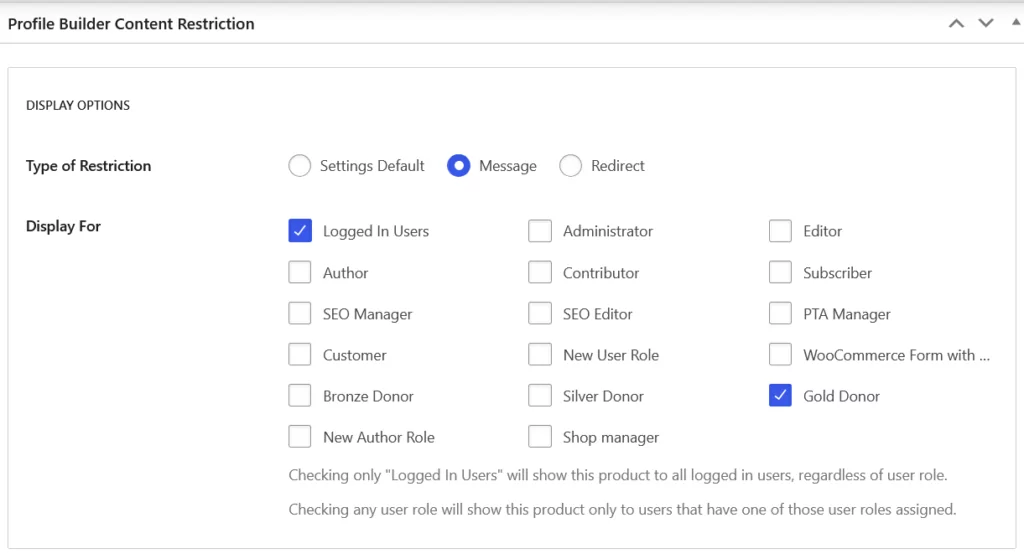
For hiding products by user roles in WooCommerce, Profile Builder offers a special meta box at the end of every product page where you can set this functionality up. There are 3 different types of content restrictions that you can apply to your individual WooCommerce product pages to hide them based on user roles. They are all designed to achieve different end goals. Let us explain them in detail below.
First things first, in order to access the Profile Builder Content Restriction meta box, you’ll need to navigate to the product page that you want to hide from the back-end and scroll all the way down. You’ll find this content restriction box at the end of every product page. Here, you can choose from the 3 different content restriction settings available.
Settings Default – Using General Content Restriction Settings
The first option when customizing individual product restrictions is Settings Default. This option will be chosen by default and will apply the default settings you have previously set in the Content Restriction tab from Profile Builder’s general Settings presented above.
It can be either to show a message on restricted product pages or to redirect them to a particular page, depending on what you have chosen there. This will save you a lot of trouble, not having to individually update every product’s content restriction settings.
However, you’ll still be able to customize the content restriction settings on individual products if you want to. So again, if you don’t want to individually customize a specific product, don’t make any changes here and the default settings will apply to that product page.
Showing a Default or Custom Message
The second option here is Message. This simply allows you to show either the default or a custom message on that particular product page for the restricted users. Choosing this will overwrite the default content restriction settings you may have set in the general settings.
So, for example, even if you have chosen the Redirect option in the general settings of Profile Builder, you can choose the Message option here to show the default or custom message on this particular product page.
If you want to have a custom message instead of the default message on restricted products, you can write it in the custom message section:
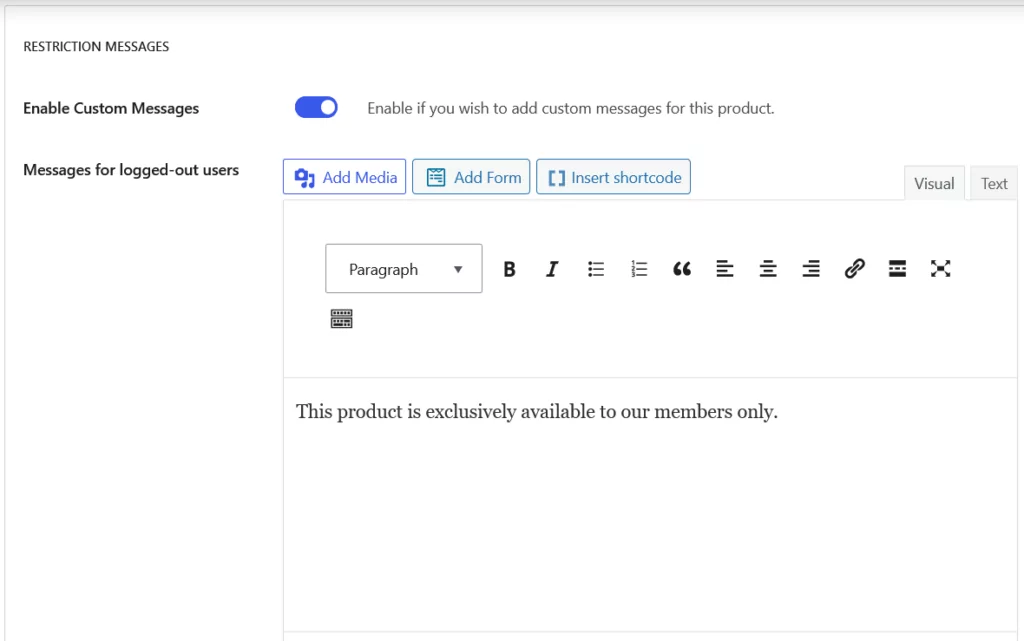
But as we said above, there’s a lot of flexibility with every feature of Profile Builder Pro. Even here, you have the ability to set different custom messages for different categories of users.
While the custom message you see in the above screenshot is for logged-out users, you can set different custom messages for logged-in users (but not eligible to view the restricted product) and for users who can view the product but are restricted to purchase it.
Select User Roles and Grant Access
Next, you need to choose the user roles that will be able to view the restricted products, while all the remaining users will automatically be restricted from accessing them.
To do this, scroll down to the Display For section under the Profile Builder Content Restriction meta box. Here, you can choose the user roles that you want to allow access to the product page you’re restricting.
Once you click on the ‘Logged In Users’ checkbox, you will be able to select any other specific user role to allow them access to the product. These can include the Administrator, Author, SEO Manager, SEO Editor, Shop manager, or any other user role you have set up on your website.
Now, if you don’t want all the logged-in users to access the restricted product in question, you can uncheck the Logged-In Users checkbox after selecting the other user roles.
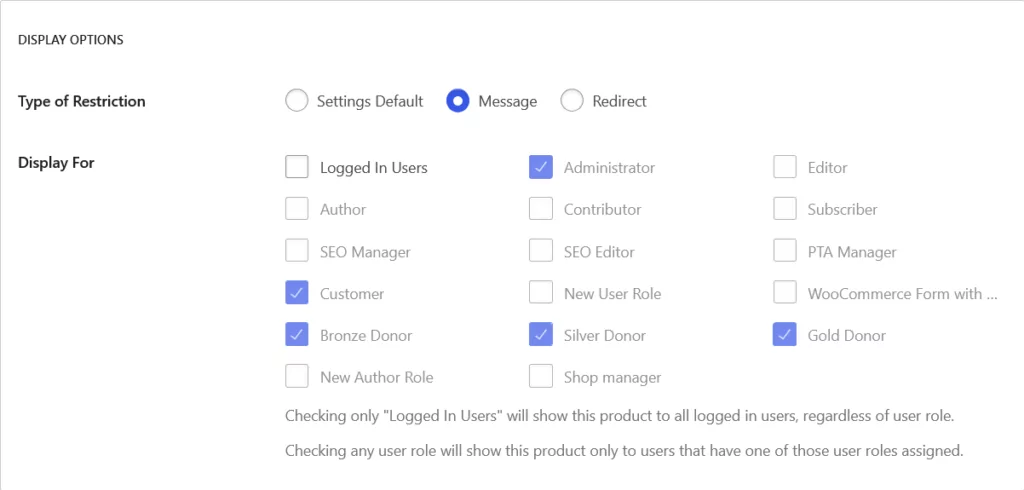
However, if you leave the Logged-In Users checkbox selected, then every registered user on your WooCommerce store who is logged in will be able to access the restricted product, irrespective of their user role.
The restricted user roles will either get the default restriction message (or a custom message set by you), or get redirected to a page of your choice, depending on the settings you choose.
And since we’re on the topic, with Profile Builder you can even create your own custom user roles or edit the already existing ones. This way you can personalize the user experience even more.
Redirecting Restricted Users
That brings us to the Redirect option. Again, you can choose which user roles can access the product and which user roles get redirected to some other page, just like I’ve shown you above. If you choose to create new user roles, those will then appear in the Display For section of the meta box.
So again, for example, if some of your product pages need updating or optimization by your team, you can allow those user roles access to those products, while restricting it for all the other user roles.
Similarly, you can use the Redirect setting option to redirect the restricted users to a page telling them that the product will be available soon. Of course, you can also just as well redirect them to a similar product that they may be interested in.
You can also choose a custom redirect URL here even if you have a default redirect URL saved in the settings.

Once you’ve chosen your settings, scroll back to the top and click on the Update button for your changes to take place. That’s it! You have successfully applied your product restriction settings.
To confirm that the product restriction has actually come into effect for the specific WooCommerce user roles, you can visit the restricted product page as one of the restricted users. In my example, this is what a user role with no access should see if I choose the Message restriction type:

Other Important Content Restriction Features
We have covered most of the content restriction functionality of Profile Builder that helps you manage product visibility in WooCommerce. However, Profile Builder has more to offer.
There are also some advanced content restriction functionalities that you can use in specific cases. They can also help convert more users into premium members if that’s what you’re looking to achieve.
So with that said, let us also take a look at those advanced functionalities.
Adding Media in Default Content Restriction
When you edit the default content restriction settings as explained above, you can also make use of media. This means that you can display an image or a video instead of text informing the users about the hidden WooCommerce product.
Of course, this would only work if you’re choosing the Message option. With the Redirect option, you can have your media elements embedded on the redirected page itself.
The same goes when updating restriction settings for individual products. You can choose to add media to your custom restriction message. In addition to this, when talking about product page content restrictions, you can also add a form that will only be displayed to restricted users. You can do this if you have a contact form plugin installed on your WooCommerce website. However, you do need to have a form created through your contact form plugin to be able to do so.
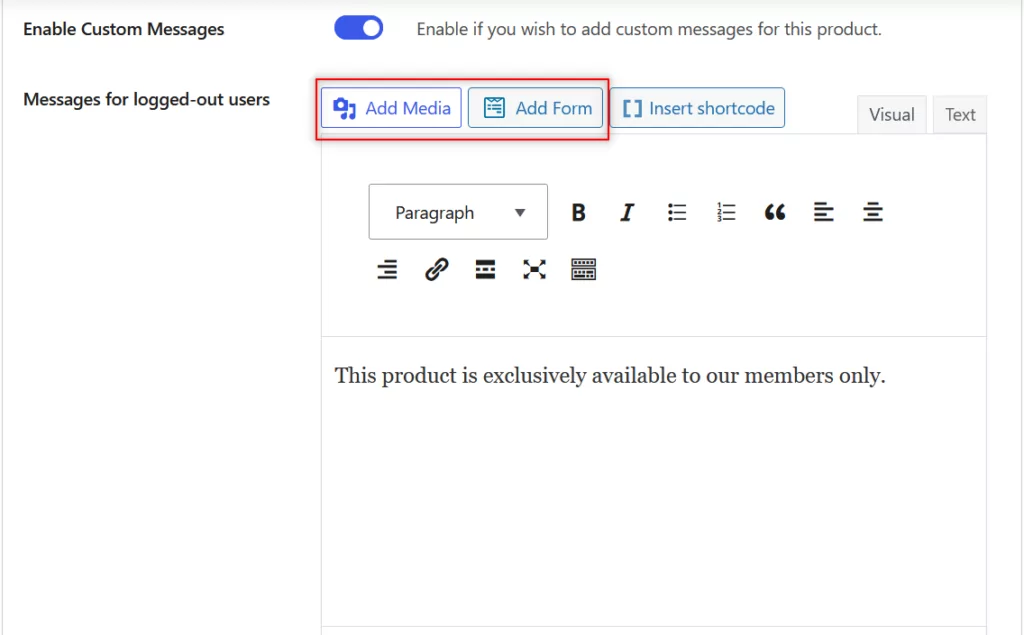
This functionality would allow you to get the details you want of users that land on restricted product pages. You can notify them when you can offer those products to them again, or even offer them some other similar products depending on their interest.
You can use Profile Builder’s Mailchimp integration add-on to send emails to these users as well.
Allow Display but Not Product Purchase in WooCommerce
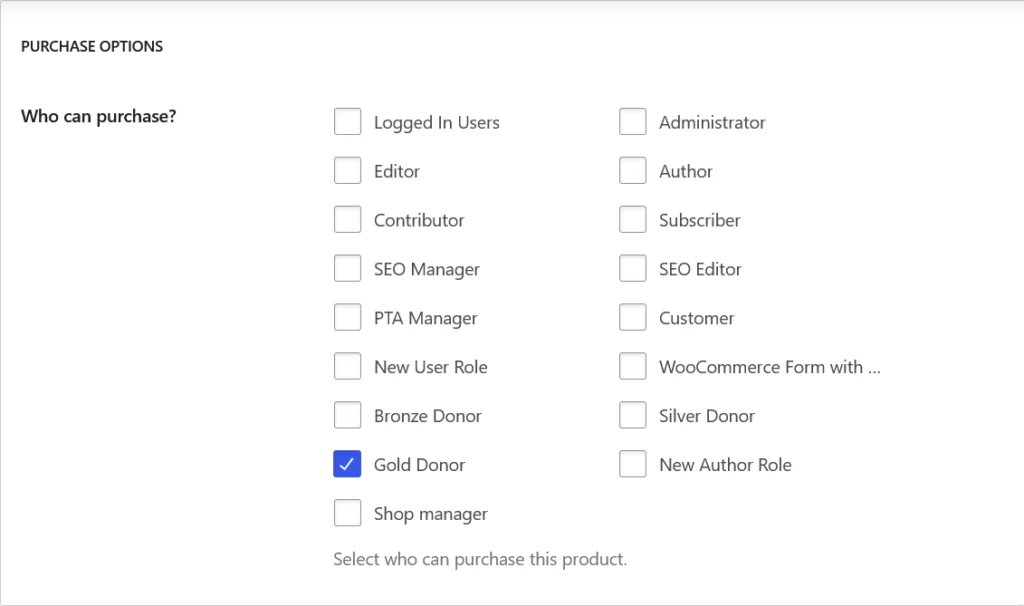
Profile Builder offers another interesting functionality here. In addition to hiding products for the restricted users, you can also choose to display the restricted products to all users but allow only the selected user roles to purchase them.
This can be very useful when you’re trying to turn more of your general users into subscribers or members, or your free members into premium members.
You will find the setting to set this up under the Profile Builder Content Restriction meta box as well.
Start Hiding Products by User Role in WooCommerce Today
Finally, Profile Builder Pro comes with a whole lot of other user management features outside of content restriction. Some of them include:
- Ability to create custom registration, login, and other forms;
- Create a fully functional member directory, with both front-end and back-end functionality;
- Add, remove and edit user roles;
- Integrations with popular email services like Mailchimp to send confirmation emails;
- Create and manage custom redirections;
- And much more.
Give Profile Builder Pro a try if you’re looking for the most seamless and effective way to manage users on your WooCommerce website. Or download the free version if custom forms and content restrictions are all you need.
Profile Builder Pro
Restrict product pages by user roles the easy way, quickly and with all possible customizations.
Get Profile BuilderDo you still have questions about how to hide WooCommerce products by user roles? Ask them away in the comments below!
Related Articles

How to Customize the WooCommerce Login Page (No Code Needed)
Searching for a solution to customize the WooCommerce login page and otherwise control login behavior on your WooCommerce store? If you allow (or force) registration on your store, you'll want to create a user-friendly login experience so that your shoppers can easily log in to their accounts and access other key features. In this post, […]
Continue Reading
8 Best WordPress User Registration Plugins
Not sure what WordPress user registration plugin to use for your project? Going through all the WordPress user registration plugins can be disorienting. You may have spent hours and hours searching for plugins and tutorials to help you with your project, and you’re still as confused as you were when you started. Imagine finding the […]
Continue Reading
How to Customize WordPress Email Login Behavior (+ Registration)
Searching for a WordPress email login feature so that you can customize your site's login process, such as requiring users to use their email address instead of a username? By default, WordPress lets users log in with either their username and password or their email and password via the default login page. But if you […]
Continue Reading

