

Table of Contents
- 1 Why Sell Courses with WooCommerce?
- 2 Benefits of Selling Courses with WooCommerce
- 3 How to Sell Courses with WooCommerce
- 4 Set Up WooCommerce to Sell Courses as Products
- 5 Integrate WooCommerce with Tutor LMS
- 6 Create One-Time Purchase Courses
- 7 Earn Recurring Revenue by Selling Access to Courses
- 8 Final Words
Are you looking to sell courses with WooCommerce?
If that’s a resounding yes, prepare to learn everything you need to start today, even if it’s your first time, and you’re on a tight budget.
The eLearning market has grown tremendously in the last few years, offering individuals and businesses additional revenue opportunities.
While this is great news for anybody looking to sell courses, figuring things out as a beginner can be tricky, especially if you aren’t tech-savvy.
First-timers are often plagued by questions such as:
- Which platform should I use? Should I go with WordPress + WooCommerce or find something else outside the WordPress ecosystem?
- Is WordPress a good enough platform for online courses?
- Which learning management system should I use?
- How do I structure my course?
- How do I even market my course?
- Does it cost an arm and a leg to run a course?
- Et cetera.
These are some of the questions that delay or discourage many would-be entrepreneurs from starting an online business selling courses.
So…
In the article, I will show you how to sell courses with WooCommerce without being a tech master.
In a nutshell, we will learn how to integrate WooCommerce with a learning management system so you can process payments and onboard students effortlessly.
And before you go, you will learn how to use Paid Member Subscriptions to achieve much more.
Of course, that is the meat of the article but we will also be sharing tips for creating a user-friendly experience and marketing your course, among other things.
Sounds good? Let us dive right in.
⏩ Skip straight to the tutorial.
Why Sell Courses with WooCommerce?

Before we get into the thick of things, we hinted that the eLearning industry has grown tremendously over the last few years.
As things stand, the market is projected to reach 400 billion U.S. dollars by 2026, with the United States being one of the top countries using online learning platforms.
Many factors have fueled this growth, further boosting demand for online courses across topics such as business, cooking, home improvement, and personal finance, to mention a few.
Quickly, some of these factors include:
- Changing consumer preferences – Many customers turn to online learning as a convenient and flexible way of acquiring new skills and knowledge. This is primarily for professional development, lifelong learning, and the need to remain relevant in the job market;
- Market trends – New technologies have made it possible to deliver immersive learning experiences that continue to endear online learning platforms to users. In addition, microlearning, where the information is delivered in modules that users can pause and continue at will, makes the platforms attractive to busy individuals;
- Macroeconomic factors – Factors such as the increasing cost of traditional education and living expenses have made online learning a more affordable option for many individuals. On top of that, the COVID-19 pandemic led to increased awareness and adoption of online learning.
As more people take to online learning, you can only expect the demand for online courses to grow.
But why sell courses with WooCommerce instead of other, often better-known, platforms? I’m glad you asked.
Benefits of Selling Courses with WooCommerce
For most individuals, WooCommerce is primarily a WordPress plugin you use to create an online store to sell other types of products – physical or virtual.
Most people don’t think you can sell courses using WooCommerce. After all, why should they think that way when we already have many other learning management systems?
Well, nothing could be further from the truth. You can use WooCommerce to sell a course like any other product.
You only need to know what to do and the right tools or couple it with a learning management plugin.
With that being said…
…why should you use WooCommerce instead of established online learning platforms such as Teachable or Udemy?
It’s Free and Open-Source
One of the main advantages of WooCommerce is that it’s free and open-source. This means you can create your online course and take it in any direction without paying a dime.
It also means you don’t need to seek permission or licensing to change the code however you want.
Granted, you may need to pay for premium extensions later when you need the features, but WooCommerce allows you to start an online business and accept payments immediately.
But even with the premium extensions, the platform remains a more cost-effective option, which means better profit margins.
Thanks to an extensive collection of free themes and plugins, you can extend your online course in many exciting ways without needing to pay anything.
This, also, makes WooCommerce highly customizable and scalable.
That’s amazing news for creative bootstrappers or anybody in a tight spot financially but would love to share their knowledge with the world.
This I say because most WooCommerce alternatives are generally more expensive, even when they lack some of the features you need to run a successful online course.
Nonetheless, you still need to pay for a domain name and web hosting when starting a website, although these are normally cheap.
Easy to Install, Configure and Use
If you want to sell courses with WooCommerce, you will be glad to learn it’s exceptionally straightforward to install, configure, and use. I’m not kidding, a fourth-grader could do it.
First, WooCommerce is available in the official plugin repository, meaning you can install it right inside your WordPress admin dashboard. Just point and click, you don’t need to upload any files.
Secondly, WooCommerce has an intuitive quick setup wizard that launches after activation. This lets you quickly set up your base settings without breaking a sweat. This means you don’t need any HTML, CSS, or PHP knowledge.
Other than that, integrating WooCommerce with other software, including learning management systems, is a breeze. Most times, you only need to flick a switch and that’s it.
Adding products (such as your course) and integrating with multiple payment gateways, among other things, is effortless. You can whip up a WooCommerce store and be ready to add products before the next guy finishes a sandwich.
Secure and Reliable
Security and reliability are paramount in online business. That is a no-brainer. Whether you have 20 students or thousands, these individuals entrust you with their sensitive personal data.
This could be anything from their addresses, passwords, credit card info, and everything you don’t want in the hands of the malicious types.
For this reason, your website must be in tip-top shape in the security department. If you sell courses with WooCommerce, this is not a problem.
Firstly, being a WordPress plugin, WooCommerce enjoys regular updates, code reviews, and a team of dedicated experts that maintains the platform’s security.
Secondly, WordPress offers many secondary security plugins that add more security features to your site, ensuring your students shop and enjoy your course with peace of mind.
But even with all these security layers, don’t forget to play your part as well. For instance, use SSL certificates, keep regular backups, and only allow trusted users admin access.
You Own Your Data
Another benefit of selling your courses with WooCommerce as opposed to 3rd-party platforms is you own your data.
Instead of creating an account (or rather “renting” space) to sell your course, you own a business and all the data that comes with it.
Why is this an advantage?
A third-party learning platform can shut you down because of “violating” their term and conditions. Perhaps you didn’t violate their terms but they were bought by another company and changed the order of operations.
In other words, you don’t have complete control over your course business and could lose all your efforts at any moment without notice.
When selling your courses with WooCommerce, nobody can close your business for whatever reason. Of course, the assumption here is you don’t violate other government laws.
In addition, remember to comply with GDPR and other data regulations, which are easy to implement with WooCommerce.
Robust Analytics and SEO Tools
As you sell your courses with WooCommerce, you want to see how your business performs, so you can make adjustments as needed.
Maybe one of your courses is gaining good traction while the other is a complete flop. With analytics, you can easily tell where to channel your resources, and which courses (or marketing activities) need to bite the dust.
WooCommerce comes with powerful analytics tools that offer insightful data so you can tell how customers interact with your courses, and the website in general.
From customer statistics to sales reports, this helpful data can help you make informed decisions and plan for business growth strategically.
But that’s not all.
Getting found in search engines such as Google is a great way to drive more traffic to your courses and boost sales.
WooCommerce is designed to follow the best SEO guidelines, allowing you to use keywords and optimize your course pages to rank higher in search engines.
In addition, you can integrate it with an SEO plugin of your choice to further boost your course’s search engine visibility like a pro.
Community and Support
While exciting, running a course or any online business has its fair share of challenges. Something will inevitably break from time to time.
At these times, you need high-quality support to help you fix problems that could potentially cripple your course.
If you sell courses with WooCommerce, this isn’t an issue.
Firstly, WooCommerce has a bustling community at WordPress.org. These are contributors, developers, testers, store owners, and other enthusiasts eager to lend a hand.
They develop free plugins for the platform, post in forums, share tips, and support each other by answering questions. If you have an issue with WooCommerce, there is probably a solution within the community.
On top of that, WooCommerce comes with detailed documentation that shows you how to set up everything from start to finish.
Moreover, WooCommerce boasts a dedicated support team with experienced experts ready to help you 24/7.
These are a few benefits of selling courses with WooCommerce. Most other eCommerce solutions can’t measure up.
With the benefits out of the way, let us now learn how to sell courses with WooCommerce.
How to Sell Courses with WooCommerce

The following section covers how to sell courses with WooCommerce.
The method involves selling courses as WooCommerce products. It is a fun project and perfect for individuals who love tinkering and learning new things.
I will also do my best not to skip any steps.
Let’s start.
Set Up WooCommerce to Sell Courses as Products
Installing WooCommerce
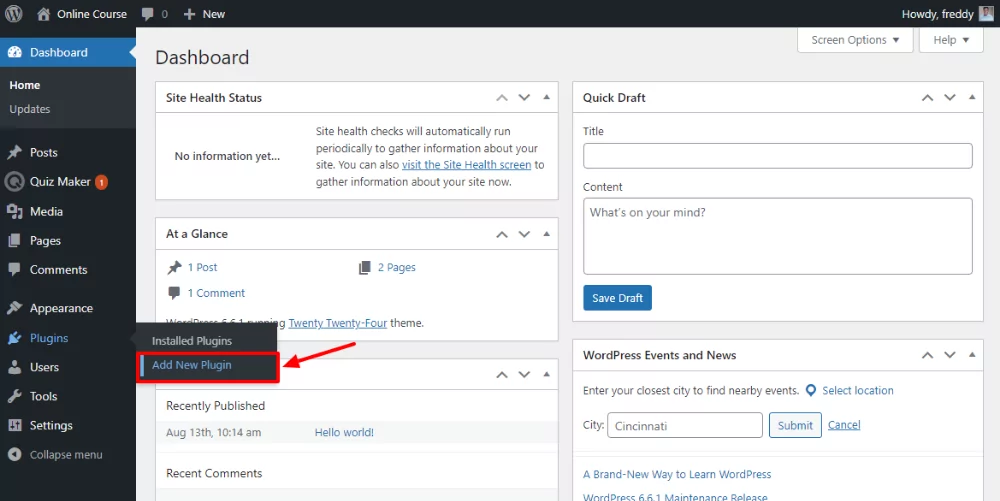
Whether you’re starting with a fresh WordPress installation or adding courses to an existing WooCommerce store, let us install the plugin for the sake of someone who is all new to this.
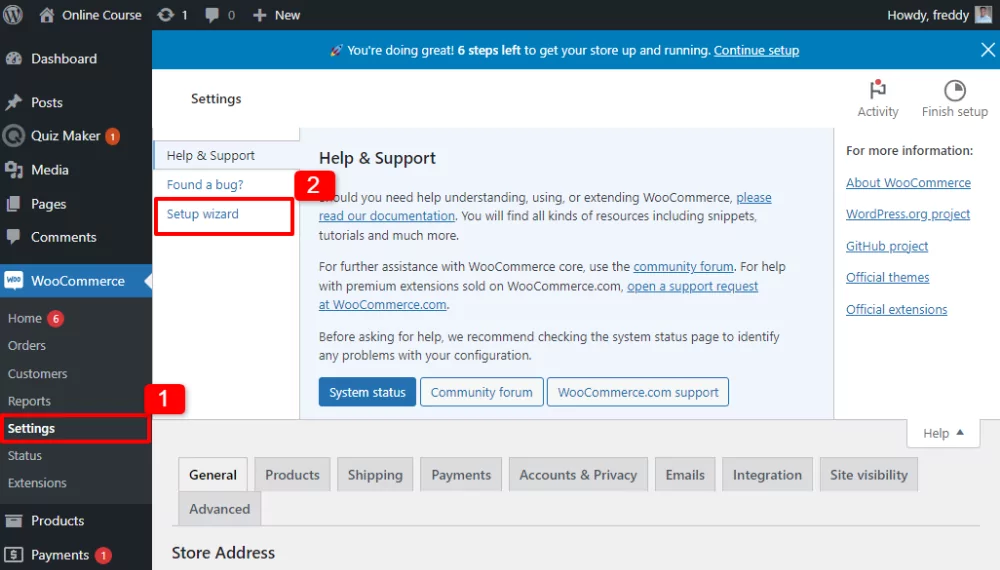
In your WordPress admin dashboard, navigate to Plugins → Add New Plugin:
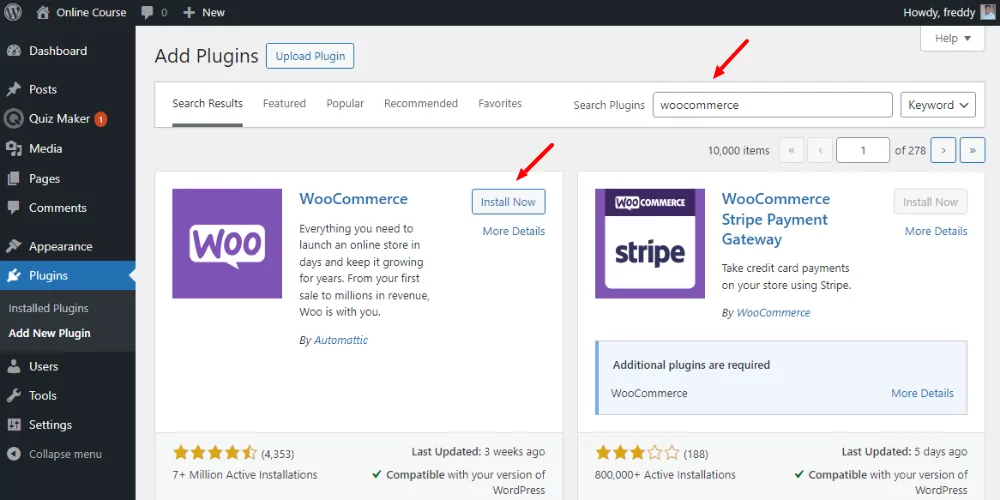
After that, enter “WooCommerce” in the keyword search box, and click Install Now.
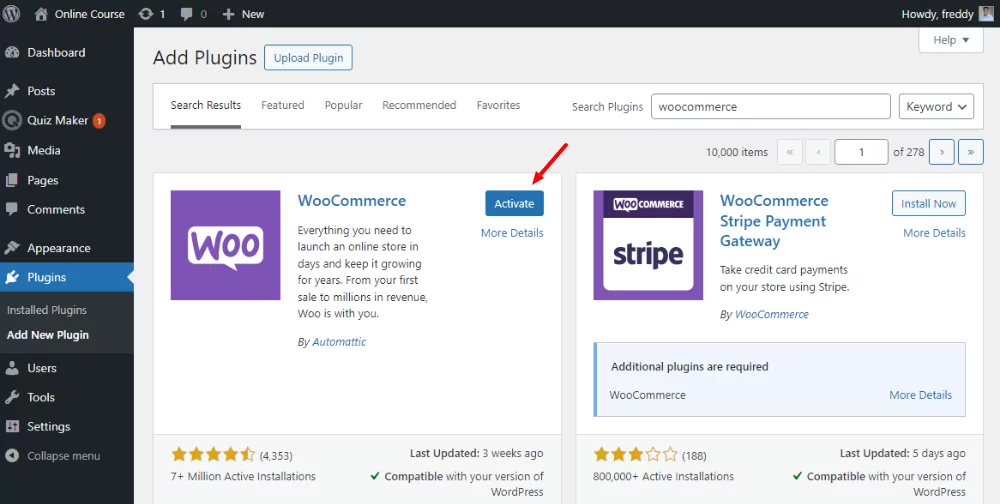
Next, click Activate to get the ball rolling.
Doing so should launch the quick setup wizard automatically. If that doesn’t happen, you can launch the setup wizard by navigating to WooCommerce Settings → Setup Wizard, as shown below.
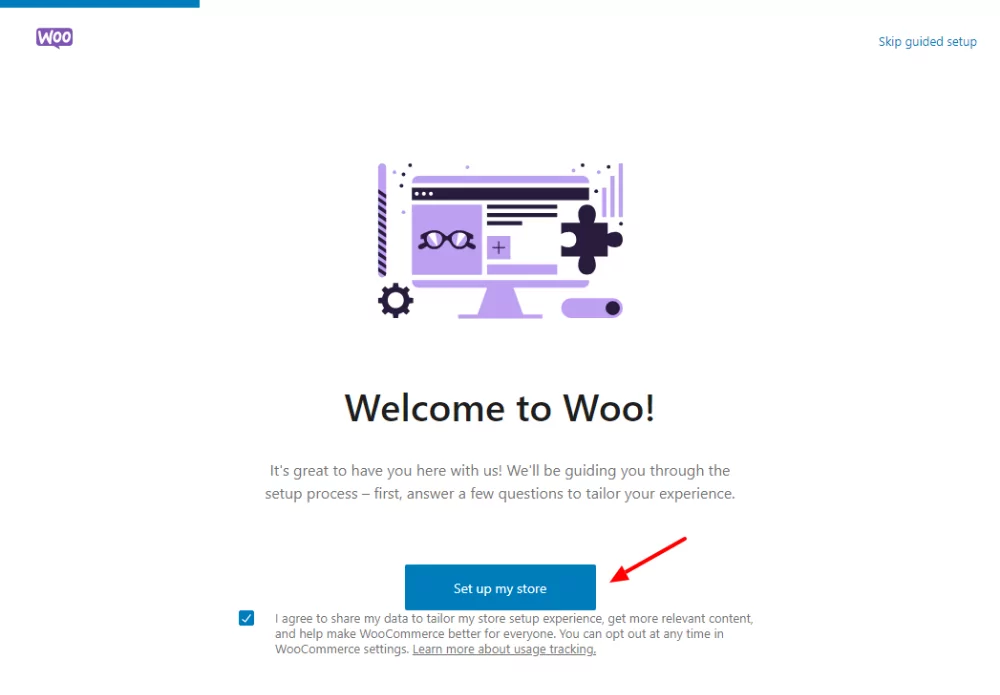
One more click and you end up on the following setup wizard. Click the Set up My Store button to get started.
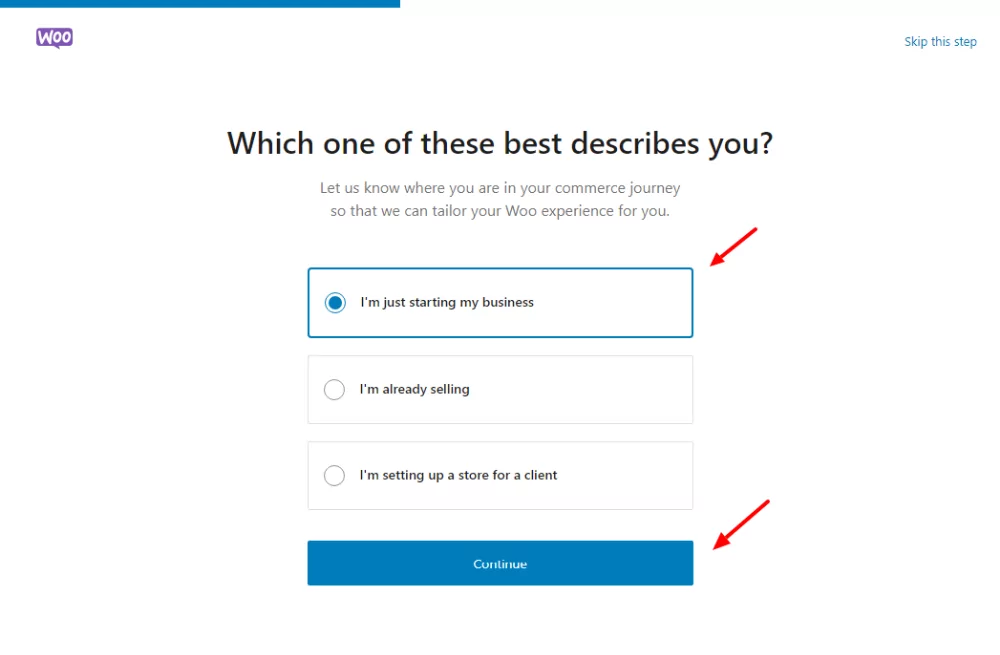
On the next page, check “I’m just starting my business,” if it’s your first time, and click Continue. You can choose any other option, but let’s stick with this one for now.
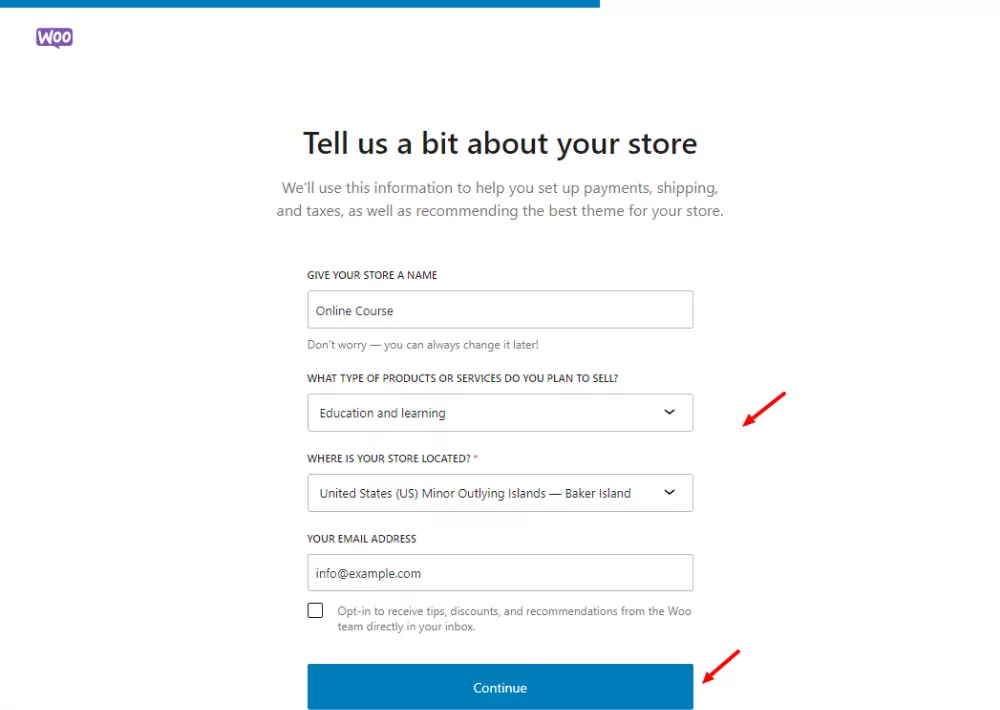
After that, enter the relevant business info (don’t worry, you can refine these details later in WooCommerce Settings) and click Continue:
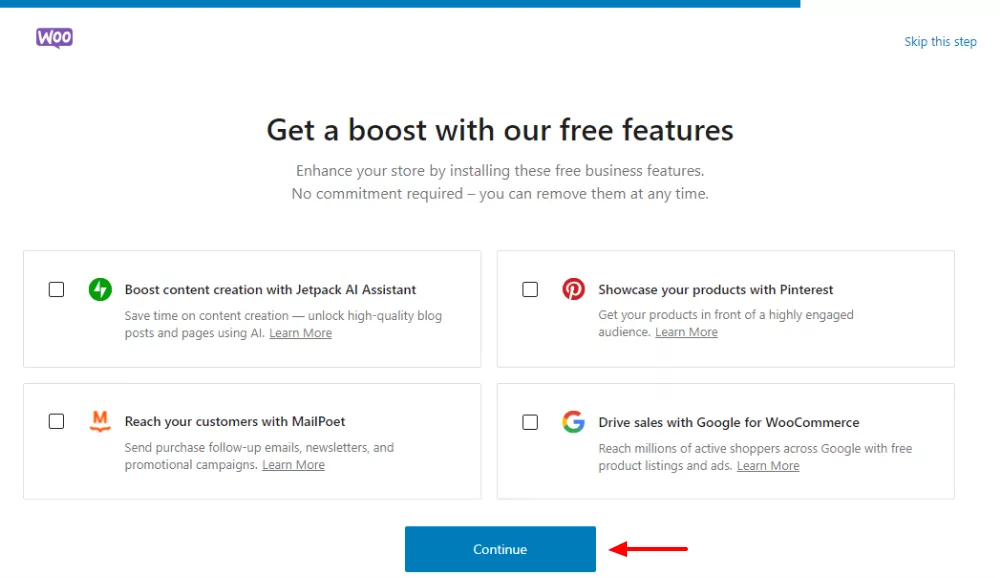
Next, WooCommerce offers you a few features to enhance your store. There is Jetpack AI Assistant to boost content creation, Pinterest, MailPoet to help with email marketing and Google for WooCommerce for product listings and ads.
Pick what you need and click Continue, but I left everything blank for this tutorial. After all, you can add these features later.
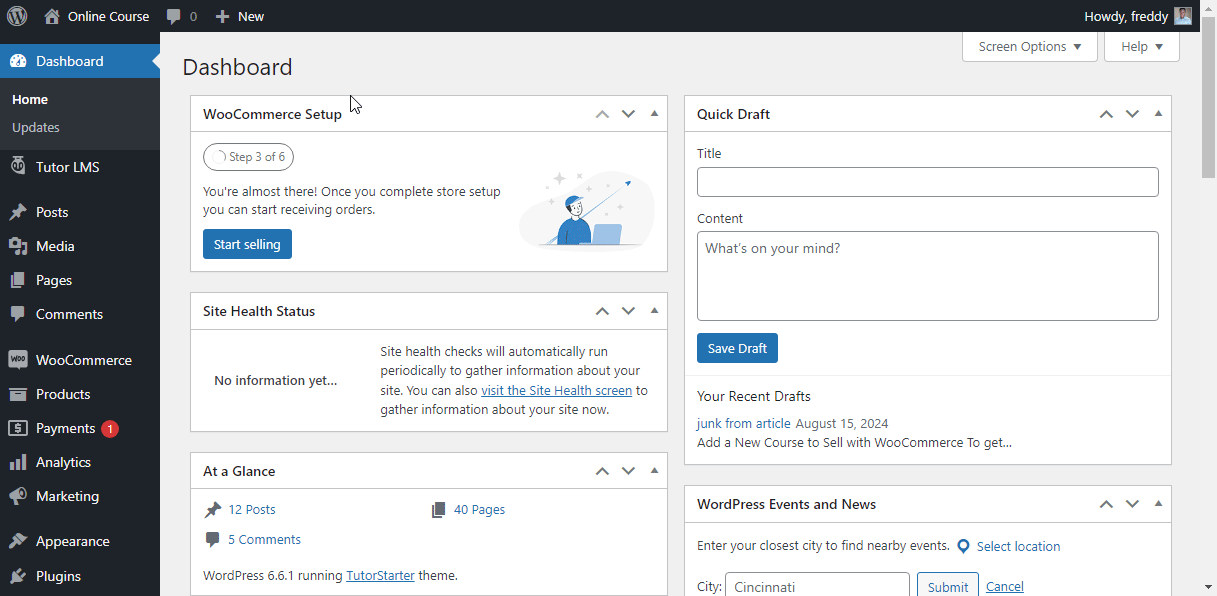
And that’s it. You will be redirected back to the WordPress admin dashboard where you can set up the rest of your store and add products.
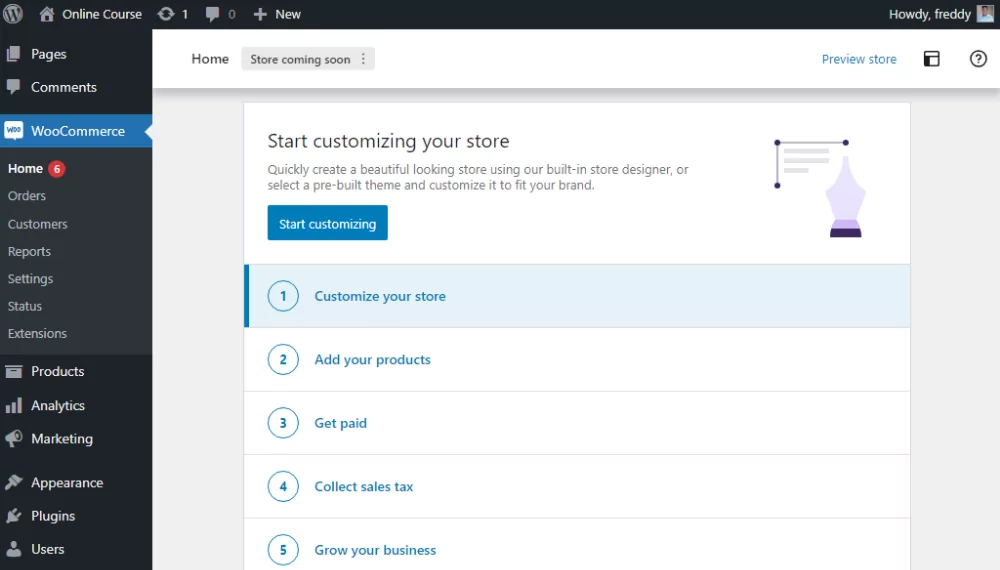
You have set up the initial settings and can even add products without hiccups. WooCommerce has created these default pages: Cart, Checkout, My Account, Shop, Refunds Policy, and Privacy Policy. You can create custom pages later but that’s nonessential at the moment.
Later, you can change your theme and customize your website to your heart’s content. For now, let us focus on adding a payment gateway, which allows you to sell your courses with WooCommerce.
Configuring Payment Gateways to Sell Courses in WooCommerce
Before we get ahead of ourselves, let us configure payment gateways. While you can add products and courses with WooCommerce and an LMS, it means nothing if you can’t accept payments.
It’s important to note that WooCommerce supports over 75 payment providers through its official extension store.
The payment gateway you choose will depend on your preferences and business needs. All the same, configuring most major providers is a walk in the park.
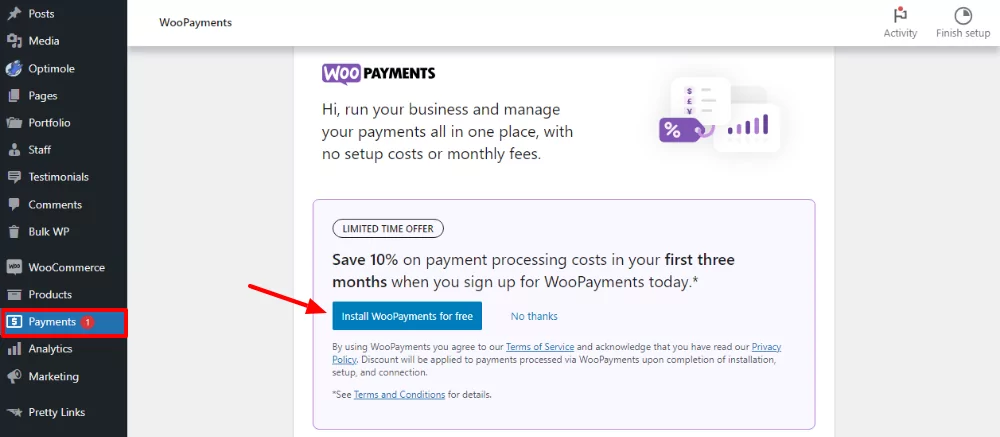
The easiest way to integrate popular gateways with your WooCommerce store is through the WooPayments plugin.
Install WooPayments
Inside your WordPress admin dashboard, navigate to WooCommerce → Payments, and click Install WooPayments for free.
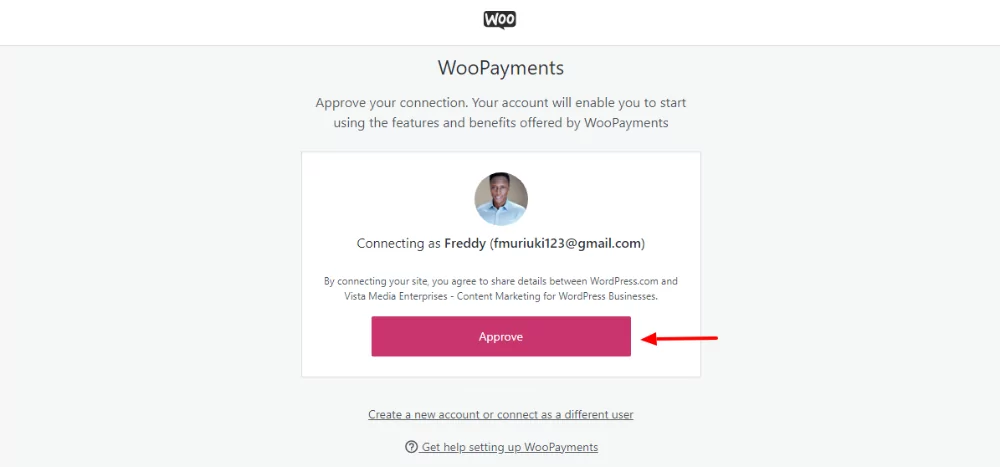
Next, click Approve to connect your WooCommerce store to WordPress.com.
After that, choose the type of business and click Continue.
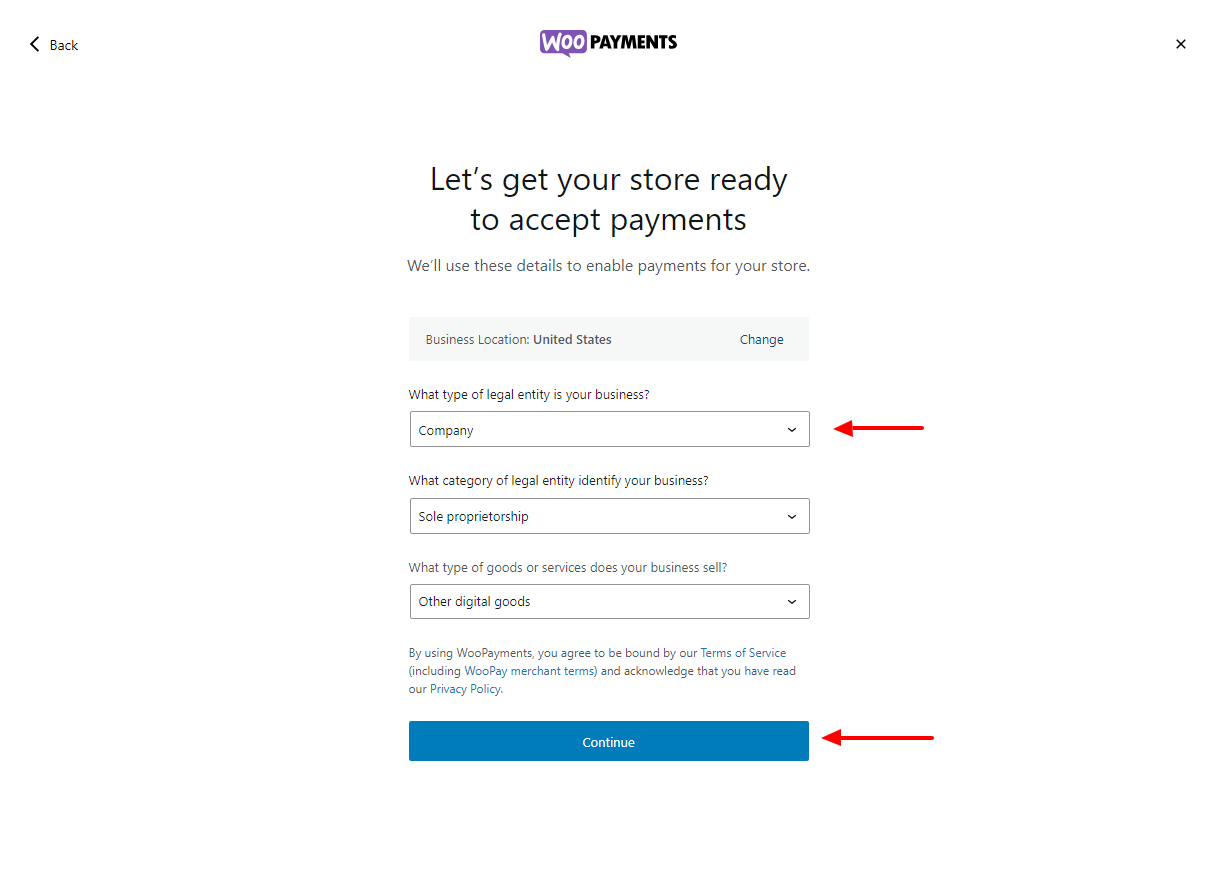
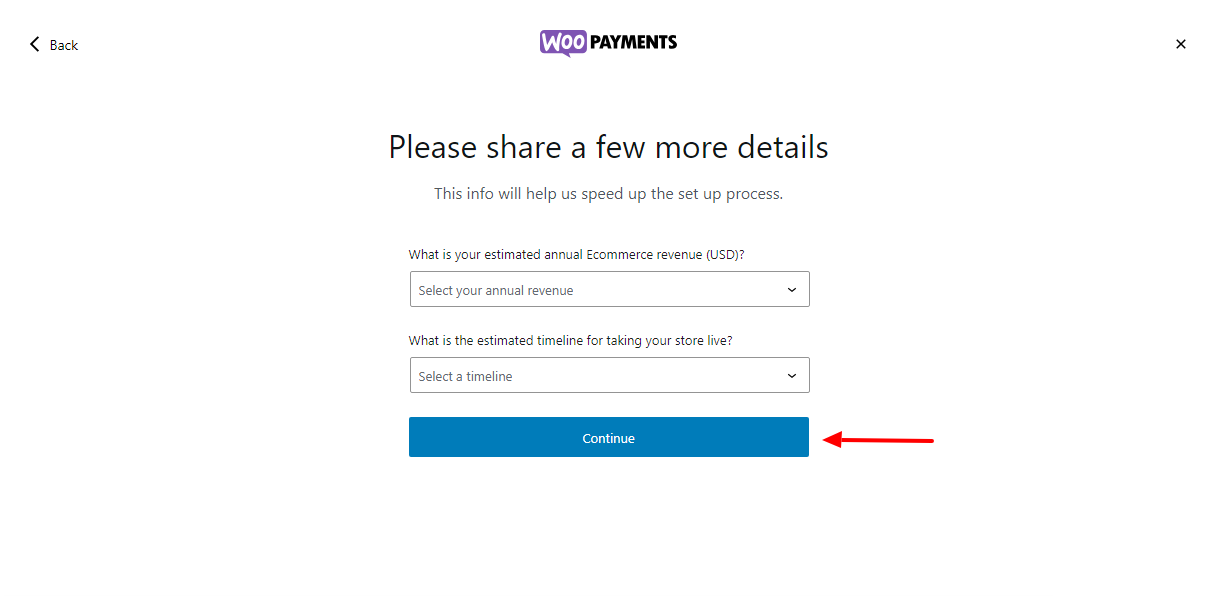
After that, select your estimated annual eCommerce revenue, and the expected timeline to take your store live. Click Continue.
After this step, you will be redirected to verify your identity with Stripe. After that, you can receive payments from major credit card providers.
If you can’t use Stripe, you can still receive payments via PayPal, which allows you to accept card payments. This payment gateway supports more countries and currencies as seen in this WooCommerce Payments vs PayPal comparison post.
First, install and activate the PayPal Payments plugin from WooCommerce.
Next, click this link to complete the PayPal setup process:
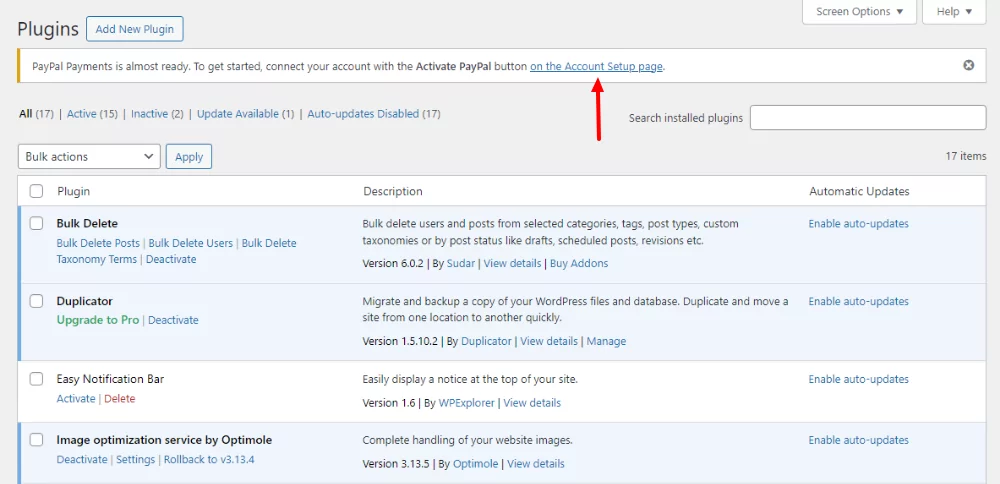
Clicking on the link will lead you to the payments tab in WooCommerce settings, where you can complete your PayPal setup.
Next, choose to securely accept major credit and debit cards and click the Activate PayPal button, as shown below.
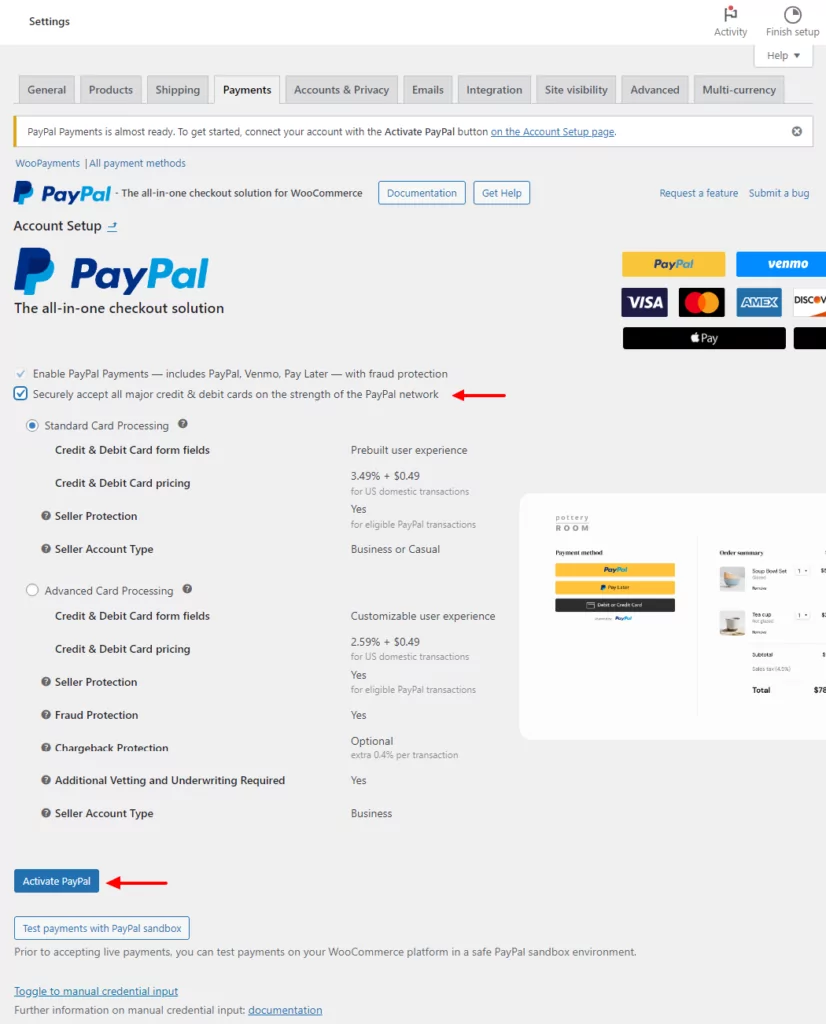
After that, a popup will appear that lets you connect to your PayPal account:
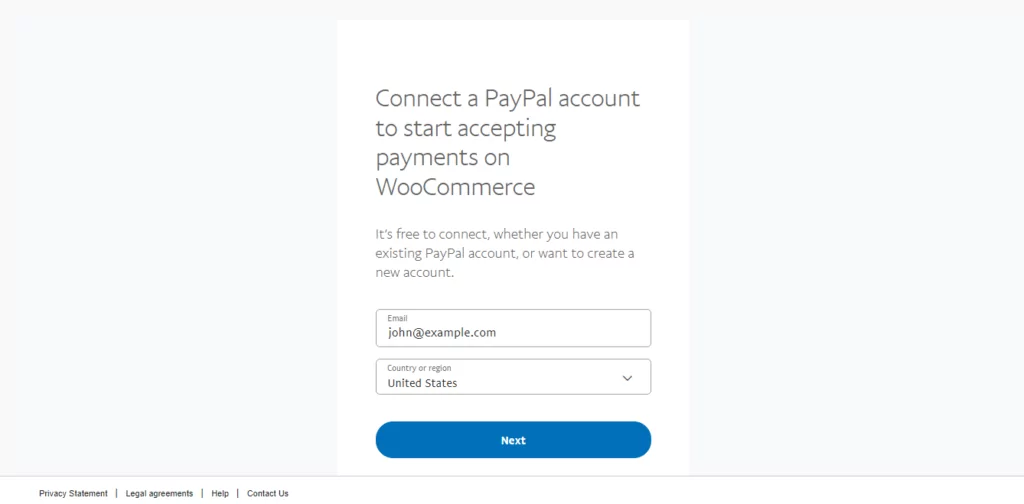
After you go through the regular checks, you can accept payments via PayPal. Easy peasy.
Setting up payment gateways in WooCommerce is easy we don’t expect you to run into any problems.
Let us move on, and sell our first course with WooCommerce.
What to do?
We recommend working with a fully-fledged learning management system such as Tutor LMS or LearnDash to manage course content and student progress.
Then use a membership plugin such as Paid Member Subscriptions to manage course access, set up subscription plans for course bundles, and restrict content based on membership levels.
Let’s learn how to integrate WooCommerce with a learning management system.
Integrate WooCommerce with Tutor LMS
If you’re serious about selling courses with WooCommerce and building an online learning platform you will be proud of, you need a robust LMS that means business.
Tutor LMS is one such LMS, offering you a wide range of features and tools to sell courses without breaking the bank. Or your back.
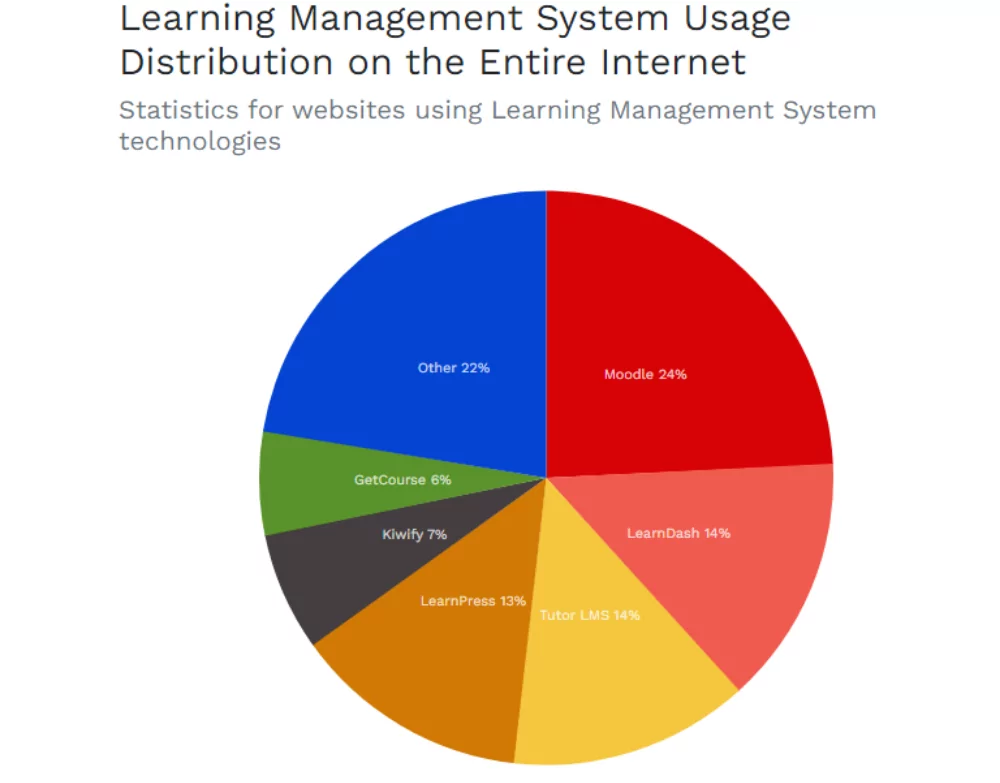
Why did I choose Tutor LMS? Firstly, according to BuiltWith, it’s one of the most popular learning management systems, going head-to-head with Learndash.
Why is it so popular? Tutor LMS features an intuitive interface and is easy to use you should be up and running in minutes. It’s flexible and highly customizable, making it a popular choice for many industries.
The LMS has powerful features such as quizzes, video content, surveys, student progress, options to create lessons specific to your needs, and more.
Besides that, it integrates seamlessly with WooCommerce allowing you to sell courses effortlessly. Other than that, Tutor LMS has amazing support, documentation, and a free plan.
Let’s integrate it with WooCommerce.
Install TutorStarter WordPress Theme (Optional)
Assuming you’re working with a fresh WordPress install, let’s begin by installing TutorStarter, a free WordPress theme made by the same company behind Tutor LMS. Now, of course, if you’ve already designed your website, you can safely skip this step.
The theme is available in the official theme repository meaning you can install it right inside your WordPress admin dashboard.
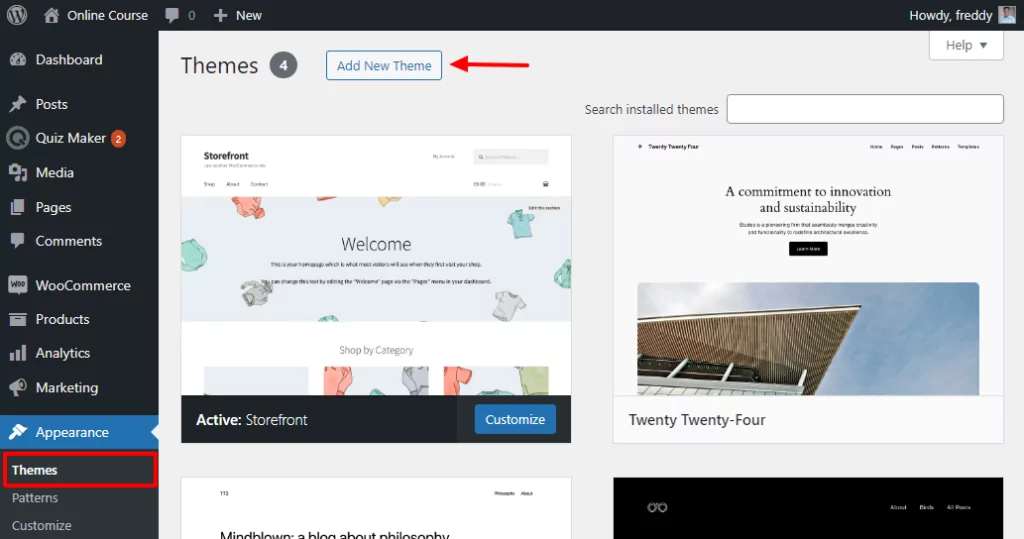
Go to Appearance → Themes → Add New Theme.
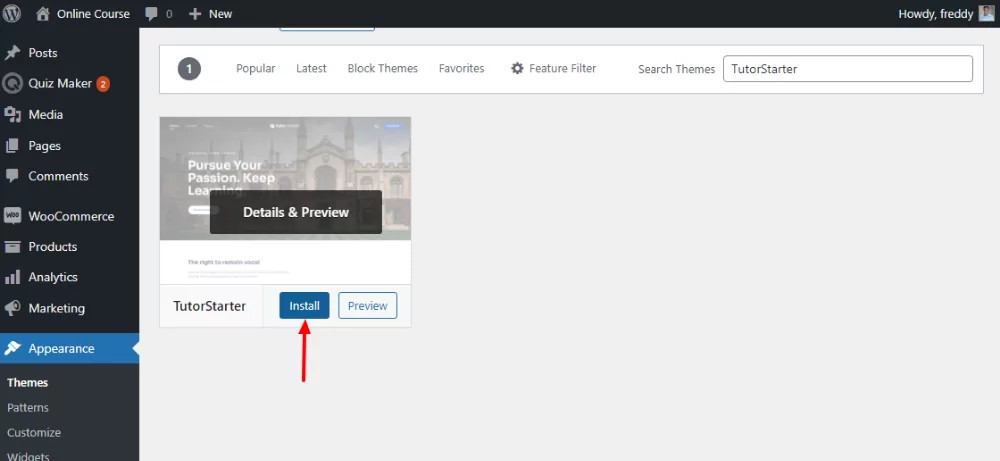
Then search “TutorStarter” and click Install as shown below:
Next, activate the theme on the next screen.
Install TutorMate Plugin
After activating the theme, you will be prompted to install a nifty plugin known as TutorMate. Go ahead and click the Begin installing plugin link:
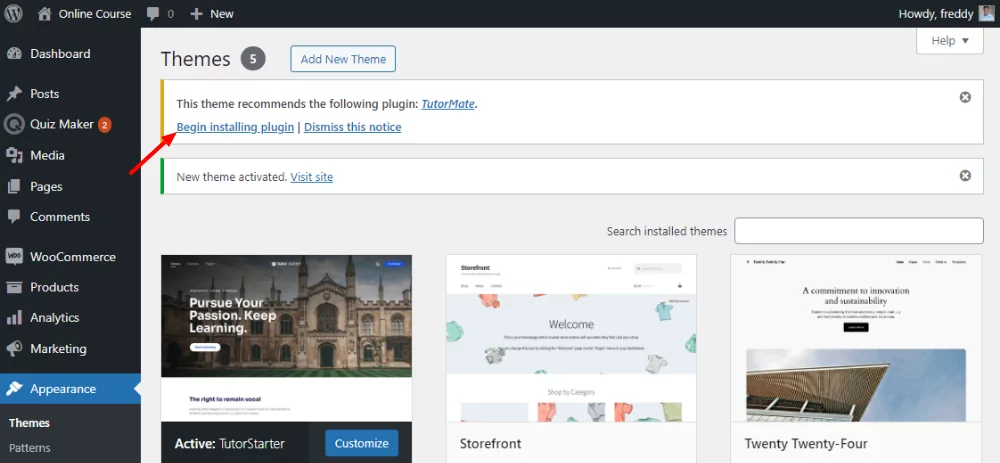
After installing and activating TutorMate, go back to your dashboard and navigate to Tutor Starter → Starter Sites:
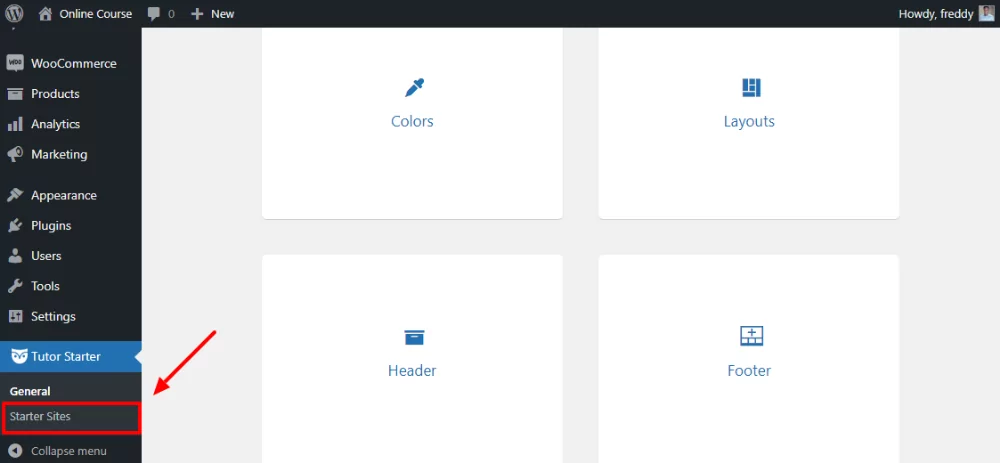
This will lead you to a page that lets you import a premade demo site so you can start right away. Sure, you can use your theme, but there is no doubt that this is a much faster way to ship out your course. These demos are especially useful for people who aren’t tech-savvy.
Let us move on.
Import TutorStarter Demo Site
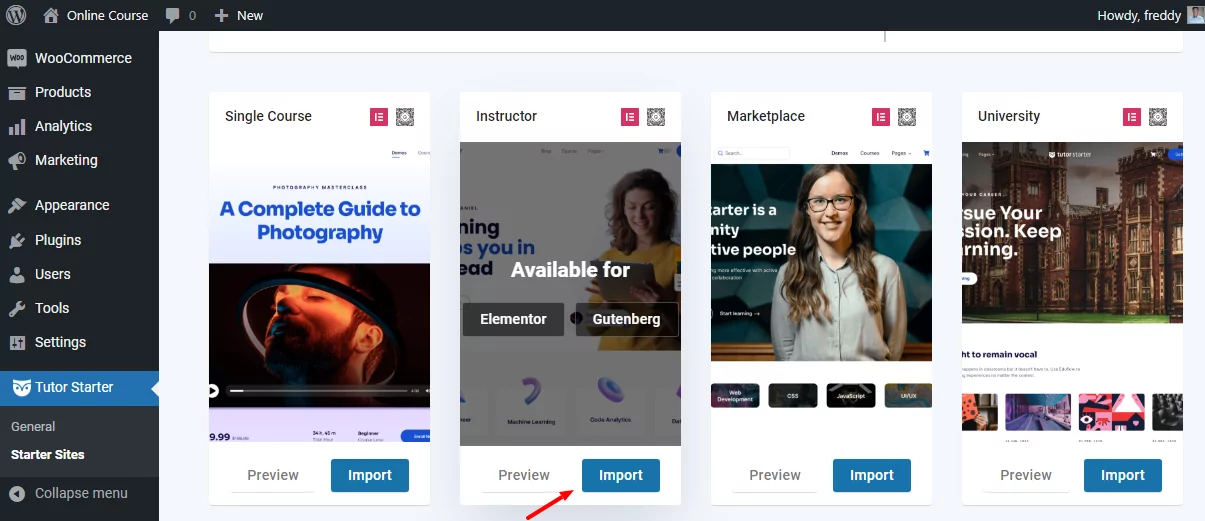
You can choose from four demo sites: Single Course, Instructor, Marketplace, or University. Each comes with unique features designed for its purpose.
For instance, if you want to create a single course, you’d choose the first demo site, and so on. Note that you can preview the demo sites before importing, so you know what you’re getting.
For this tutorial, let us go with the Single Course demo site. Click on the Import button, as shown below.
After that, you can choose the page builder you’d like to use. For this demo site, I decided to go with Gutenberg as opposed to Elementor. For some reason, I have a growing liking for the WordPress block editor nowadays.
Choose the page builder of your choice and click the Import Now button, as shown below.
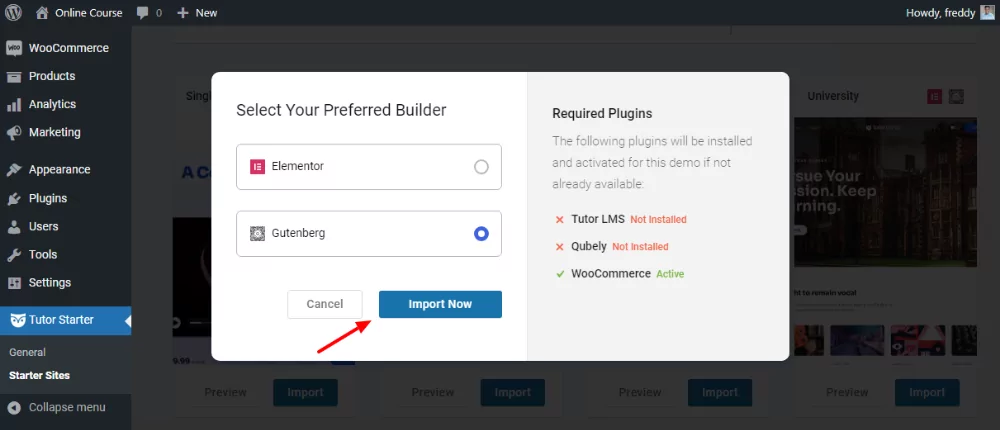
Note that the importer will automatically install all the required plugins, including Tutor LMS and Qubely. You don’t have to install anything manually. Speak of convenience.
Give the demo importer a few seconds to finish…and as you can see below, my course website is already taking shape.

Complete Your Site Setup
From here, you only need to configure some settings, add courses, and customize the website, and you are ready to rock and roll!
But wait…(and this part is totally optional but highly recommended)…
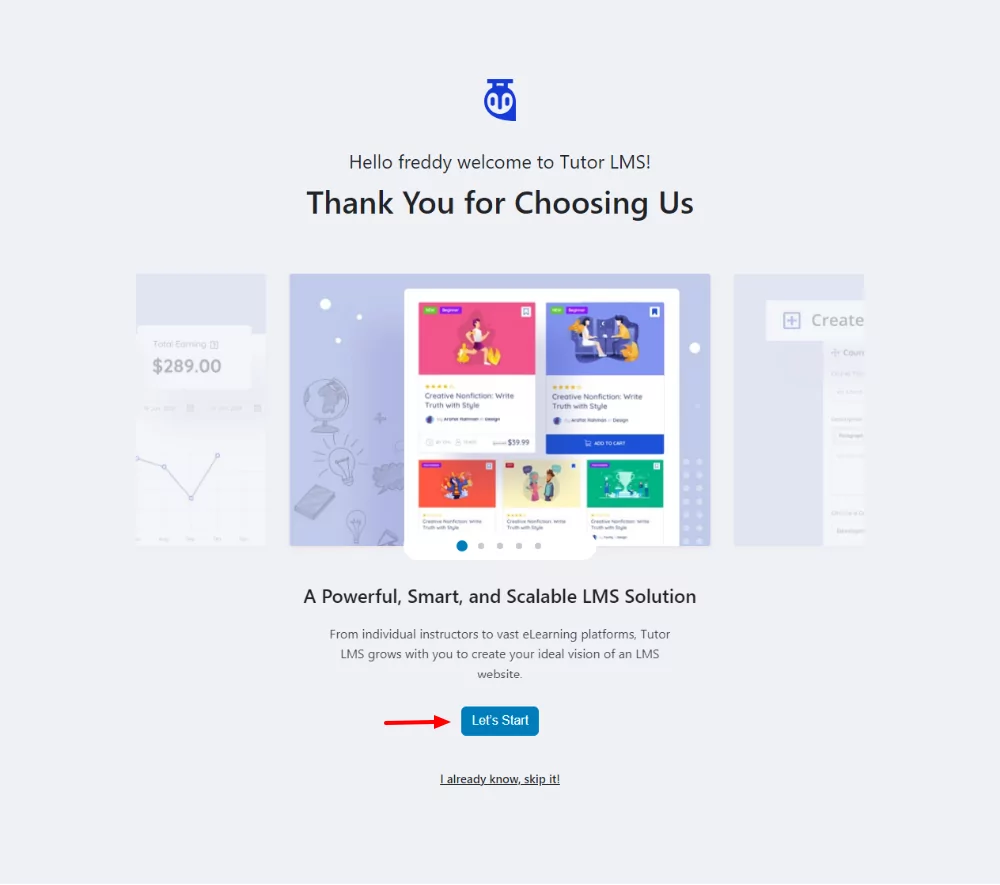
If it’s your first time, you will be redirected to the Tutor LMS quick setup wizard when you try to access the WordPress admin dashboard.
No need to panic, simply click the Let’s Start button, as shown below. Besides, you can skip the setup wizard by clicking the “I already know, skip it!” link.
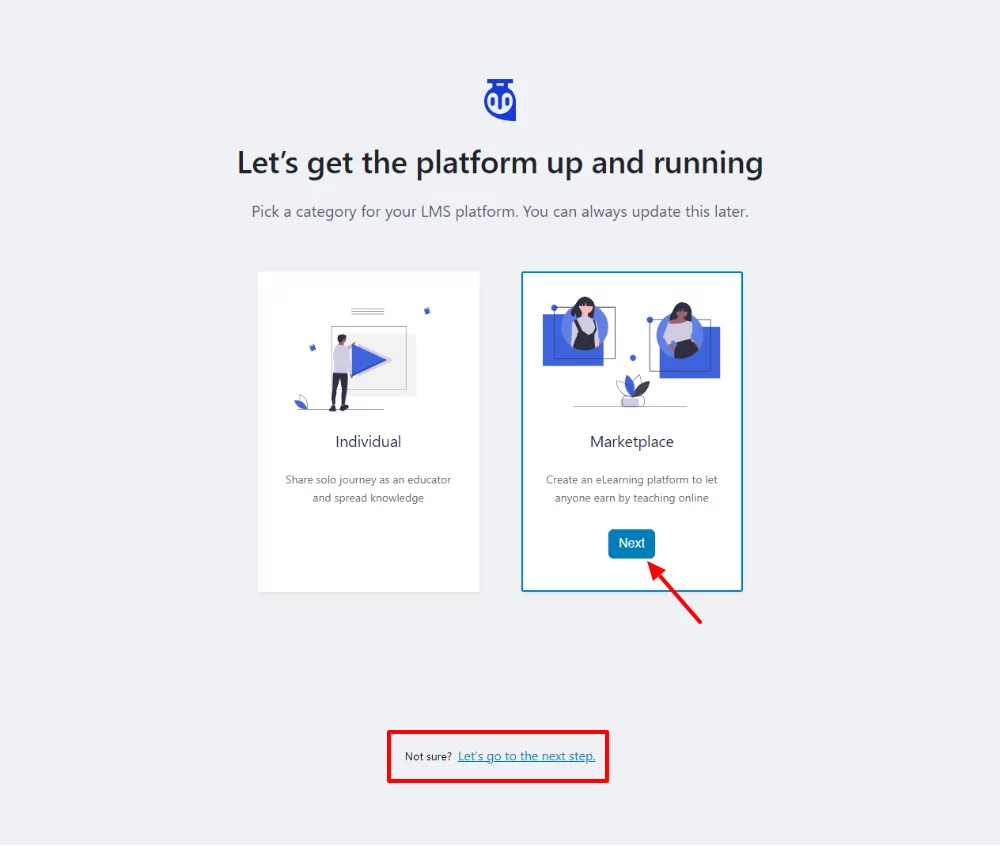
After that, choose a category for your LMS platform. It could be Individual if you want to sell courses solo, or Marketplace if you want to create an eLearning platform where other educators can join to share knowledge and earn money. You can always change this later.
Pick the category that works for you and click Next, or skip to the next step if you’re not sure.
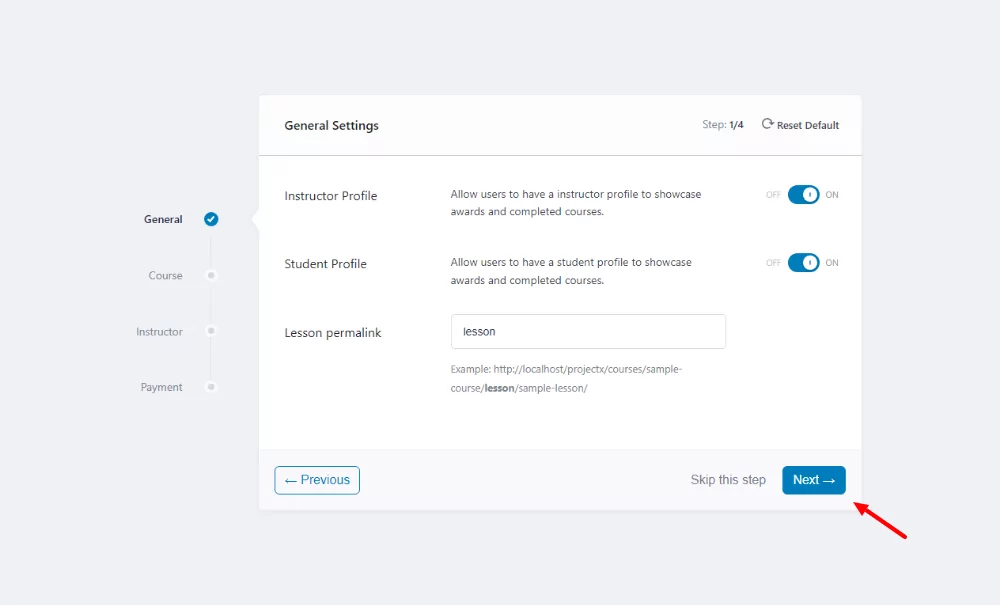
The next step is self-explanatory. Turn on your instructor and student profiles, set your lesson permalink, and hit Next.
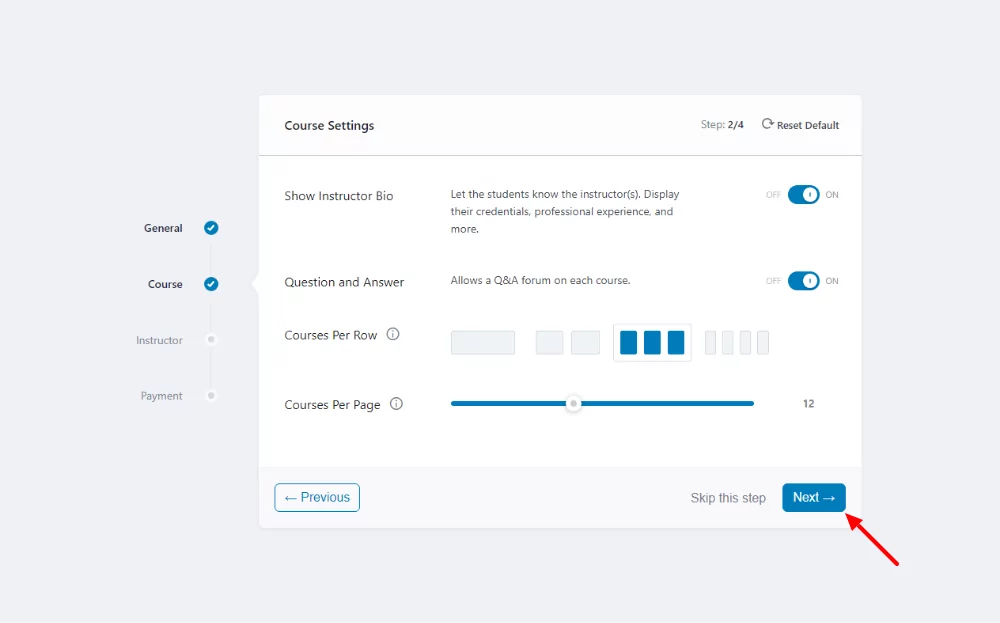
You’re doing just fine. Next, activate the instructor bio, a Q&A forum on each course, and choose the number of courses to show per row and page. Click Next.
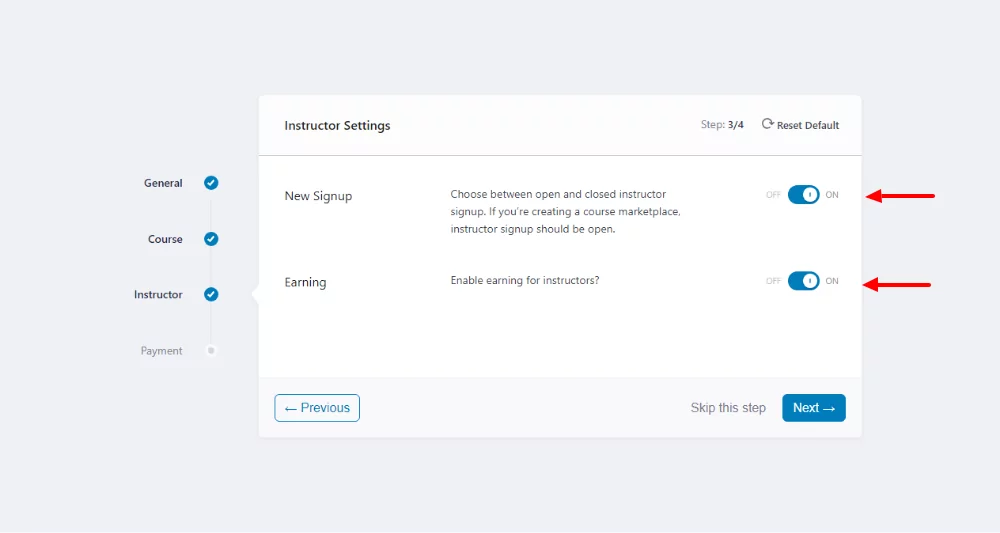
Next, we need to set the instructor settings. Since I chose the Marketplace category earlier, instructor signups should be open. Also, I would like to enable earnings for my instructors. You don’t need these settings if you’re creating a solo LMS platform.
After that, click Next, as shown below.
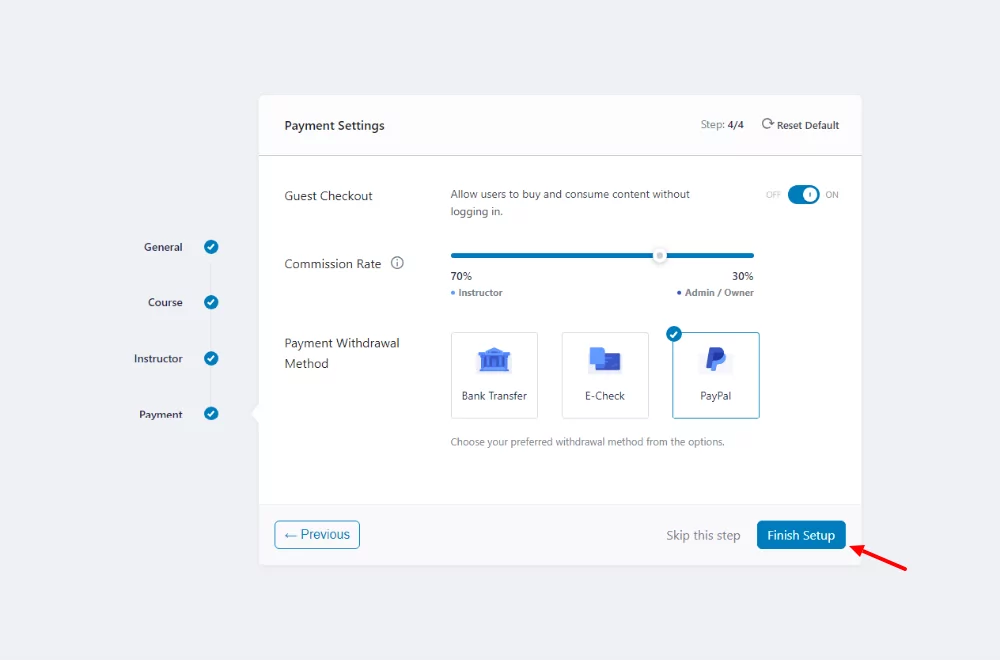
On the next screen, you can choose your payment settings. You can allow guest checkouts, set a commission rate, and choose your preferred withdrawal method. Choose your settings and hit the Finish Setup button.
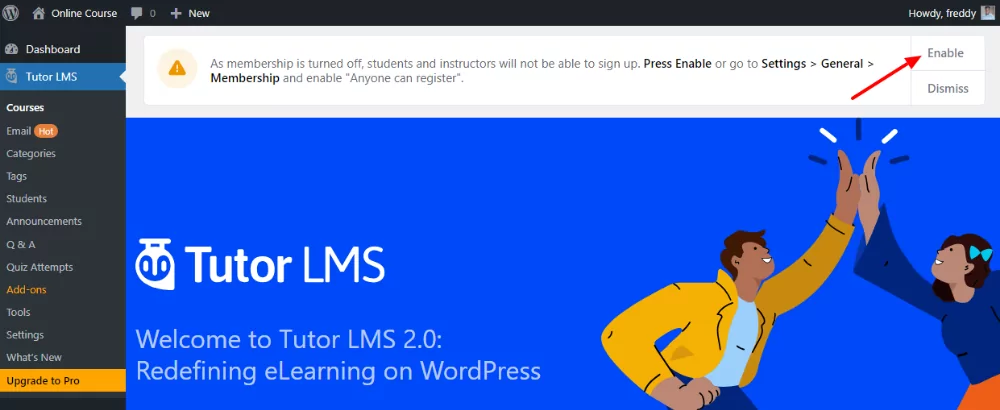
Doing so redirects you to the Tutor LMS dashboard in the WordPress admin. First things first, you must turn on the membership feature so that students and instructors can sign up.
It’s simple. Click the Enable button within the Tutor LMS dashboard or go to Settings → General → Membership and enable “Anyone can register”.
As simple as A, B, C. Now you’re ready for the fun part.
Next, let us enable WooCommerce monetization in Tutor LMS to sell courses.
Enabling WooCommerce Monetization in Tutor LMS
To sell courses with WooCommerce and Tutor LMS, you need to enable WooCommerce monetization in your Tutor LMS settings, which is also as easy as pie.
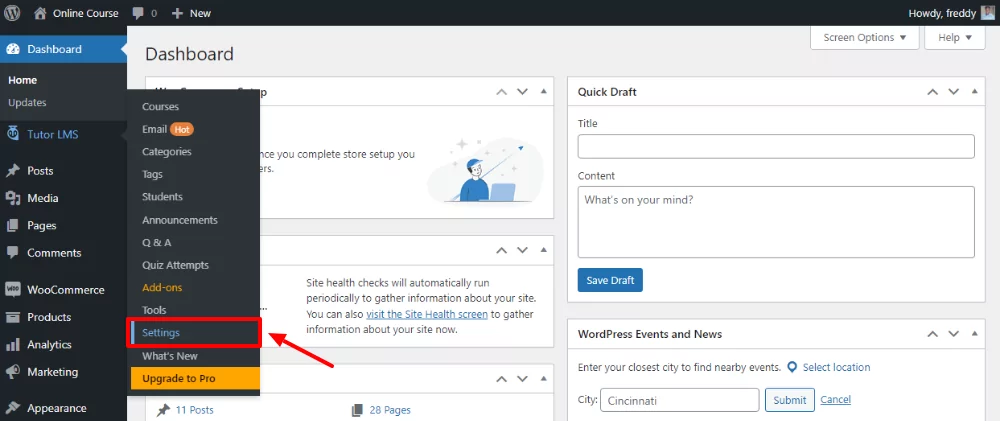
Navigate to Tutor LMS → Settings, as shown below.
After that, click the Monetization tab, choose WooCommerce as your eCommerce engine, and click Save Changes.

There are lots of other settings on this page to customize your LMS platform. For now, however, let us move on and create a WooCommerce product.
Create One-Time Purchase Courses
You must be excited to add your first course to Tutor LMS, but for that to work you must first create a corresponding WooCommerce product.
Create a WooCommerce Product
As with anything WooCommerce, this is super-duper easy.
Go to Products → Add New in your WordPress admin dashboard.
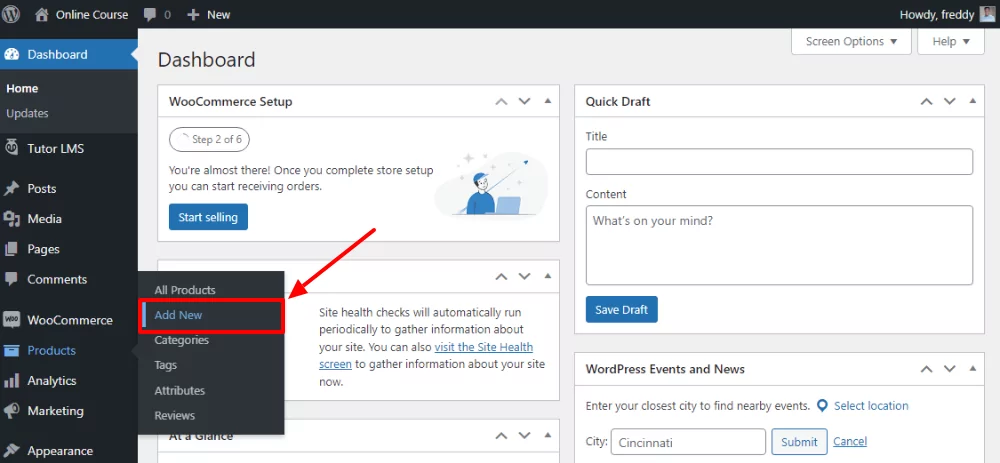
Next, enter your product details including name, description, and price. The most important thing is to ensure you’ve enabled Simple Product, Virtual, and For Tutor under the Product Data section, as shown below.
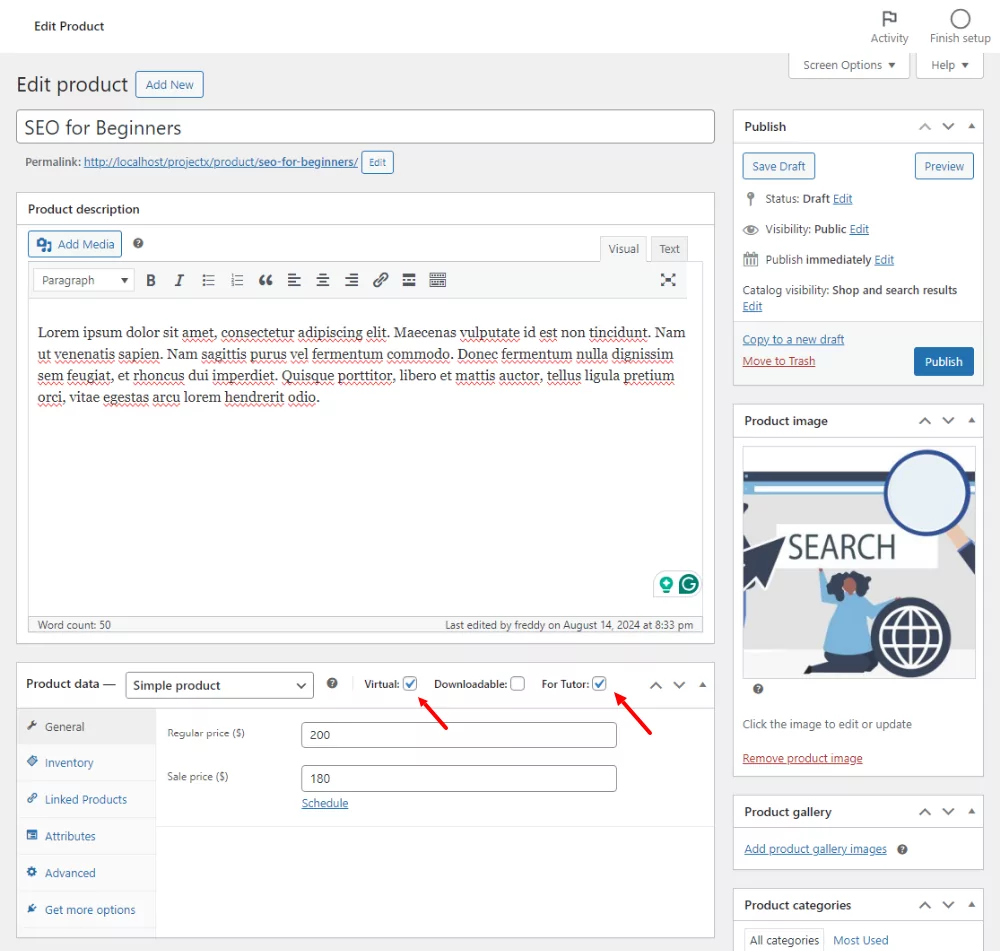
Finally, click Publish. Note that the WooCommerce product price will set the price of the corresponding course you want to create.
You’re ready for the next part.
Add New Course and Link WooCommerce Product
To sell a course with WooCommerce, you must link it to the corresponding WooCommerce product.
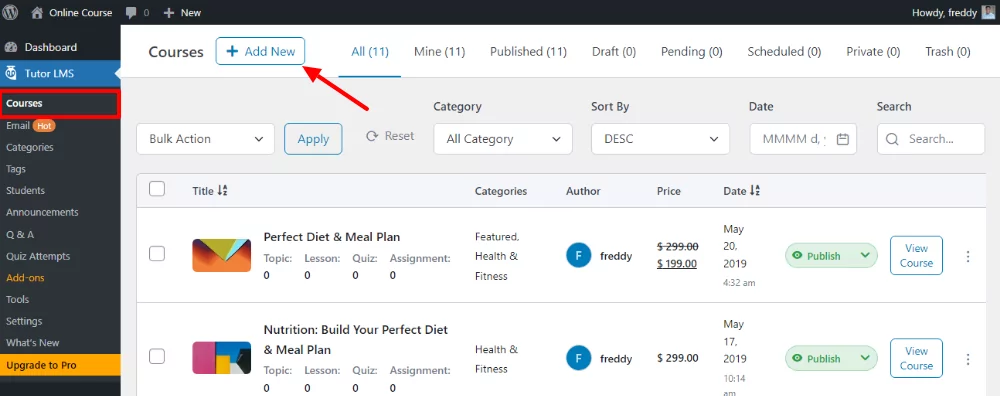
Since we’ve already created a WooCommerce product, let us add a new course in Tutor LMS.
Go to Tutor LMS → Courses and click the Add New button, as shown below.
Tutor LMS comes with a robust course builder that allows you to customize multiple aspects of your course.
After you’ve set course details such as name, description, lessons, and so on, you must link it to the corresponding WooCommerce product you created earlier.
To do that, scroll down to the Add Product section, select Paid, and choose the WooCommerce product, as shown below.
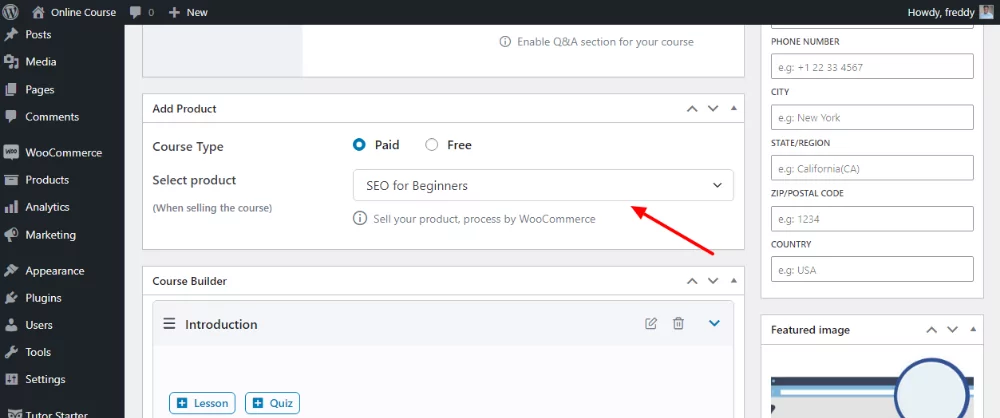
After that click, Publish.
Here’s how my example “SEO for Beginners” course looks on the website.
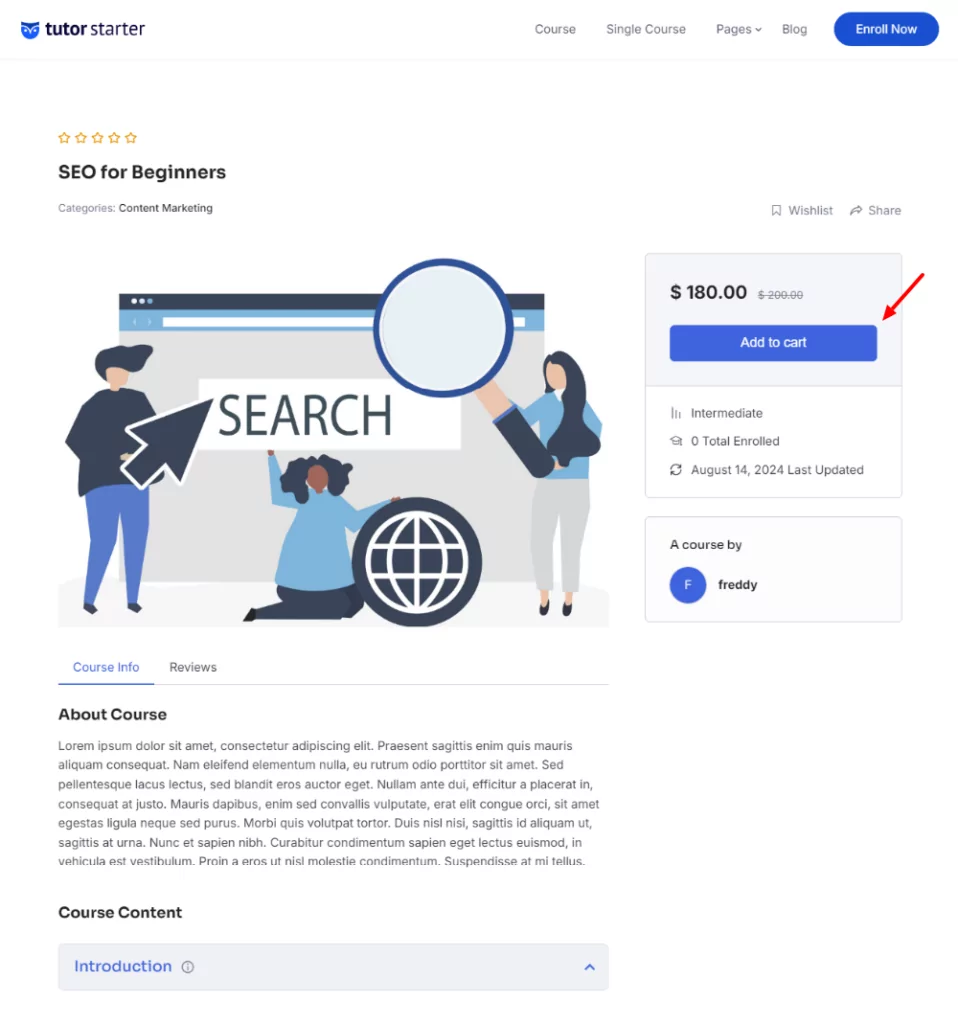
If someone buys the course, they will be directed to the WooCommerce checkout page, where they can purchase via the different payment gateways we activated earlier.
Earn Recurring Revenue by Selling Access to Courses
You’ve just learned how to sell a TutorLMS course as a WooCommerce product. In other words, as a one-time purchase individual course.
But what if you want to offer your visitors a whole learning platform, where they pay a subscription in exchange for access to your constantly growing courses? You could create different subscription tiers with different types of access and different price points.
This will help you grow a community of people who constantly want to learn and better themselves while earning a constant stream of revenue.
So, let me introduce Paid Member Subscriptions as an effective plugin to restrict content and create subscription plans.
Paid Member Subscriptions is a powerful membership plugin offering extra control over your courses and content based on membership levels.
After installing and activating the plugin, you access many new features, such as subscriptions, WooCommerce product restrictions, content restrictions, recurring payments, multiple payment gateways, and more.
And do you know what’s even better? The Paid Member Subscriptions plugin integrates seamlessly with both Tutor LMS and WooCommerce.
This means you can easily sell access to courses, create beautiful front-end register, login and reset password forms, and restrict access to your courses.
Setting up everything is as easy as A, B, C. Navigate to Tutor LMS → Settings → Monetization in your WordPress admin dashboard, and set Paid Member Subscriptions as your eCommerce engine.
From there, you can restrict access to your courses like a boss. You will see a Tutor LMS tab under Paid Member Subscriptions → Settings:
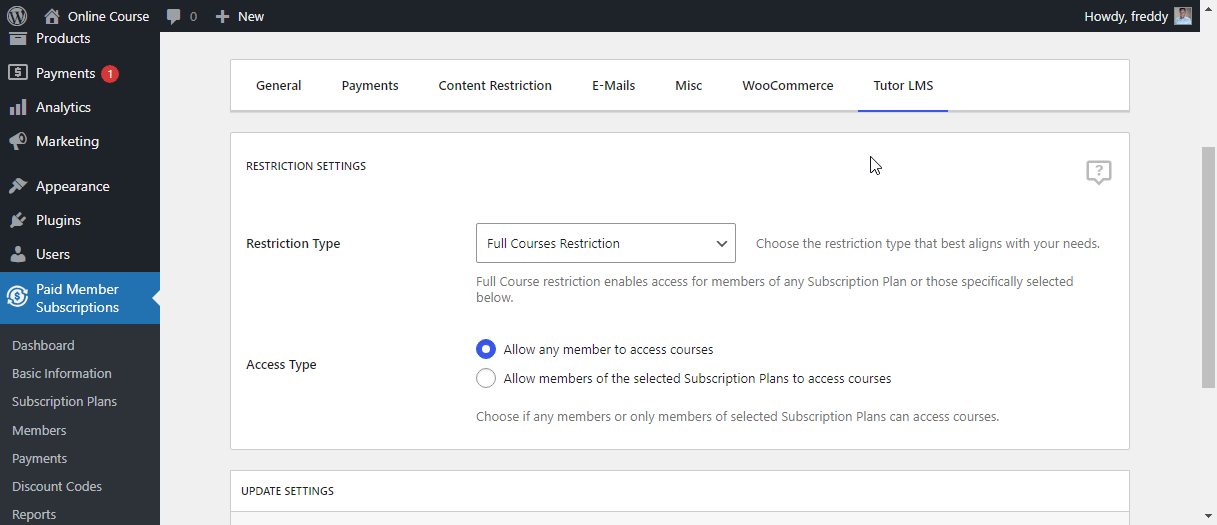
You have three restriction types:
- Full Courses Restriction – Allow all members of your site or only members of a specific subscription plan access to courses. This is great when you want to offer premium members exclusive access to your courses;
- Category Restriction – This allows you to associate Tutor LMS categories with specific subscription plans. Only members of these plans can access courses in the specified categories;
- Individual Restriction – This option enables access for members of specific subscription plans. You can enable automatic enrollment to courses when a membership is created, updated, or changed.
Using these settings, you can control who has access to which course like a boss. Learn more in Tutor LMS documentation.
Earlier, I promised to share tips on creating a pleasant user experience for your students. Seeing as this post is already too long, I will refer you to membership page design best practices. The article offers you great tips on how to design user-friendly pages. Also, check out how to use pricing table templates.
Also, I promised you marketing tips, but for the same reason, I would like to call your attention to membership marketing. The post has lots of ideas on how to market your website.
And speaking of marketing your courses, one of the best ways to build trust and grow your sales is by offering certificates. So, follow this tutorial to create your own certification program for your courses.
Final Words
Selling courses with WooCommerce needn’t be challenging. Just install the plugin, set up your payment gateways, and integrate with a learning management system such as Tutor LMS.
To have more control over your course and maximize your earning potential, consider using a membership plugin such as Paid Member Subscriptions.
Please share your thoughts in the comments and share the article.
Paid Member Subscriptions Pro
Paid Member Subscriptions and Tutor LMS is the perfect combo to grow your course business without breaking the bank. Or your back.
Get Paid Member SubscriptionsRelated Articles

How to Customize the WooCommerce Login Page (No Code Needed)
Searching for a solution to customize the WooCommerce login page and otherwise control login behavior on your WooCommerce store? If you allow (or force) registration on your store, you'll want to create a user-friendly login experience so that your shoppers can easily log in to their accounts and access other key features. In this post, […]
Continue Reading
How to Set Up WooCommerce Stripe Subscriptions with Recurring Payments (3 Methods)
Are you searching for a way to set up WooCommerce Stripe subscriptions? Setting up recurring subscriptions is a great way to build regular, dependable revenue for your website. And when it comes to processing payments, Stripe is one of the top options thanks to its competitive fees and flexible feature set. However, WooCommerce doesn't include […]
Continue Reading
How to Customize the WooCommerce Register Page (Add Custom Fields)
Looking to create a custom WooCommerce register page for your store? Whether you want to create a dedicated registration page or add custom fields to the checkout register form (or both), we're going to show you an easy, code-free way to customize all parts of the WooCommerce registration process. By following this tutorial, you'll learn […]
Continue Reading
Great article, it was really helpful! I’ve been considering using WooCommerce to sell my online courses and this guide gave me a clearer picture on setting everything up.
One thing I’m still unsure about is how Tutor LMS works in tandem with WooCommerce. Can I integrate existing courses or do I have to recreate them from scratch?
Thanks again for this straightforward walkthrough!
Hey Ivy,
Thanks for passing by. Please explain further what you mean or want to achieve and I’ll gladly help