

Table of Contents
- 1 How Profile Builder Enhances Divi
- 2 How to Add Divi Login, Register, and My Account Pages Using Profile Builder
- 3 Divi Membership Site? Consider Paid Member Subscriptions
- 4 Try Profile Builder With Divi Today
Looking for the easiest way to add more robust user profile functionality to your Divi-powered WordPress website?
While Divi offers its own built-in Login module, its functionality is limited and Divi lacks built-in modules for other important parts of your site’s user profile system, such as the registration form.
With the free Profile Builder plugin, you can access dedicated Divi modules for registration forms, login forms, edit profile forms, and password recovery forms, such as the Divi registration module in the screenshot below:
Not only do these modules let you work directly inside Divi, but they also offer a lot more features and flexibility than Divi’s built-in features, such as the ability to fully customize all of the fields on your registration and edit profile forms.
For Divi membership sites, you can also access similar functionality with the Paid Member Subscriptions plugin, including the ability to set up subscription plans on your site.
In this post, we’re going to cover everything that you need to know about setting up Divi login, registration, and my account pages using Profile Builder (or Paid Member Subscriptions):
- How the modules in Profile Builder can help your Divi site (and how they go beyond Divi’s core modules)
- How to add Divi user profile forms using Profile Builder (including login, registration, and edit profile pages)
- How the Paid Member Subscriptions plugin can further build on these features for Divi membership sites.
How Profile Builder Enhances Divi
If you just want to skip straight to the tutorial, you can click this link.
But before I show you how to set up everything, I thought it would first be useful to explain how Profile Builder can give you more flexibility when setting up user profile-related pages on your WordPress site.
Most of these features are available in the free version of Profile Builder at WordPress.org. So, while the premium version of Profile Builder does add some nice new features, you can already access some helpful new Divi user profile features without needing to pay anything.
Here are some of the main reasons to consider using Profile Builder…
More Modules Than the Core Divi Modules
In terms of built-in modules, Divi only offers a Login module. So, while you do have a way to let existing users log in, there’s no built-in way to let users register from the frontend, nor can users manage their profiles from the frontend after they’ve registered.
With Profile Builder (and Paid Member Subscriptions), you can access four dedicated Divi Builder user profile modules:
- Login – you can create a login form and get more flexibility over advanced settings, such as redirecting users to a custom page after they log in.
- Register – you can add one or more registration forms, including assigning different user roles to people based on which form they use.
- Recover Password – you can add a dedicated password recovery page in case people forget their passwords.
- Edit Profile – you can let people edit their profiles from the frontend, including controlling which profile fields they’re allowed to edit.
Option to Customize the Registration and Edit Profile Form Fields
Beyond just adding “a registration form” to Divi, Profile Builder also lets you customize the actual form fields that appear on your site’s registration form (and your edit profile forms).
You can show/hide all of the built-in WordPress user profile fields. Plus, with the premium version, you can also add your own custom fields using a variety of different formats including open-ended text, multiple choice, and more.
This lets you collect additional information from people that goes beyond the core WordPress user profile system.
The premium version also lets you create multiple unique registration and edit profile forms that you can use in different parts of your Divi website. For example, if you have an online course website, you could create one registration form for students and another for instructors.
More Options for Customizing Form Behavior
In addition to customizing the form fields that appear on your Divi registration and edit profile fields, Profile Builder also just generally gives you more options for customizing the behavior of all of your user profile forms.
For example, you can set up custom redirects that send users to different pages on your site after they submit a form (e.g. logging in). While the built-in Divi Login module does let you set up after-login redirects, Profile Builder lets you go even further with setting up custom redirects based on the user who’s logging in.
For example, let’s continue with the idea of an online course website powered by Divi. With Profile Builder Pro, you could automatically redirect users with the “Student” user role to the student dashboard and users with the “Instructor” role to the instructor role dashboard.
Ability to Restrict Access to Divi Modules or Sections
Finally, in addition to all of the Divi modules that it adds, Profile Builder also gives you tools to restrict access to your Divi content based on a user’s logged-in status and/or user role.
In addition to restricting access to entire pages, you can also restrict access to individual Divi modules or sections.
And if you want even more robust membership functionalities, you can also access similar functionality in the Paid Member Subscriptions plugin.
How to Add Divi Login, Register, and My Account Pages Using Profile Builder
Now, let’s get into the actual guide for how you can add login, register, and my account pages to Divi.
For these examples, we’re going to use the free Profile Builder plugin. However, the same basic principles from Step #3 also apply to the Paid Member Subscriptions plugin.
1. Install the Profile Builder Plugin and Complete Setup Wizard
To get started, you’ll want to install and activate the Profile Builder plugin on your Divi-powered site, if you haven’t done so already.
Profile Builder comes in both a free version at WordPress.org, as well as a premium version that adds more features.
You can follow this guide and access all of the Divi modules using just the free version, so it’s totally fine to get started with that.
However, the premium version does give you some more flexibility in certain areas. For example, while the free version lets you customize your registration and edit profile forms using all of the default WordPress fields, the premium version adds the ability to add completely custom fields.
The premium version also lets you create multiple unique forms that you can use in different parts of your site.
If you’re not sure which version to start with, you can always begin with the free version. If you upgrade later on, you won’t lose any of your forms or settings.
Profile Builder Pro
The best plugin to add Divi login, registration, and my account modules.
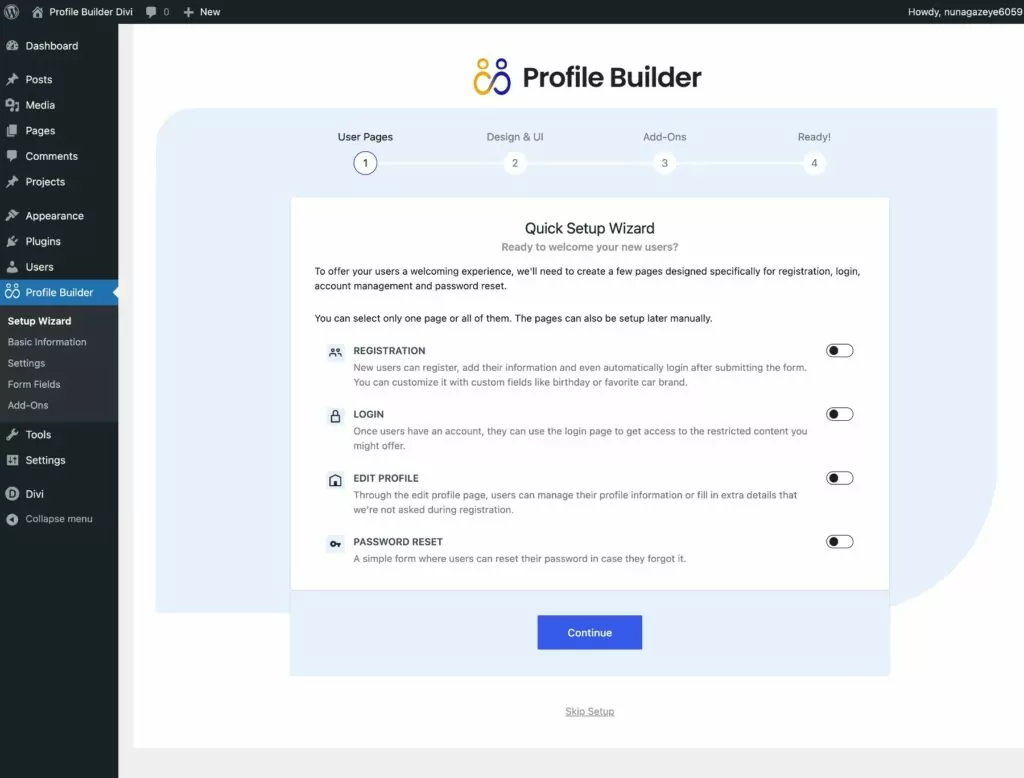
Get Profile BuilderOnce you activate either version of the plugin, it should automatically launch a setup wizard to configure some important basics. However, don’t stress too much about the choices because you can always adjust everything later on if needed.
2. Set Up Your Registration and Edit Profile Forms
Before you start working in the Divi Builder interface, you’ll first want to set up your registration and edit profile form fields in Profile Builder.
With the free version of Profile Builder, you can work with all of the core WordPress fields. And then if you upgrade to the premium version of Profile Builder, you can add custom fields, as well.
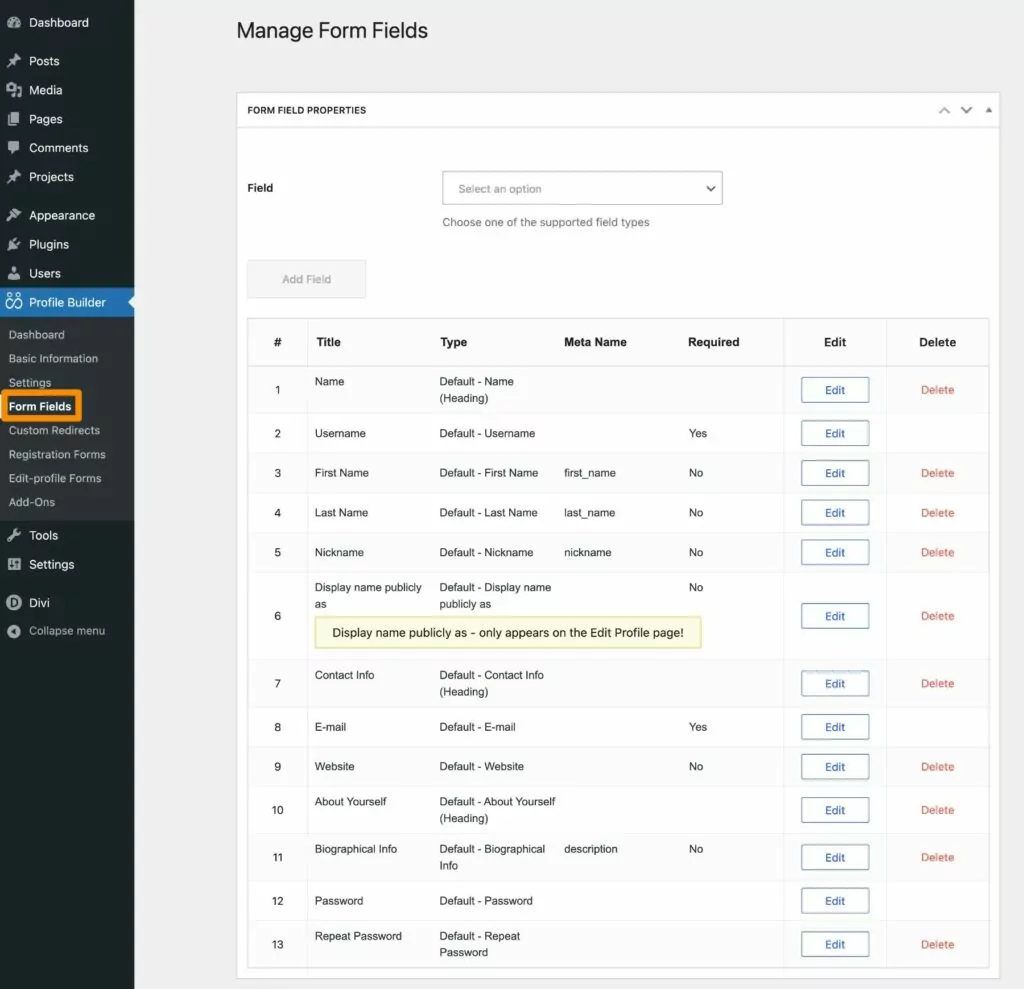
To customize the default fields on these forms, you can go to Profile Builder → Form Fields.
In this interface, you’re free to do the following:
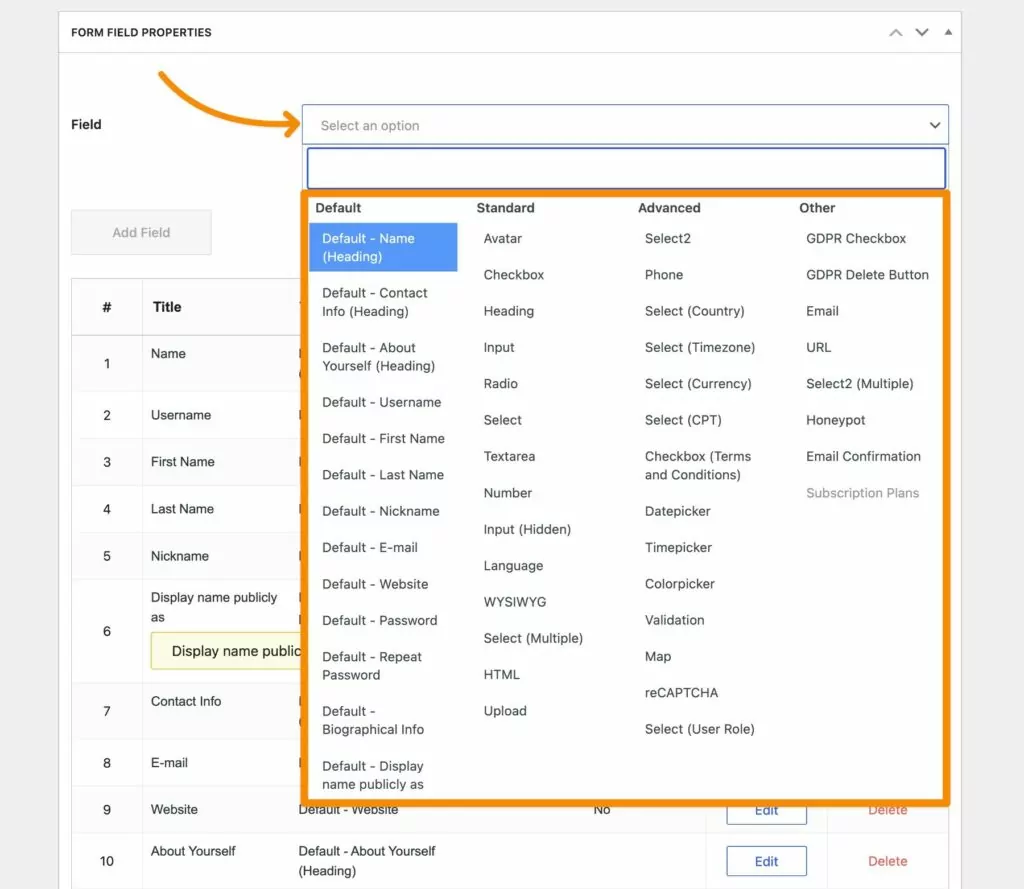
- Add new fields to appear on your registration and profile forms by using the Field drop-down at the top of the interface.
- Edit any of the existing fields on your form by clicking the Edit button next to the field.
- Rearrange fields using drag and drop – just hover your mouse over the number column and then drag and drop as needed.
- Delete any existing fields by clicking the Delete button next to the field. You can’t delete the username, email, and password fields, as these are the minimum requirements for a WordPress registration form.
For example, here are all the different types of fields that you can add to your forms using Profile Builder Pro.
With the premium version of Profile Builder, you can also create multiple registration and edit profile fields, each with its own unique field configurations. You can then choose which form to show in the Divi module settings.
If you have the premium version, you can set these up by going to Profile Builder → Registration Forms or Profile Builder → Edit-profile Forms, respectively.
3. Create Your User Profile Pages In Divi
Once you’ve set up your forms, you’re ready to use Profile Builder’s Divi modules to set up the user profile pages on your site, including the registration, login, and edit profile pages.
If you opted to create these pages when you went through the Profile Builder setup wizard, you can edit the existing pages to customize them with Divi Builder. Otherwise, you’ll want to create new pages for your site’s user profile system.
The same basic steps here will also apply to the Paid Member Subscriptions plugin, as the modules are very similar.
Divi Registration Module
To use the Divi register module, you can add the PB Register module where you want your form to appear.
You should see a live preview of the registration form, which will display the fields that you set up in the previous step.
To further customize your site’s registration behavior and style, you can use the module’s settings.
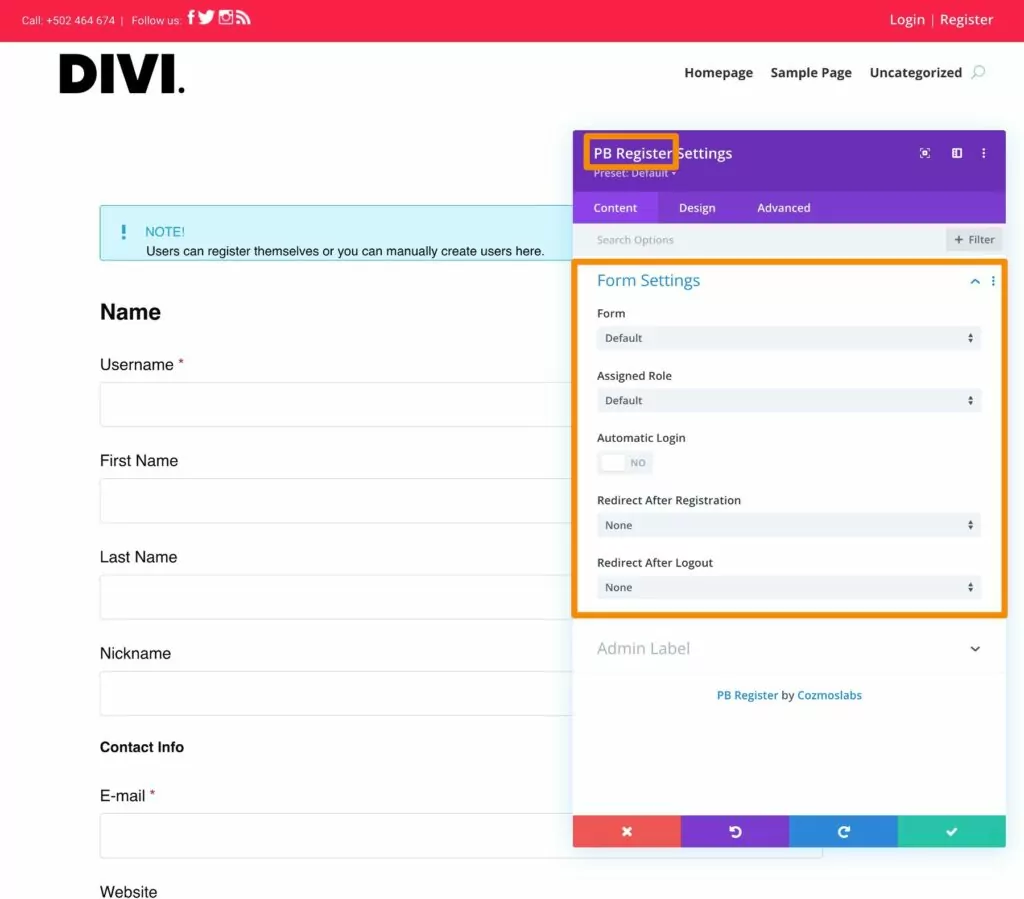
First off, you can make several important choices in the Form Settings section, which is available in the Content tab:
- Form – if you have the premium version of Profile Builder and you’ve created multiple registration forms, you can choose which registration form to display on this page.
- Assigned Role – this is the WordPress user role that will be assigned to people who register through this specific form.
- Automatic Login – when enabled, users will be automatically logged in to their accounts after registering. If disabled, they’ll need to manually log in.
- Redirect After Registration – you can choose to redirect users to a page on your site after they register. For example, if you enabled Automatic Login, you could redirect users to their “My Account” page after they register.
- Redirect After Logout – you can choose to redirect users to a different page if they use this form to log out. Once a user is already registered and logged in, they won’t see the actual registration form anymore.
If you go to the Design tab of the module’s settings, you can access lots of style rules to control the design of your site’s registration form.
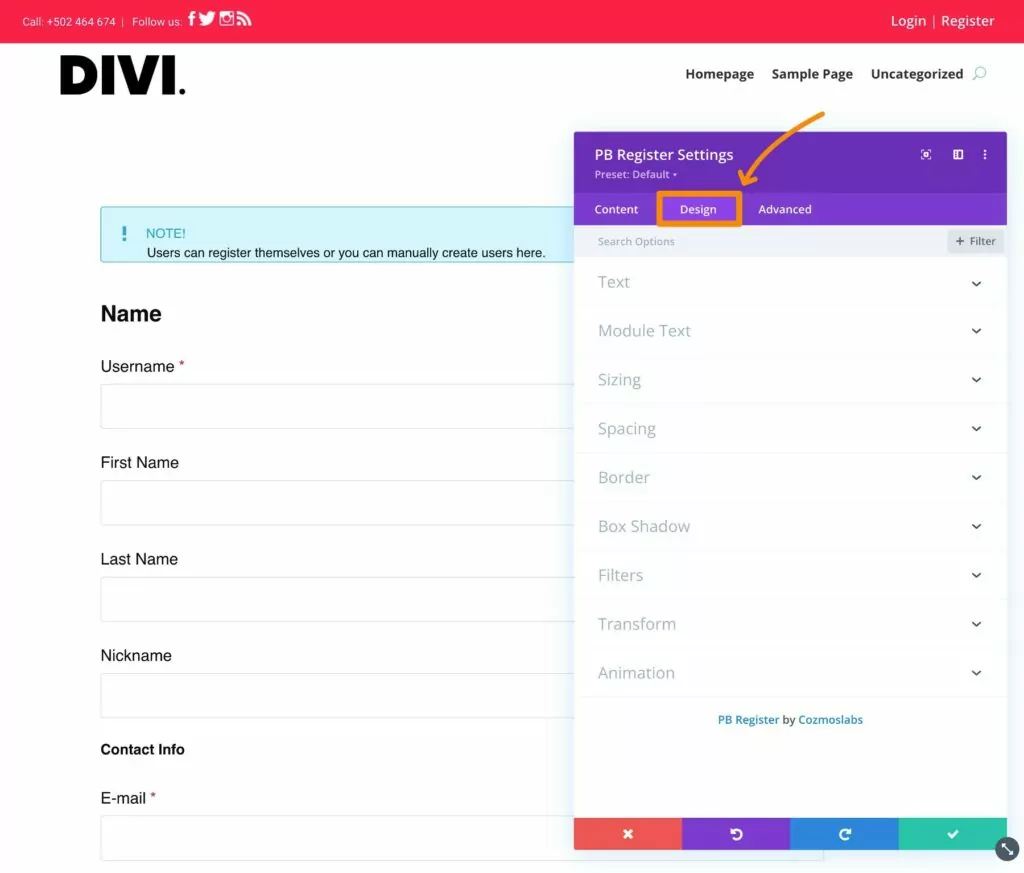
You can also access all of the normal Divi options in the Advanced tab, such as adding custom CSS, scroll effects, positioning, and more.
Divi Login Module (and Password Recovery Module)
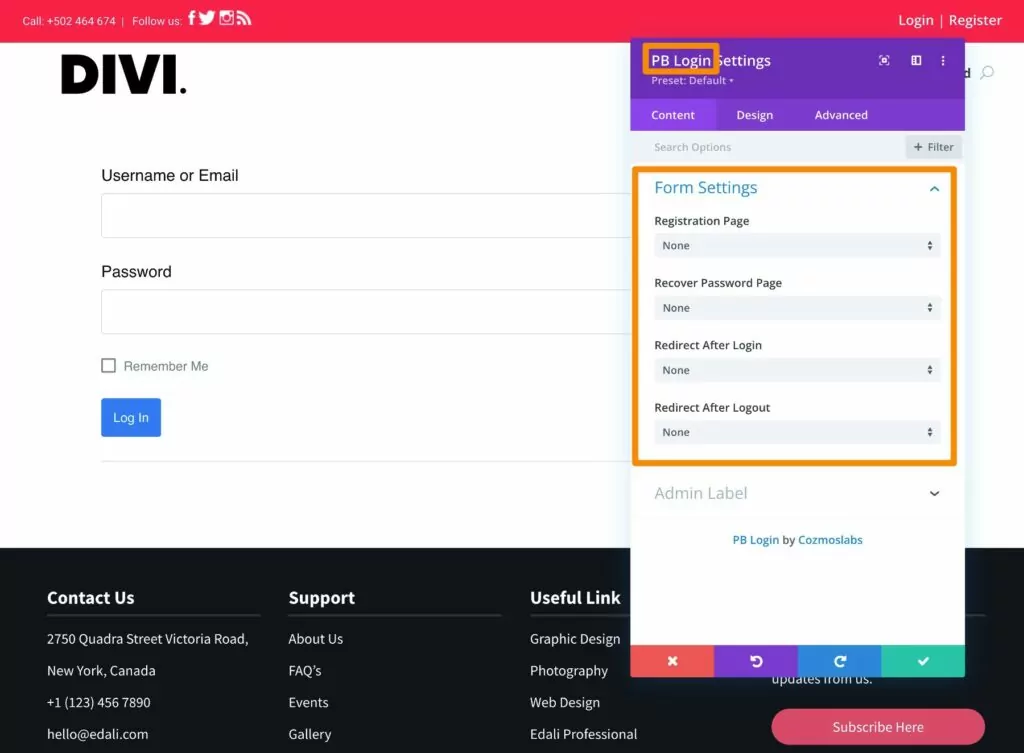
Next, create or edit the page that you want to use for your Divi login form. Then, add the PB Login module where you want your login form to appear.
You should automatically see a login form appear in the visual preview. Then, you can use the Form Settings area of the module’s settings to control how your login form functions:
- Registration Page – you can add a link to your registration page for people who don’t have accounts yet.
- Recover Password Page – you can add a link to let people recover their passwords if they forget. More on this below.
- Redirect After Login – you can redirect users to a certain page after they log in, such as the homepage or the My Account page.
- Redirect After Logout – you can redirect users to a certain page after they log out of their accounts.
If you go to the Design tab, you can also access options to style your form.
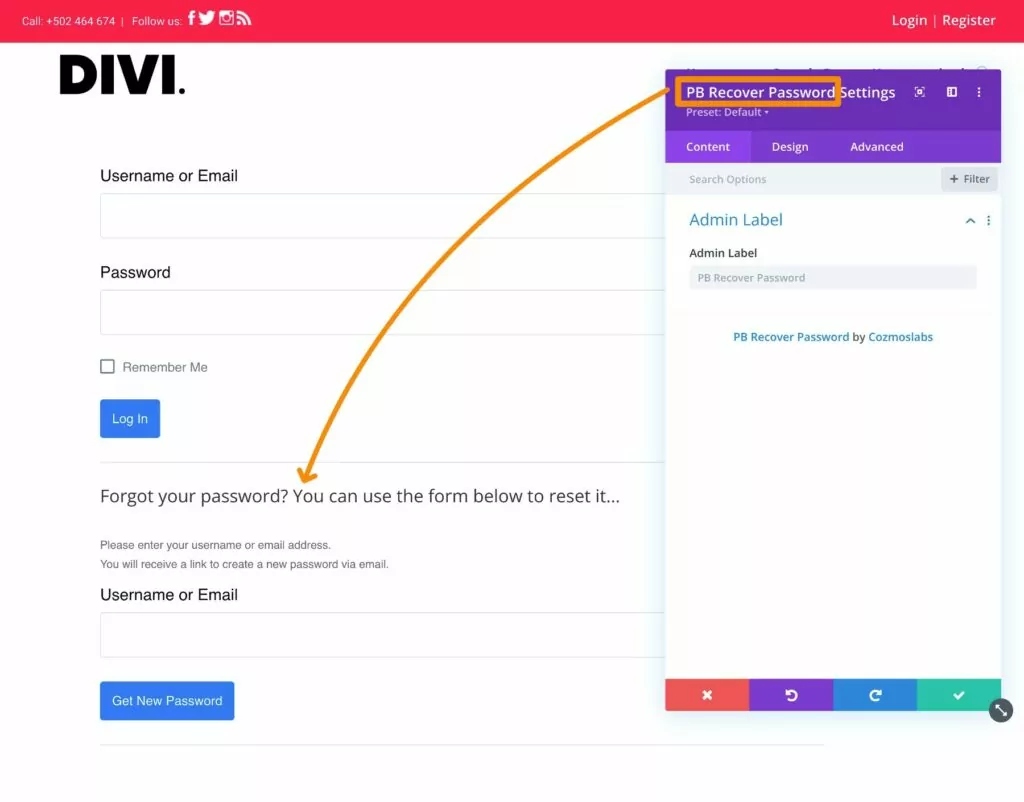
In addition to the login form, you’ll want to give users some way to recover their passwords if they forgot them.
You could add a password recovery in two ways:
- You could create a new page that contains the PB Recover Password module and then link to it from your login page. You can add this link directly from the module’s settings using the Recover Password Page option, as we explained above.
- You can include the password recovery form on the same page as the login form by adding the PB Recover Password module in Divi.
Here’s what it might look like to display the password recovery form on the same page as the login form.
Edit Profile Page
This last one is optional. But if you want to give users a way to edit their profiles from the frontend of your site, you’ll also want to create a Divi My Account page; called an “edit profile” form in Profile Builder.
This page will let users edit all of the profile fields that you gave them permission to edit when setting up your edit profile form in the previous step.
To begin, create or edit the page where you want users to be able to manage their accounts. Then, add the PB Edit Profile module where you want the edit profile form to appear.
You can then access two configuration settings in the module’s settings:
- Form – if you have the premium version of Profile Builder and you’ve created multiple edit profile forms, you can choose which form you want to use on this page.
- Redirect After Edit Profile – you can redirect users to a different page after they save their changes in the edit profile form.

4. Restrict Access to Content Based on User Roles (Optional)
This last step is totally optional and you’re free to skip it if it doesn’t apply to your site.
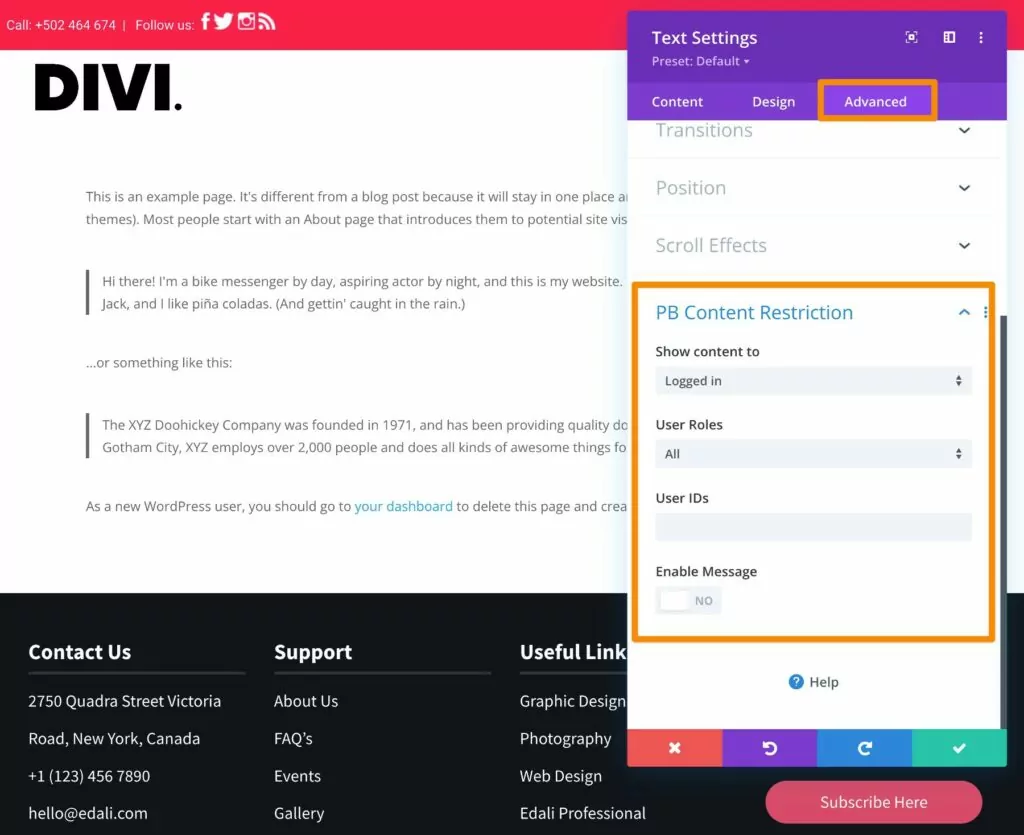
However, another one of the advantages of using Profile Builder with Divi is that Profile Builder lets you restrict access to Divi sections or modules based on a user’s logged-in status or user role.
For example, maybe you have certain content that you only want to be visible to people who are logged in to their user accounts, but not to anonymous visitors.
This feature works with any Divi module or section (or even entire pages), including the core modules as well as any third-party modules that you’re using.
To restrict access to any module or section, all you need to do is open the settings for the relevant element and use the PB Restriction settings in the Advanced tab.
If you want to restrict access to an entire page or post, you can do that from the regular WordPress editor screen for that content.
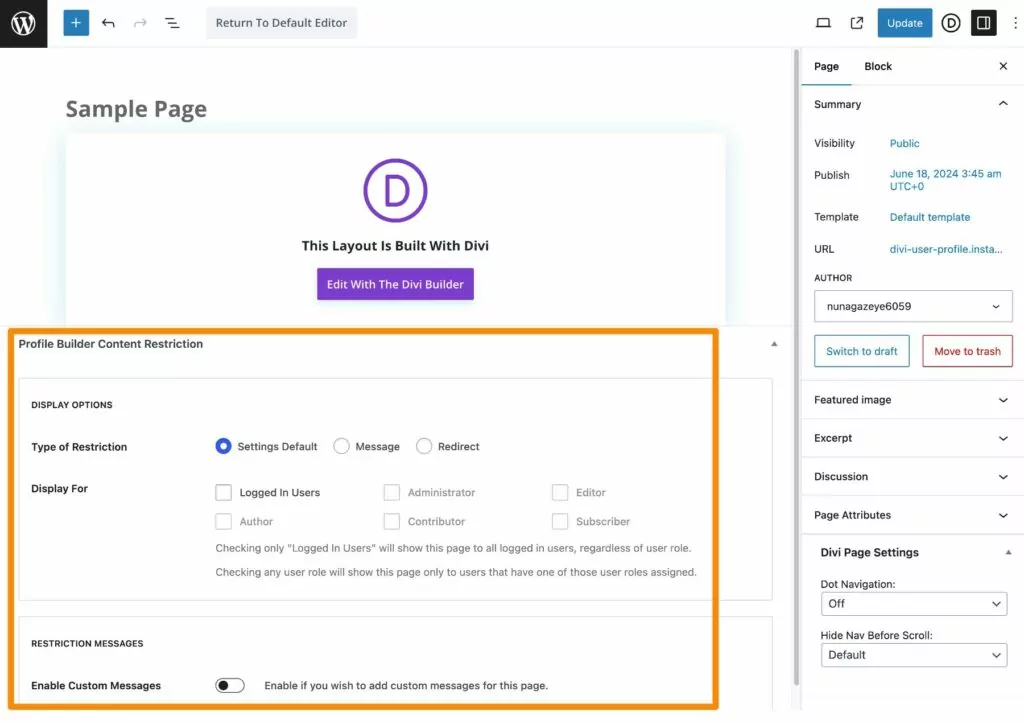
If you don’t see these options, make sure that you’ve enabled content restriction in the Profile Builder settings (Profile Builder → Settings → Content Restriction and enable the Activate Content Restriction toggle).
Divi Membership Site? Consider Paid Member Subscriptions
If you want to create a Divi-powered membership website, you can also access similar user account modules via the Paid Member Subscriptions plugin, which comes from the same team behind Profile Builder.
You can use Paid Member Subscriptions as a standalone tool for membership sites. Or, if you still want access to more advanced user profile functionality, you can also pair it with the Profile Builder plugin and use both at the same time.
With Paid Member Subscriptions, you can set up unlimited free and/or paid membership levels and then use them to restrict access to some or all of your site. Like Profile Builder, you can also restrict access to individual Divi modules and sections.
If you want to learn more about it, check out our full guide to building a Divi membership site.
Paid Member Subscriptions Pro
The best plugin to build a Divi membership website with user profile functionality.
Get Paid Member SubscriptionsTry Profile Builder With Divi Today
If you want to access more robust user profile functionality and modules in Divi, Profile Builder is a great option.
It gives you dedicated Divi modules for registration, login, edit profile, and password recovery forms. Plus, it also gives you lots of functionality to customize those forms in different ways.
If you’re building a Divi membership site, you can also access all of the user profile modules in the Paid Member Subscriptions plugin. Or, you can combine Profile Builder and Paid Member Subscriptions to access the best of both worlds.
You can access all of the Divi modules from the free versions of both plugins.
Then, consider upgrading to the premium versions to access even more features to improve your Divi websites:
- Purchase the premium version of Profile Builder
- Purchase the premium version of Paid Member Subscriptions
- Get a bundle of both plugins and save money
Profile Builder Pro
The best plugin to add Divi login, registration, and my account modules.
Get Profile BuilderRelated Articles

How to Automate WordPress with a Workflow Automation Tool
Interested in WordPress automation but not sure where to begin? In this post, we're going to cover everything that you need to know about automating WordPress. We'll start with some of the different reasons to consider using automations. After that, we'll give you a generalized tutorial on how to use a WordPress automation plugin named […]
Continue Reading
How to Create a Website for Affiliate Marketing
If you’re looking for a side hustle or want to create a passive income stream, affiliate marketing can be a good option. This involves promoting products by other companies, which can lead to commissions on sales and leads. But to get started, you’ll need to set up a website. Thanks to WordPress, creating a website […]
Continue Reading
Roundup of WordPress ecosystem #1 – January 2017
After writing the article "Overview of the WordPress Community in 2016" and getting feedback for the article on various platforms, I decided to continue writing them, but I changed its name into "Roundup of WordPress ecosystem". This is the first article from a monthly series that will showcase what happened around the whole ecosystem in […]
Continue Reading