
Table of Contents
Restricting content on your WordPress site can help you deliver a personalized experience for members while ensuring unauthorized users cannot access premium content without paying or signing up first.
Whether you run an online membership site or want to create a VIP area on your blog or online store, you will need a way to restrict content in WordPress.
In this article, we’re going to take a closer look at restricting content in WordPress and highlight the best tools to do this.
Importance of restricting content in WordPress
Restricting content in WordPress means hiding or displaying content based on the user role’s logged-in status or subscription plan.
In simple words this means that the content you publish on your site won’t be accessible to all site visitors or user roles, only the ones you choose to show it to.
For example, if you run an online membership site, you can choose to only let users who have purchased the VIP Subscription Plan access premium content on your site. Regular site visitors must register and pay for the premium plan before they can access the restricted content.
Let’s look at another example. Let’s say you want more people to register for your newsletter. You can assign a Subscriber user role to anyone who subscribes to your newsletter and publish premium content only Subscribers can view on your site. This way, you can incentivize and encourage more site visitors to register so they can also access the premium content you publish.
To sum it up, here are some of the main reasons why you might consider restricting content in WordPress:
- Offer members-only content. If you run an online membership site or are looking to monetize your blog, you can offer members access to exclusive content without having to worry about regular site users getting access to it for free.
- Prevent spam. Restricting content on your WordPress site can also help you protect it from spam attacks and people trying to steal your content for commercial purposes. You can use content restriction to prevent regular site visitors from accessing premium content.
- Create exclusive, members-only areas. Restricting content on your WordPress site also means you can create exclusive, members-only areas that are only accessible to authorized users. This is useful if you want to publish premium content for paying users only.
How to restrict content using the WordPress editor?
WordPress by default doesn’t let you restrict content on your pages or in general. Fortunately, there are professional content restriction solutions for WordPress – like Paid Member Subscriptions and Profile Builder – that come pre-built with extensive features for restricting content on your WordPress site.
Let’s quickly explore both solutions.
Profile Builder is a dedicated user registration and profile builder plugin for WordPress that comes with a wide range of content restriction options.
It offers extensive options for restricting content based on the logged-in status and specific user roles on your site. This means you can hide premium content for regular site visitors while registered users can access those parts of your WordPress site once they’re logged in.
Paid Member Subscriptions, on the other hand, is a robust membership plugin for WordPress that’s designed to let you create custom subscription plans and restrict content.
Paid Member Subscriptions Pro
The easiest way to restrict content for paying users in WordPress.
Get Paid Member SubscriptionsYou can create as many membership or subscription plans on your WordPress site as you’d like and let users sign up by filling out an optimized front-end form. It’s an effective way to start monetizing your premium content and start generating a passive income stream for your business.
Paid Member Subscriptions also let you restrict content on any part of your WordPress pages based on the subscription status of site visitors. This means you can hide premium content until a user pays the subscription fee or upgrades their subscription.
The best part about both plugins – Profile Builder and Paid Member Subscriptions – is that they are very easy to use for restricting content in the WordPress editor, even if you’re not particularly tech-savvy.
Method 1: Restricting content for logged-in users or specific user roles
To get started, you will need to get the Profile Builder plugin and install it on your WordPress site. This will add content restriction features to your site and make it easier to show or hide content based on the logged-in user status.
You can get started with the free version of the plugin for simple content restriction and upgrade to the pro version if you need access to advanced features like extra user fields, front-end user listing, and multiple registration forms.
After downloading the plugin, navigate to Plugins → Add New Plugin and upload the plugin’s ZIP file before clicking on the Install Now button to continue. With the Profile Builder plugin installed on your site, you can start restricting content based on the logged-in status of your site visitors.
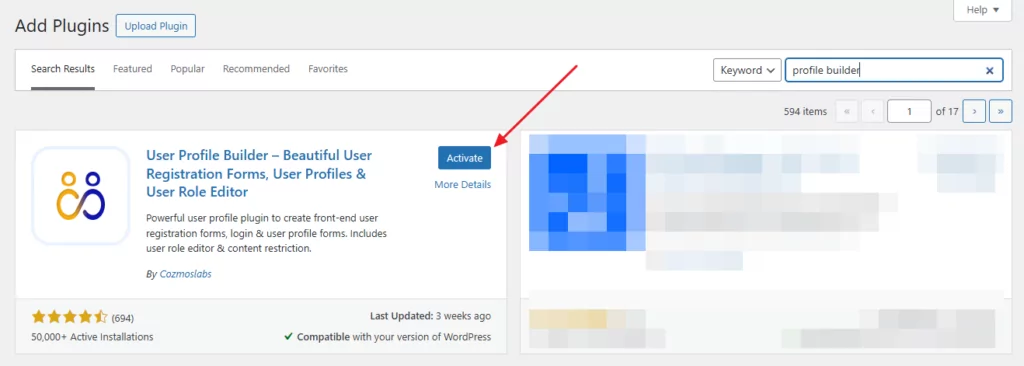
Before you begin, you need to enable content restriction from the plugin’s settings. For this, navigate to Profile Builder → Settings and click on the Content Restriction tab from the top.
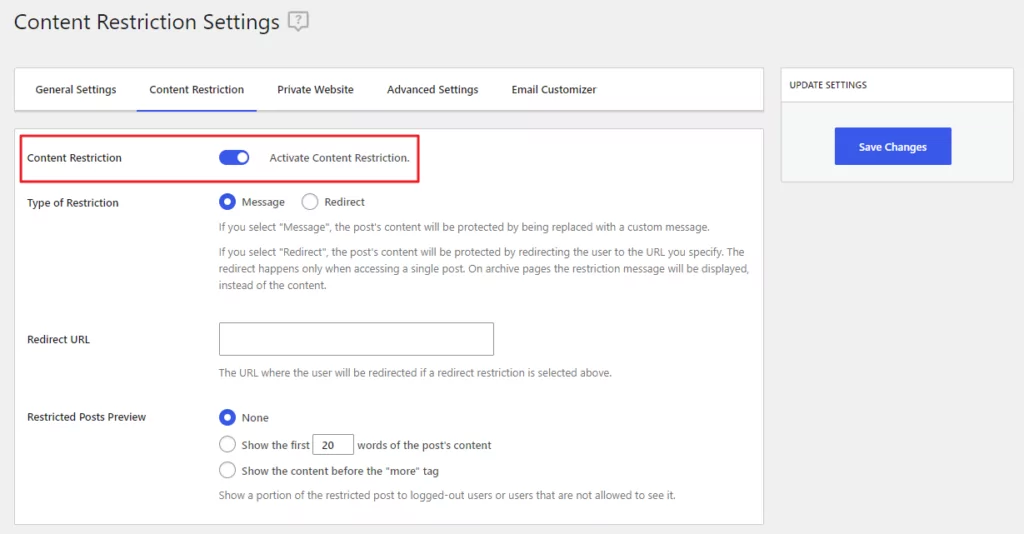
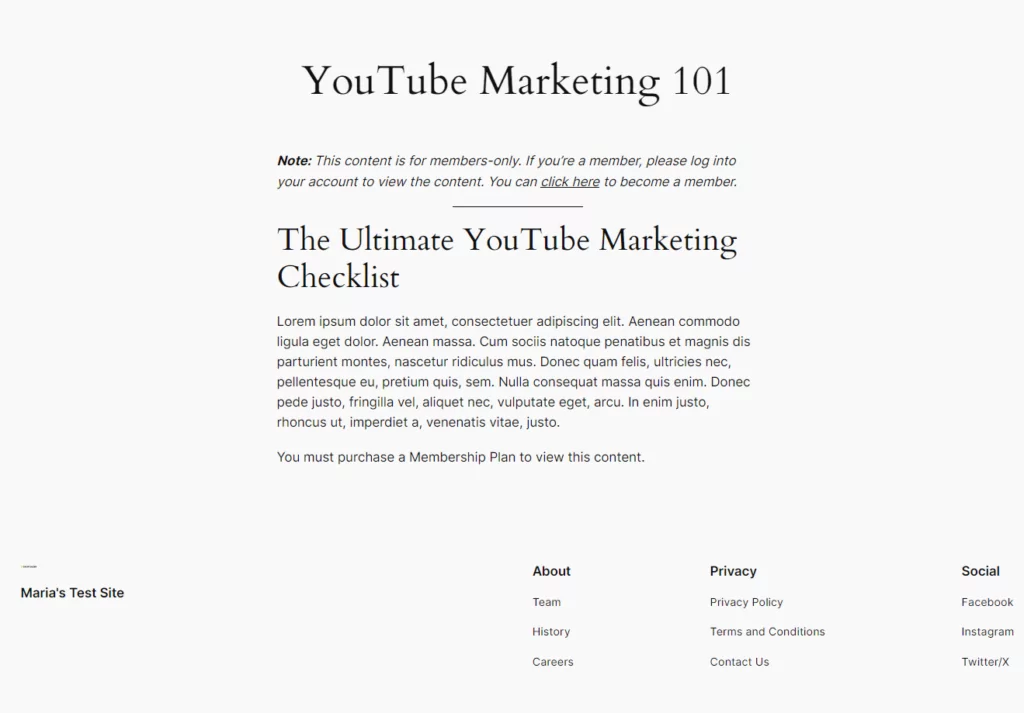
Enable the Content Restriction checkbox and select the type of restriction you want to set up. With Profile Builder, you can either display a custom message to unauthorized users or redirect them to other pages of your site.
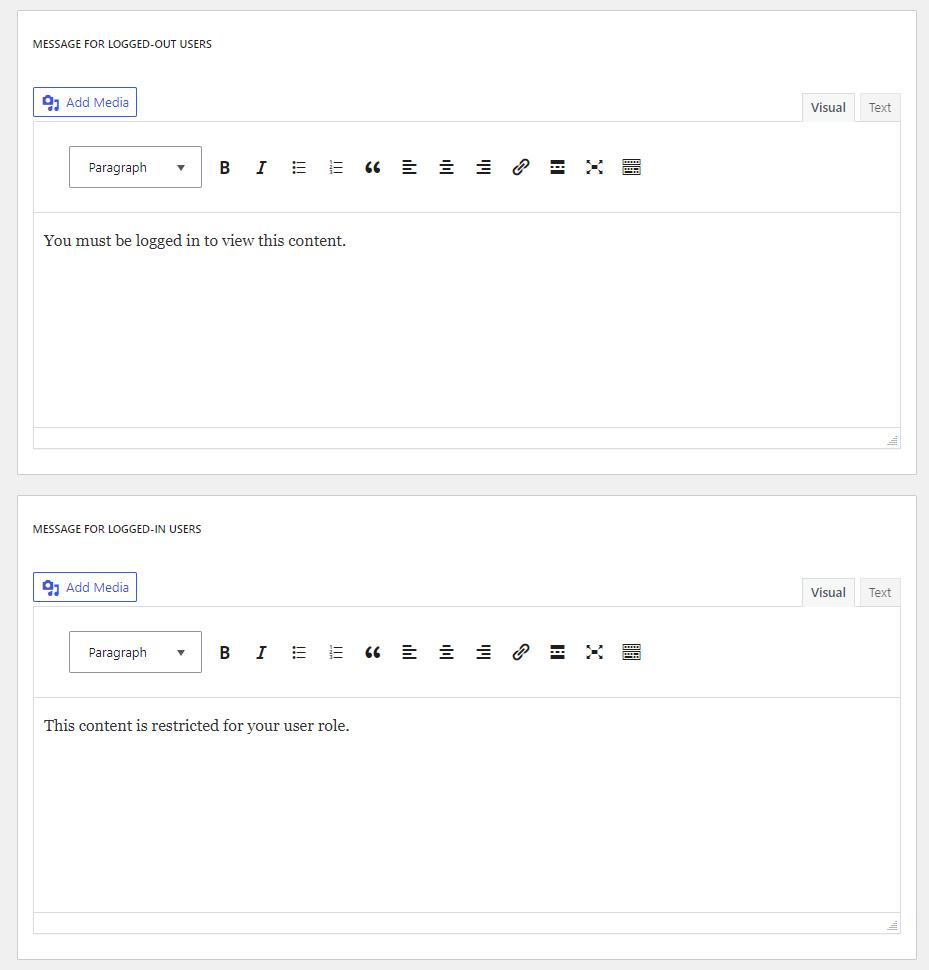
Make sure to click on the Save Changes button to continue. After enabling the functionality, the same content restriction options are displayed in the WordPress page editor of your site.
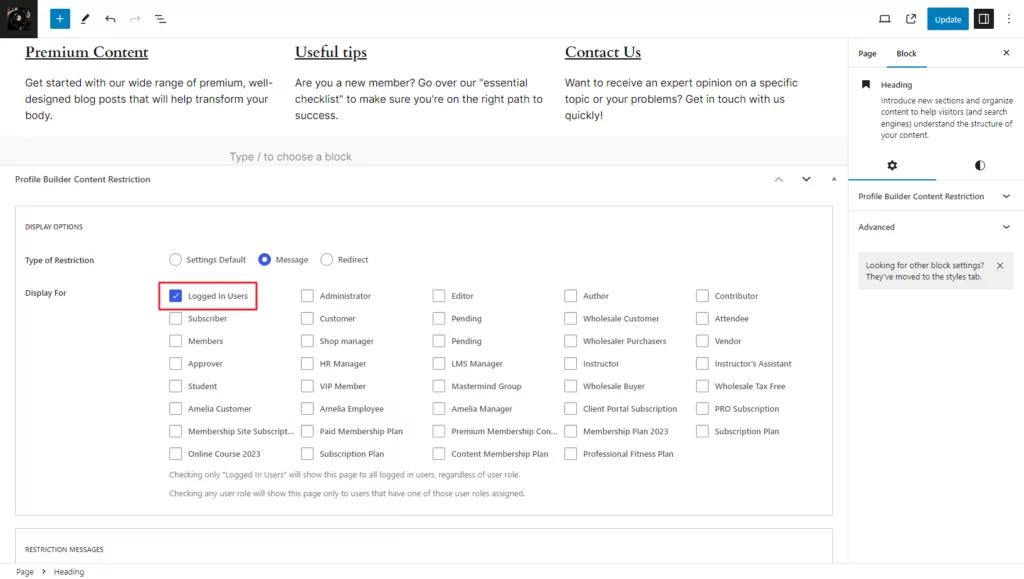
This way, you can restrict content on any page of your WordPress site for specific user roles or logged-in users. Depending on the type of restriction you use, unauthorized users will either see a custom message or be redirected to the registration page so they can access the exclusive content afterward.
If you leave the Settings Default option selected as your preferred type of restriction, then the settings you chose in the Content Restriction tab of the Profile Builder Settings will apply.
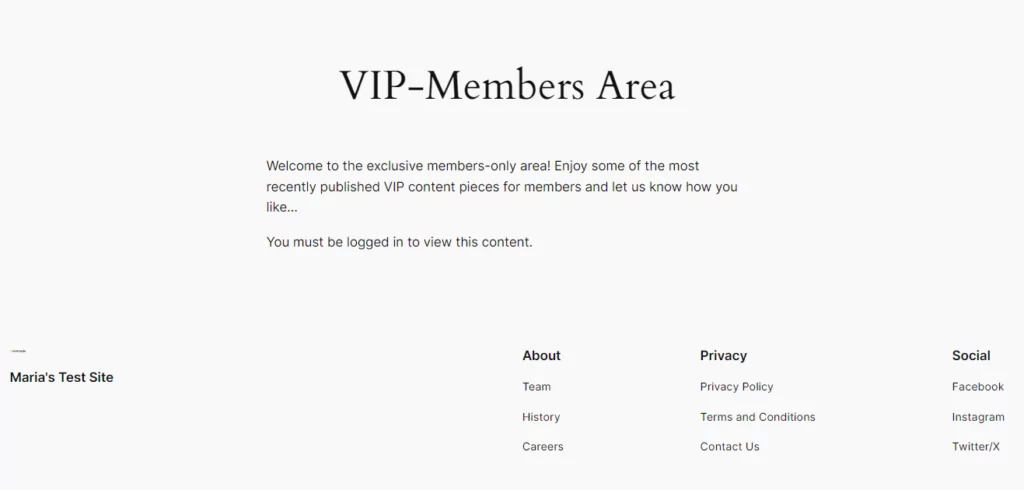
In addition to this, you can also use the Profile Builder plugin to restrict content on a block-by-block basis. The first way to do this is by enabling content restriction from the block settings section on the right.
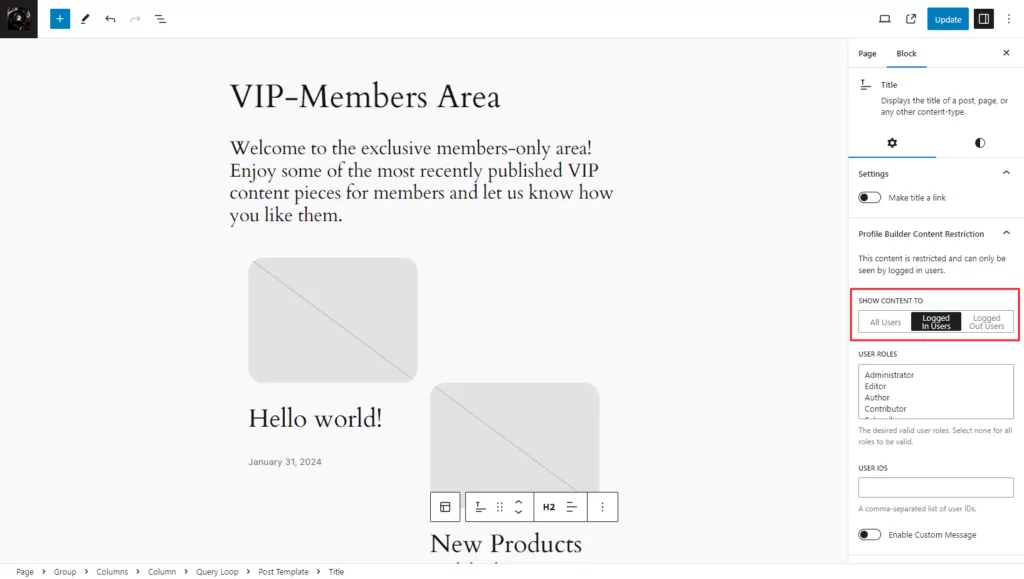
This way, you can restrict each Gutenberg block based on specific user roles or the logged-in status of your target audience.
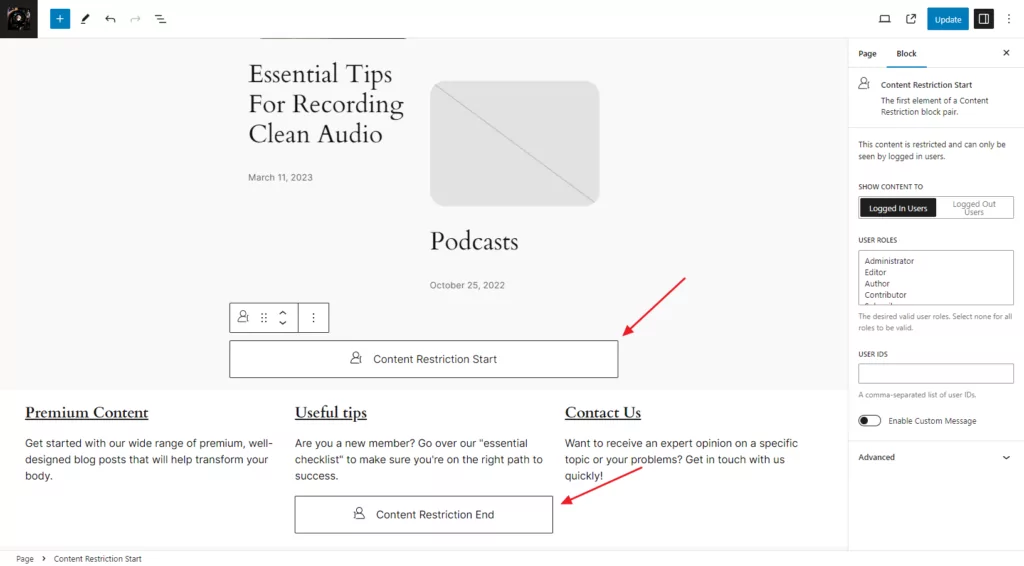
Additionally, you can use the Content Restriction Start and Content Restriction End Gutenberg blocks by Profile Builder to create exclusive sections on any page of your WordPress site.
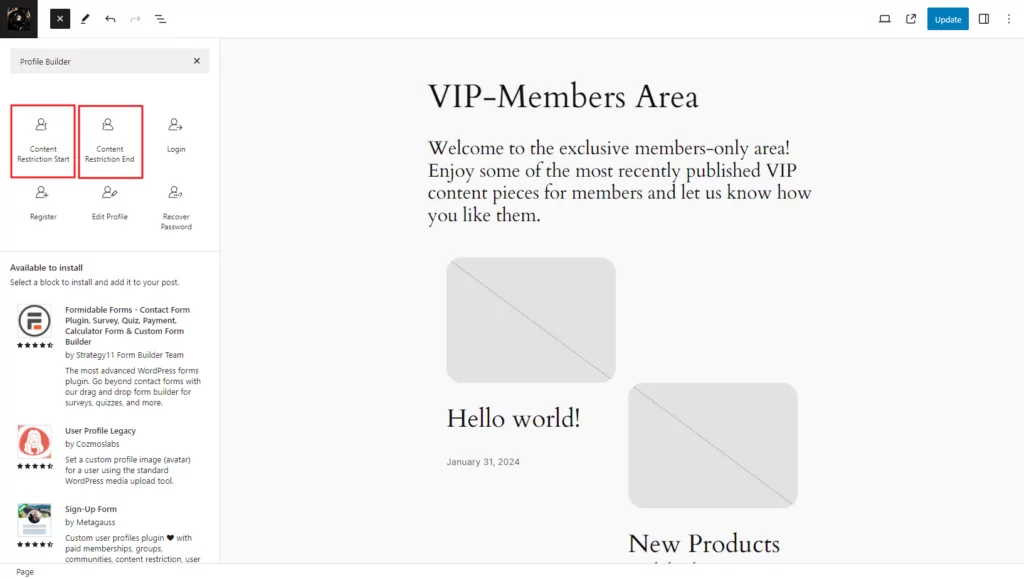
It’s an effective way to create “private” sections on your WordPress pages without negatively affecting the user experience for regular site visitors.
Method 2: Restricting content for paying users
You might also want to restrict content for paying users. For this, we’ll use the Paid Member Subscriptions plugin to set up extensive content restriction options so that only paying users get access to premium content on your site.
If you’re looking for a simple solution to restrict access to content, you can get started with the free version of the Paid Member Subscriptions plugin. It lets you restrict entire posts, pages, or custom post types, or just selected portions of each. And, when you’re ready to take things further you can get the pro version to set up advanced features like content dripping and multiple subscriptions per user.
After getting the plugin, you need to install it on your WordPress site. Navigate to Plugins → Add New Plugin and upload the plugin to your WordPress site before clicking on the Install Now button. Once that’s done, activate the plugin.
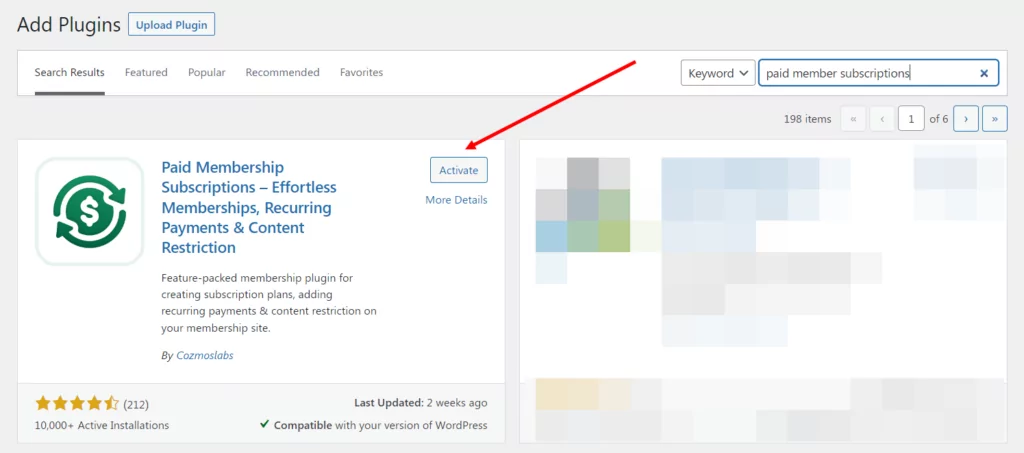
After the Paid Member Subscriptions plugin is activated on your site, navigate to Paid Member Subscriptions → Settings from the WordPress admin panel and click on the Content Restriction tab.
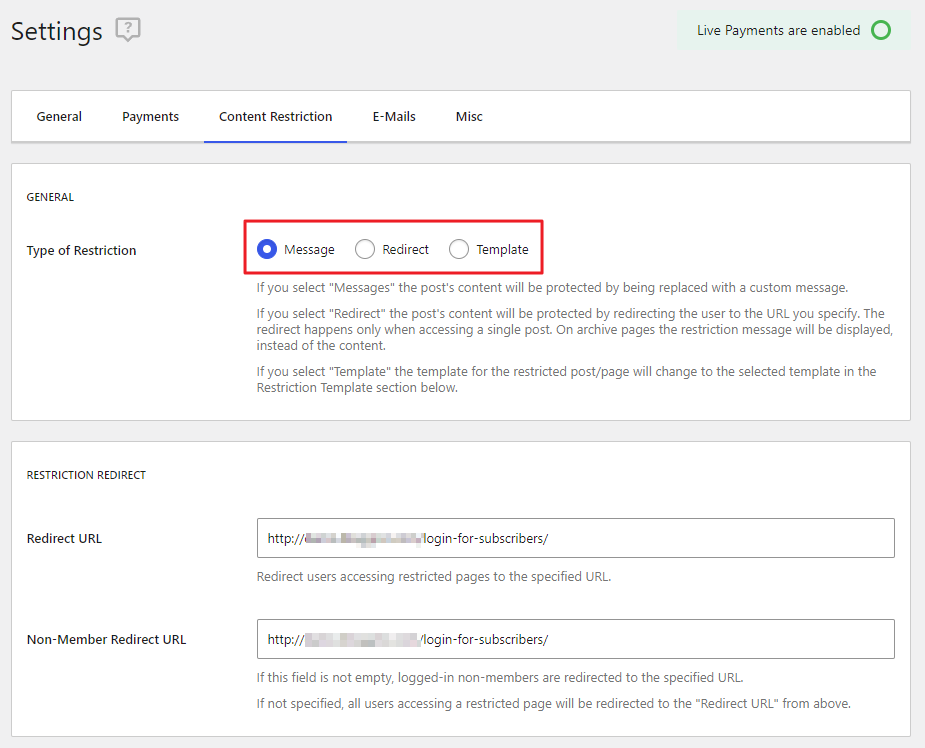
Here, you can set custom restriction messages as well as specify redirect URLs for unauthorized users. You can also choose a page template to be used when a content piece is restricted on your site using the Template dropdown menu. For this, you will also need to set the Type Of Restriction to the Template option. Once you’re ready, make sure to click on the Save Settings button to continue.
Then, you can enable content restriction on a page-by-page basis by navigating to the WordPress page editor. This works in the same way I described above for the Profile Builder plugin.
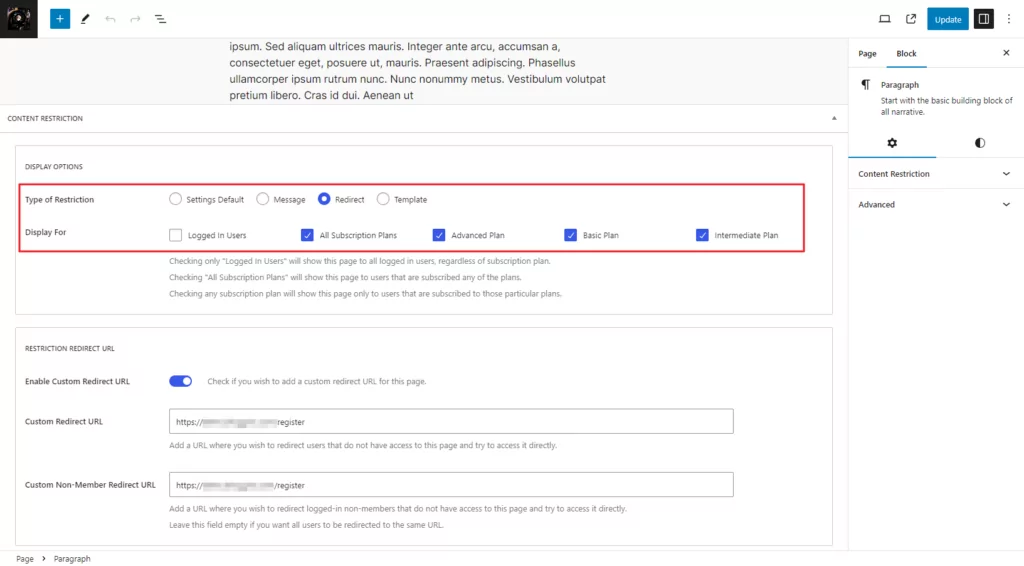
The plugin lets you select the type of restriction and customize the messages you want to display to unauthorized users on your site. You can also select what membership or subscription plans qualify for the premium content. This means that you can offer multiple subscription plans on your WordPress site or display premium content for different types of users on the same page.
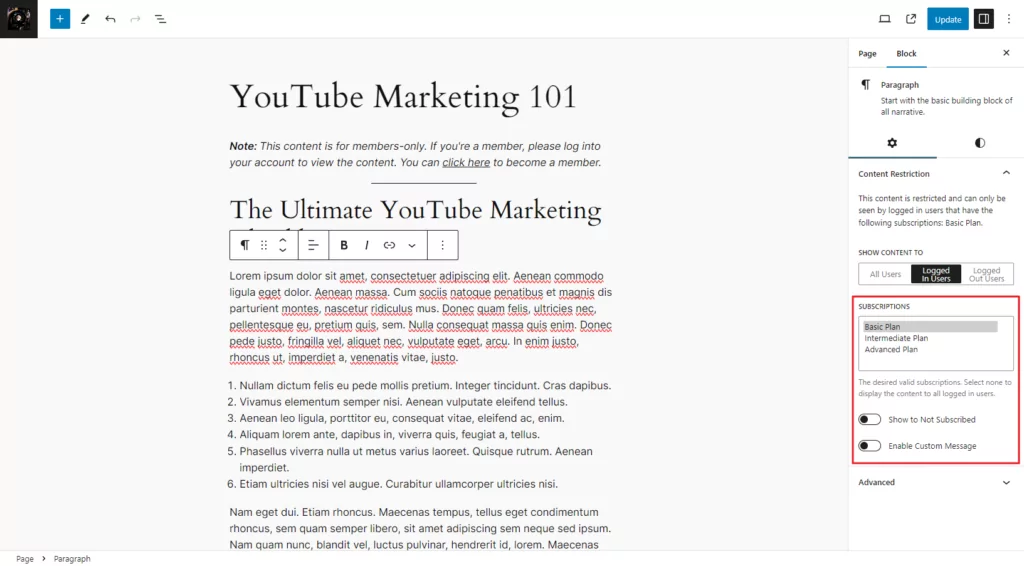
For instance, if you offer multiple subscription tiers, you can let the entry-level tier access some parts of the page while users with the premium tier subscription can freely access the whole page. This is because Paid Member Subscriptions seamlessly integrates with Gutenberg and offers a block-by-block basic content restriction feature.
Conclusion
Restricting content in WordPress is important for many reasons like preventing spam, hiding premium content from regular users, and even creating members-only areas on your site.
Even if you’re not experienced with coding, you can use the Profile Builder and Paid Member Subscriptions plugins to create advanced content restriction rules on your WordPress site. Both plugins are suited for businesses looking for an easy-to-use content restriction solution for WordPress.
Ready to start restricting content using the WordPress editor? Get Paid Member Subscriptions or Profile Builder today!
Related Articles
WordPress Profile Builder: a Front-end User Registration, Login and Edit-Profile Plugin
Easily Login, Register and Edit your Profile Directly from the Front-end Profile Builder lets you add front-end forms that give your users a more flexible way to register, log in, and modify their profile information. If you allow public registration on your site, you don't want to force your users to use the backend WordPress […]
Continue Reading
How to Customize WordPress Emails with Profile Builder Pro
Discover how to customize your WordPress emails with the Profile Builder Pro plugin by Cozmoslabs
Continue Reading
5 Best WordPress User Management Plugins
By default, WordPress lets you add different types of users to your website. However, you might be looking for a more flexible way to manage the people who interact with your content. If this is the case, you can use a WordPress user management plugin to manage authors and contributors. With an efficient user management […]
Continue Reading


