
Table of Contents
- 1 3 Options for Setting Up WooCommerce Stripe Subscriptions
- 2 How to Set Up WooCommerce Stripe Subscriptions With WooCommerce Subscriptions (2 Steps)
- 3 How to Enhance WooCommerce Stripe Subscriptions With Paid Member Subscriptions (5 Steps)
- 3.1 Paid Member Subscriptions Pro
- 3.2 1. Create Your WooCommerce Subscription Product (Per Previous Section)
- 3.3 2. Create a New Subscription Plan
- 3.4 3. Link Your Subscription Plan to the WooCommerce Subscription Product
- 3.5 4. Start Using Your Subscription Plan
- 3.6 5. Repeat As Needed for Additional Subscriptions
- 4 Cheaper Alternative: Set Up Manual WooCommerce Stripe Subscriptions With Paid Member Subscriptions
- 5 Set Up WooCommerce Stripe Subscriptions Today
Are you searching for a way to set up WooCommerce Stripe subscriptions?
Setting up recurring subscriptions is a great way to build regular, dependable revenue for your website. And when it comes to processing payments, Stripe is one of the top options thanks to its competitive fees and flexible feature set.
However, WooCommerce doesn’t include built-in functionality to set up WooCommerce Stripe recurring payments. So if you want to add this functionality to your store, you’ll need a little help.
In this post, we’ll show you three ways to set up WooCommerce Stripe subscriptions. Let’s get started!
3 Options for Setting Up WooCommerce Stripe Subscriptions
Before we get into the main tutorials, let’s discuss the available options for setting up WooCommerce Stripe subscriptions.
Each one involves slightly different plugin combinations. Plus, there’s a method for manual subscriptions if you want to keep things cheap.
Here are the three options you have for setting up WooCommerce Stripe subscriptions:
- You can set up basic automatic recurring Stripe subscriptions using the WooCommerce Subscriptions plugin.
- You can pair Paid Member Subscriptions with the first method to add new functionality to your WooCommerce Stripe subscriptions. For example, you could use a person’s subscription status to restrict access to content on your site or offer special members-only discounts.
- If you don’t need automatic recurring billing, you can use Paid Member Subscriptions by itself to set up manual WooCommerce Stripe subscriptions in a cheaper way. You can still create subscriptions, but users will need to manually pay via Stripe each billing cycle.
Ready to get started? Let’s dig in!
How to Set Up WooCommerce Stripe Subscriptions With WooCommerce Subscriptions (2 Steps)
For this first method, we’ll show you how to set up WooCommerce Stripe recurring payments using the premium WooCommerce Subscriptions extension, which is one of the most popular WooCommerce subscription plugins.
This extension was developed by the WooCommerce team and lets you set up automatic recurring billing. For basic WooCommerce Stripe recurring payments, this is one of the easiest ways to set things up.
Plus, it fully integrates with Paid Member Subscriptions, which lets you easily enhance your subscriptions with new features if needed. More on that in the next section.
1. Set Up Stripe On Your WooCommerce Store
Before you start adding any subscriptions, you’ll first want to set up the basic Stripe payment gateway if you haven’t done so already.
To do this, you can use the official WooCommerce Stripe Payment Gateway plugin, which is available for free at WordPress.org. You’ll need to install and activate the plugin through the WordPress dashboard.
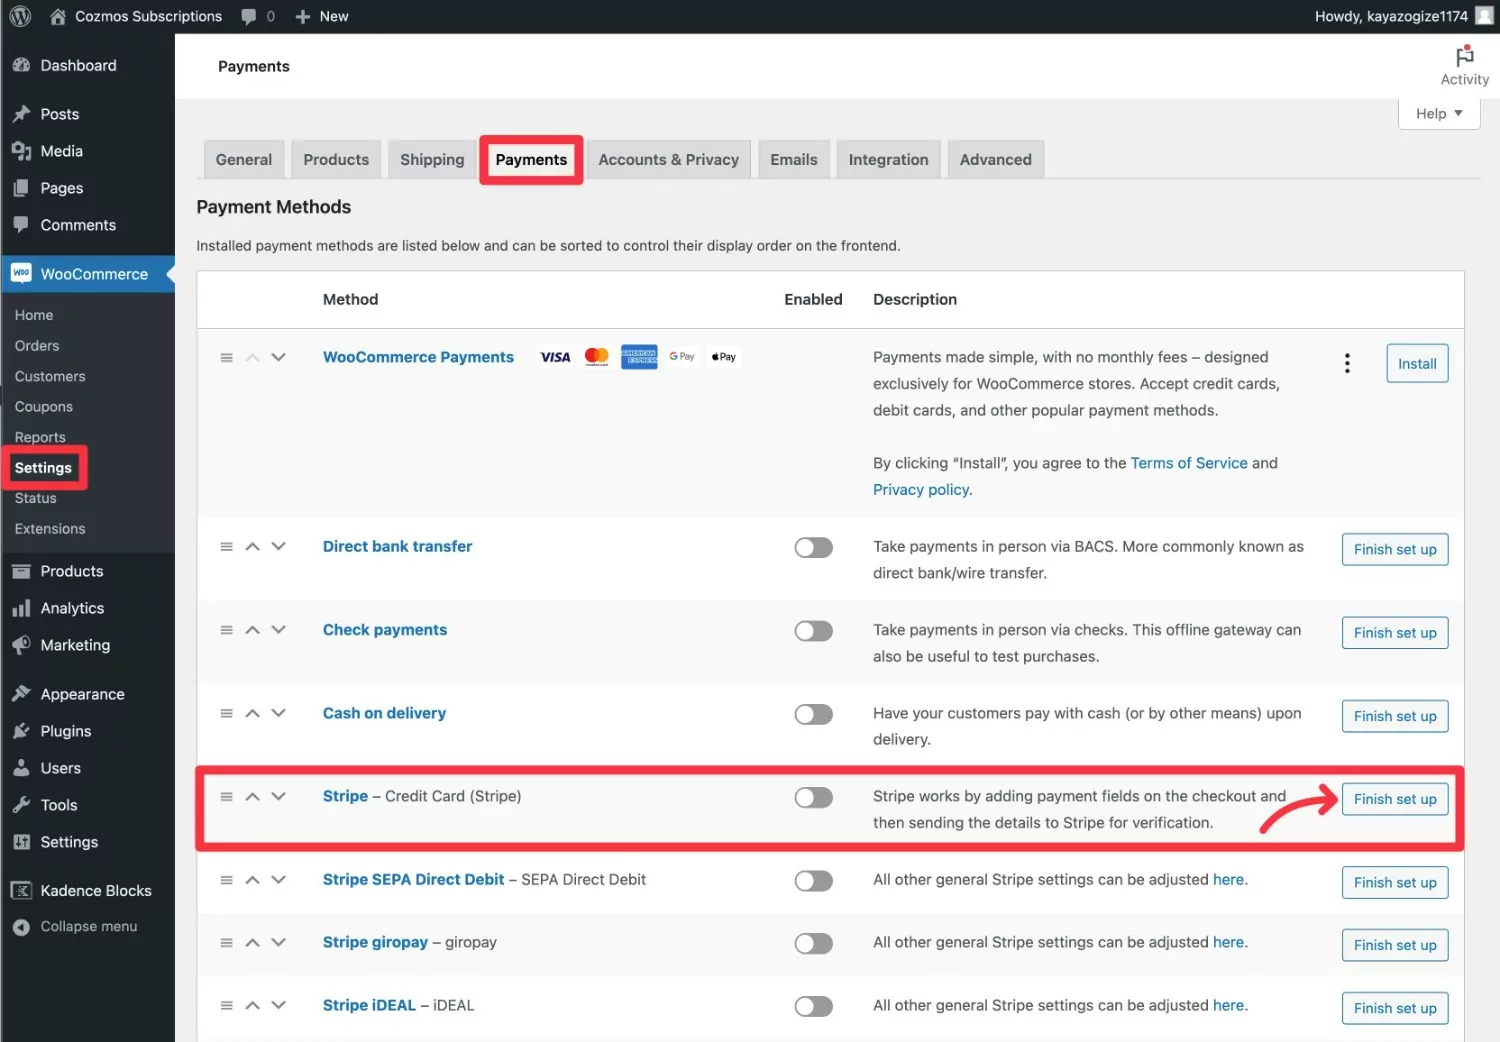
Then, go to WooCommerce → Settings → Payments. Click on the Finish set up button next to Stripe:
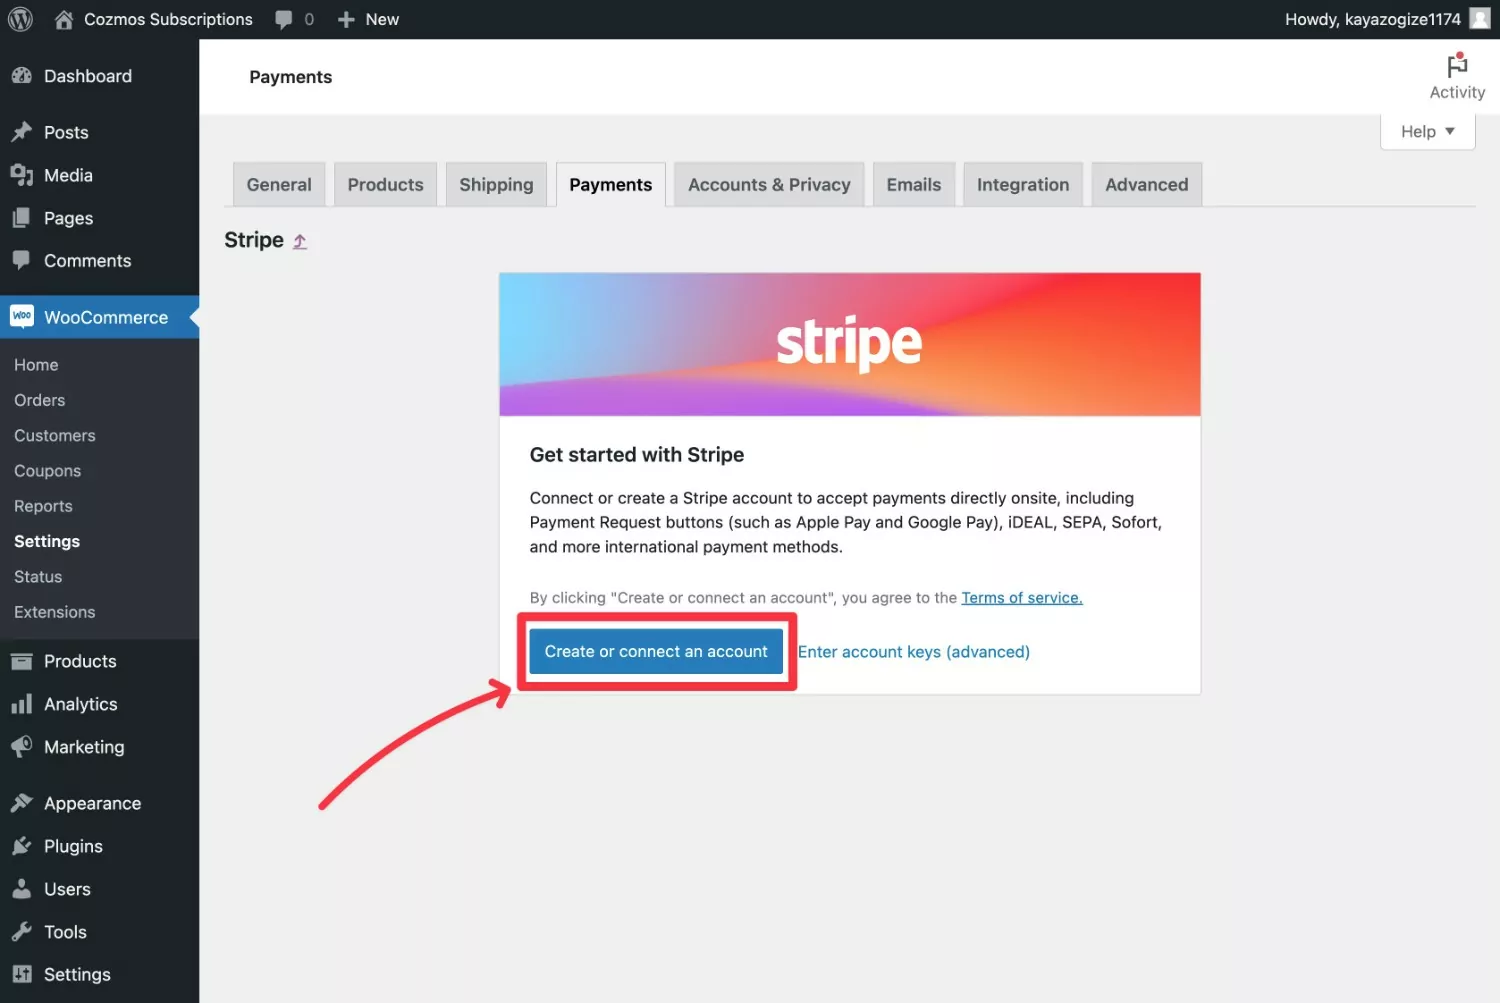
This launches a screen that prompts you to connect to your Stripe account (or register for a free Stripe account if you haven’t done so already). Click on the Create or connect an account button to continue:
Once you go through the connection wizard, Stripe should redirect you back to your WordPress dashboard.
You’ll now be able to configure some additional settings. We recommend enabling “test mode” while you’re testing WooCommerce Stripe subscriptions:
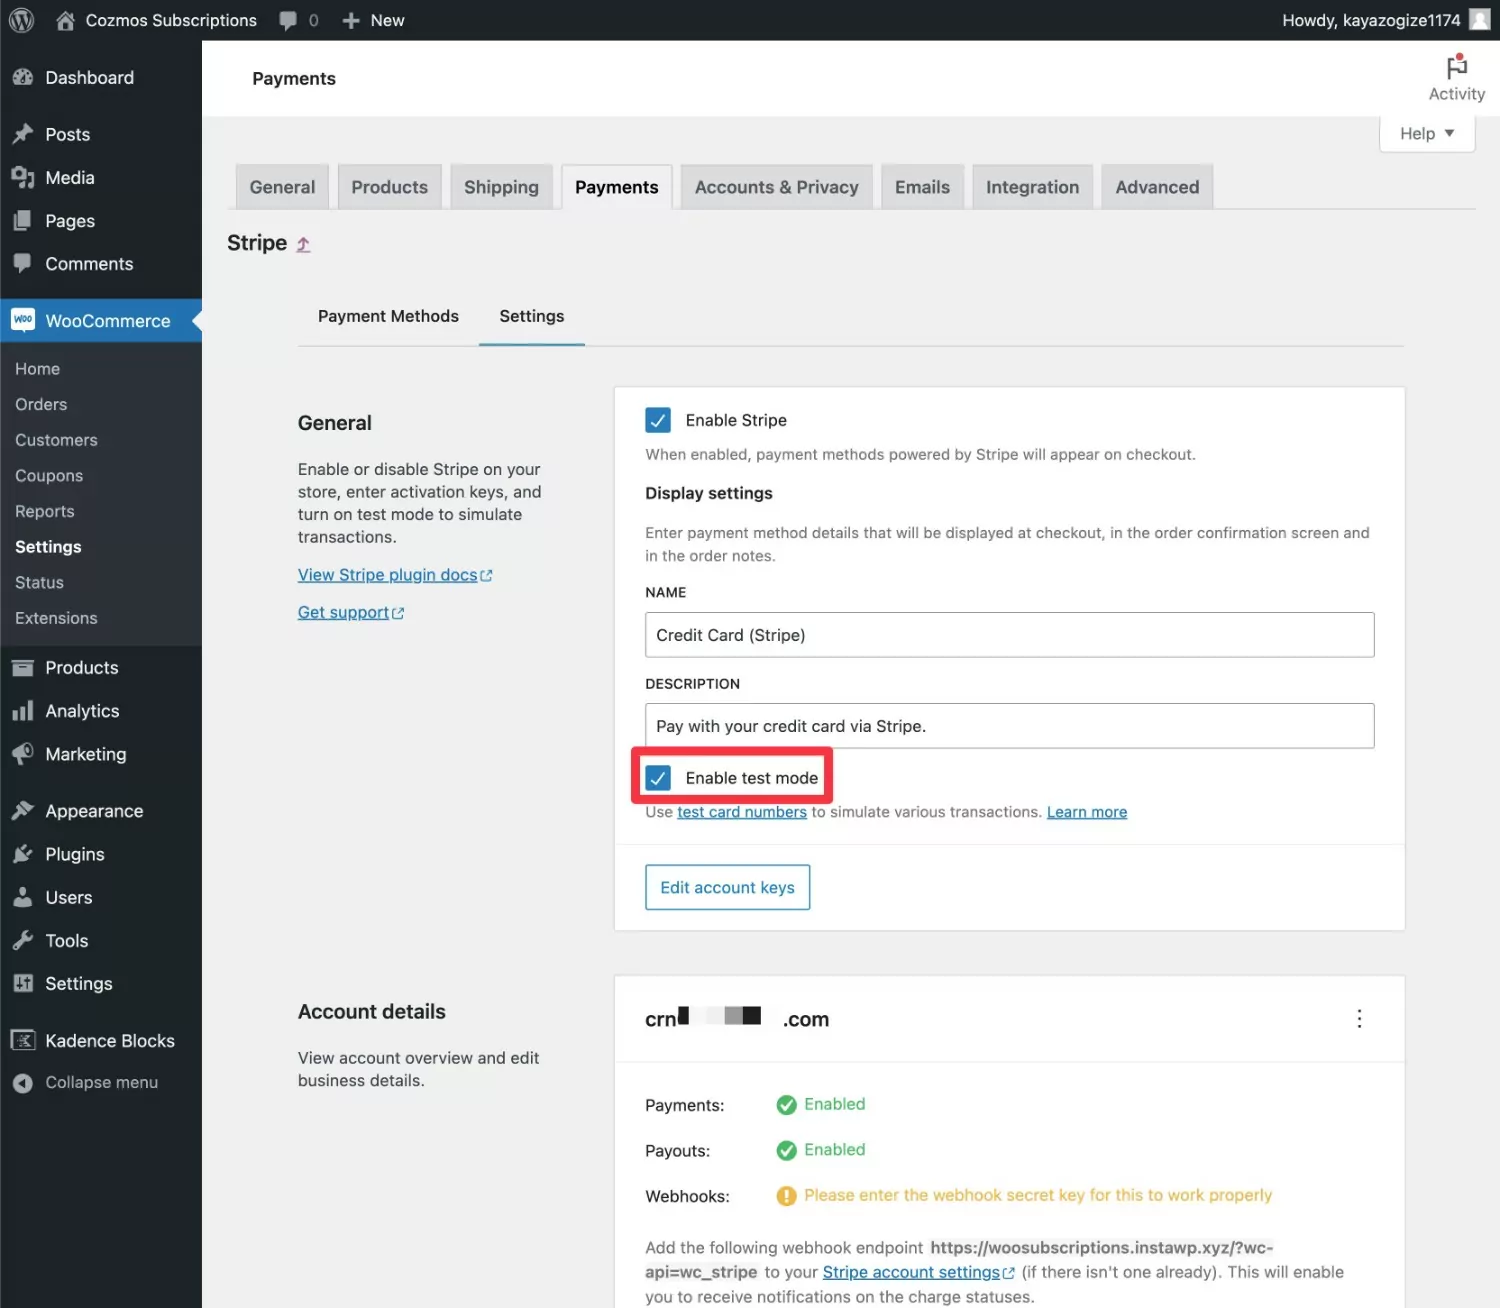
You can do this in the Settings tab. Just remember to turn off test mode once you verify that everything is working correctly.
2. Create a New Subscription Product
Once you’ve set up the basic Stripe payment gateway, you’re ready to create your first WooCommerce Stripe subscription product. First, make sure that you’ve installed and activated the official WooCommerce Subscriptions plugin.
Then, you can create a new product to control your subscription. Users can purchase this product just like any other product. The only difference is that they’ll be subscribed to a recurring payment when they do so.
To get started, go to Products → Add New. Find the Product data box and use the drop-down to set the product type equal to either:
- Simple subscription: you only want to offer a single subscription option.
- Variable subscription: you want to offer multiple subscription options.
If you won’t be shipping any physical products as part of the subscription, you should also check the Virtual box. Then, use the product details below to fill out the subscription information.
Pay special attention to the following:
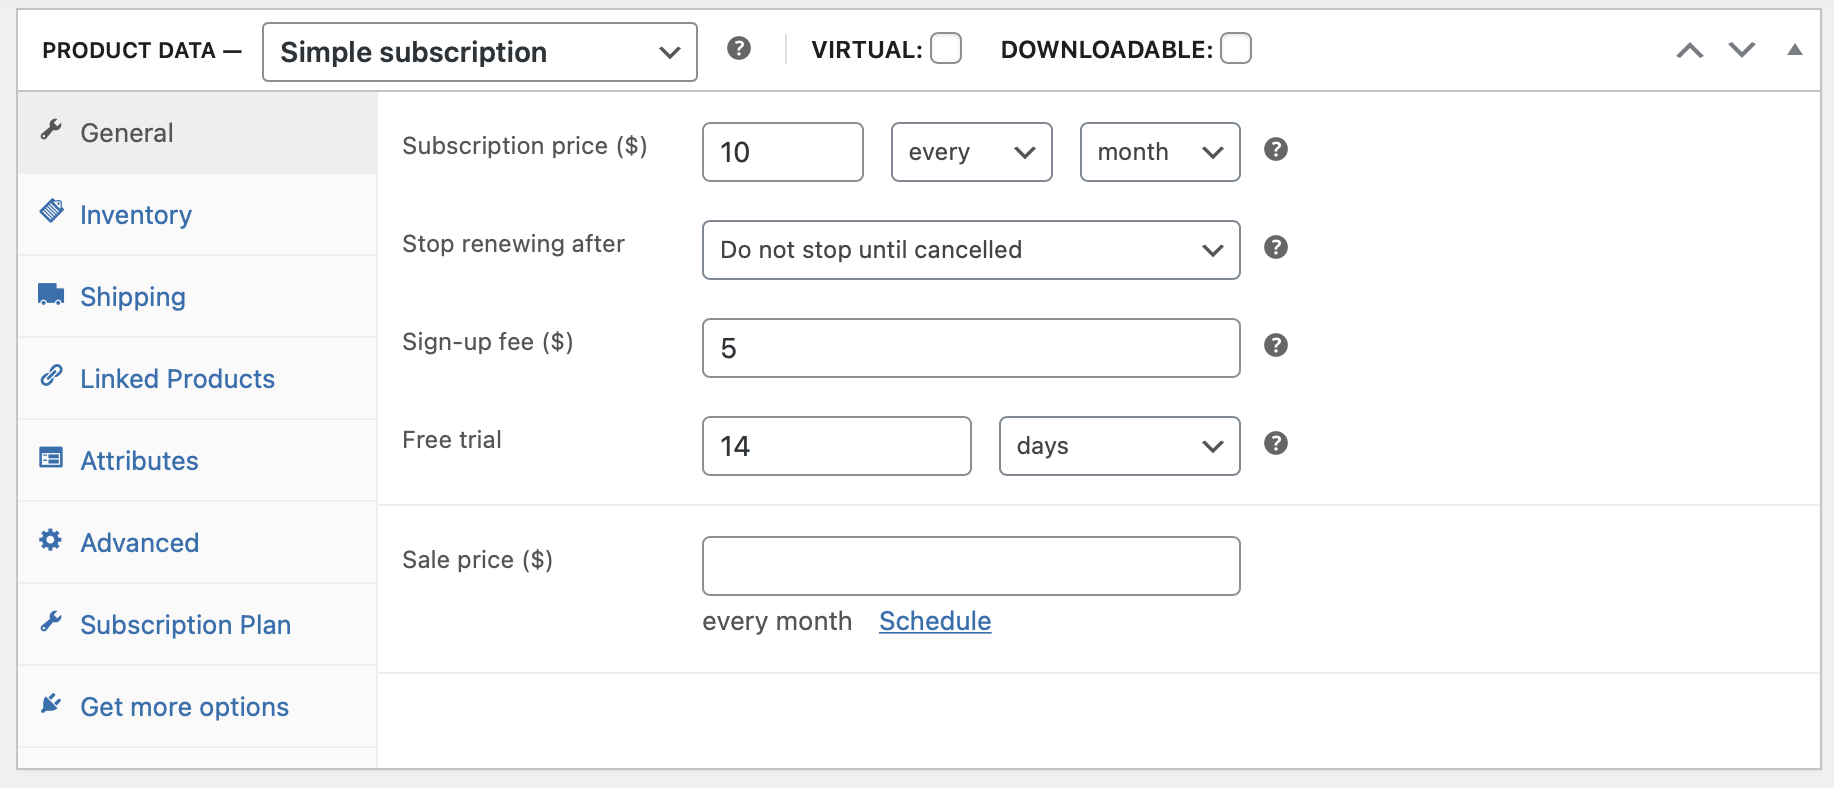
- Price
- Billing period (e.g. per month or per year)
- Stop renewing after (set it to Do not stop until canceled to make the subscription run until canceled)
You can also set up free trials or one-time signup fees as needed:
Then, fill out all the remaining product details like you would for any other product. When you’re finished, publish your product.
Now, whenever customers purchase your subscription product, they can check out using Stripe:
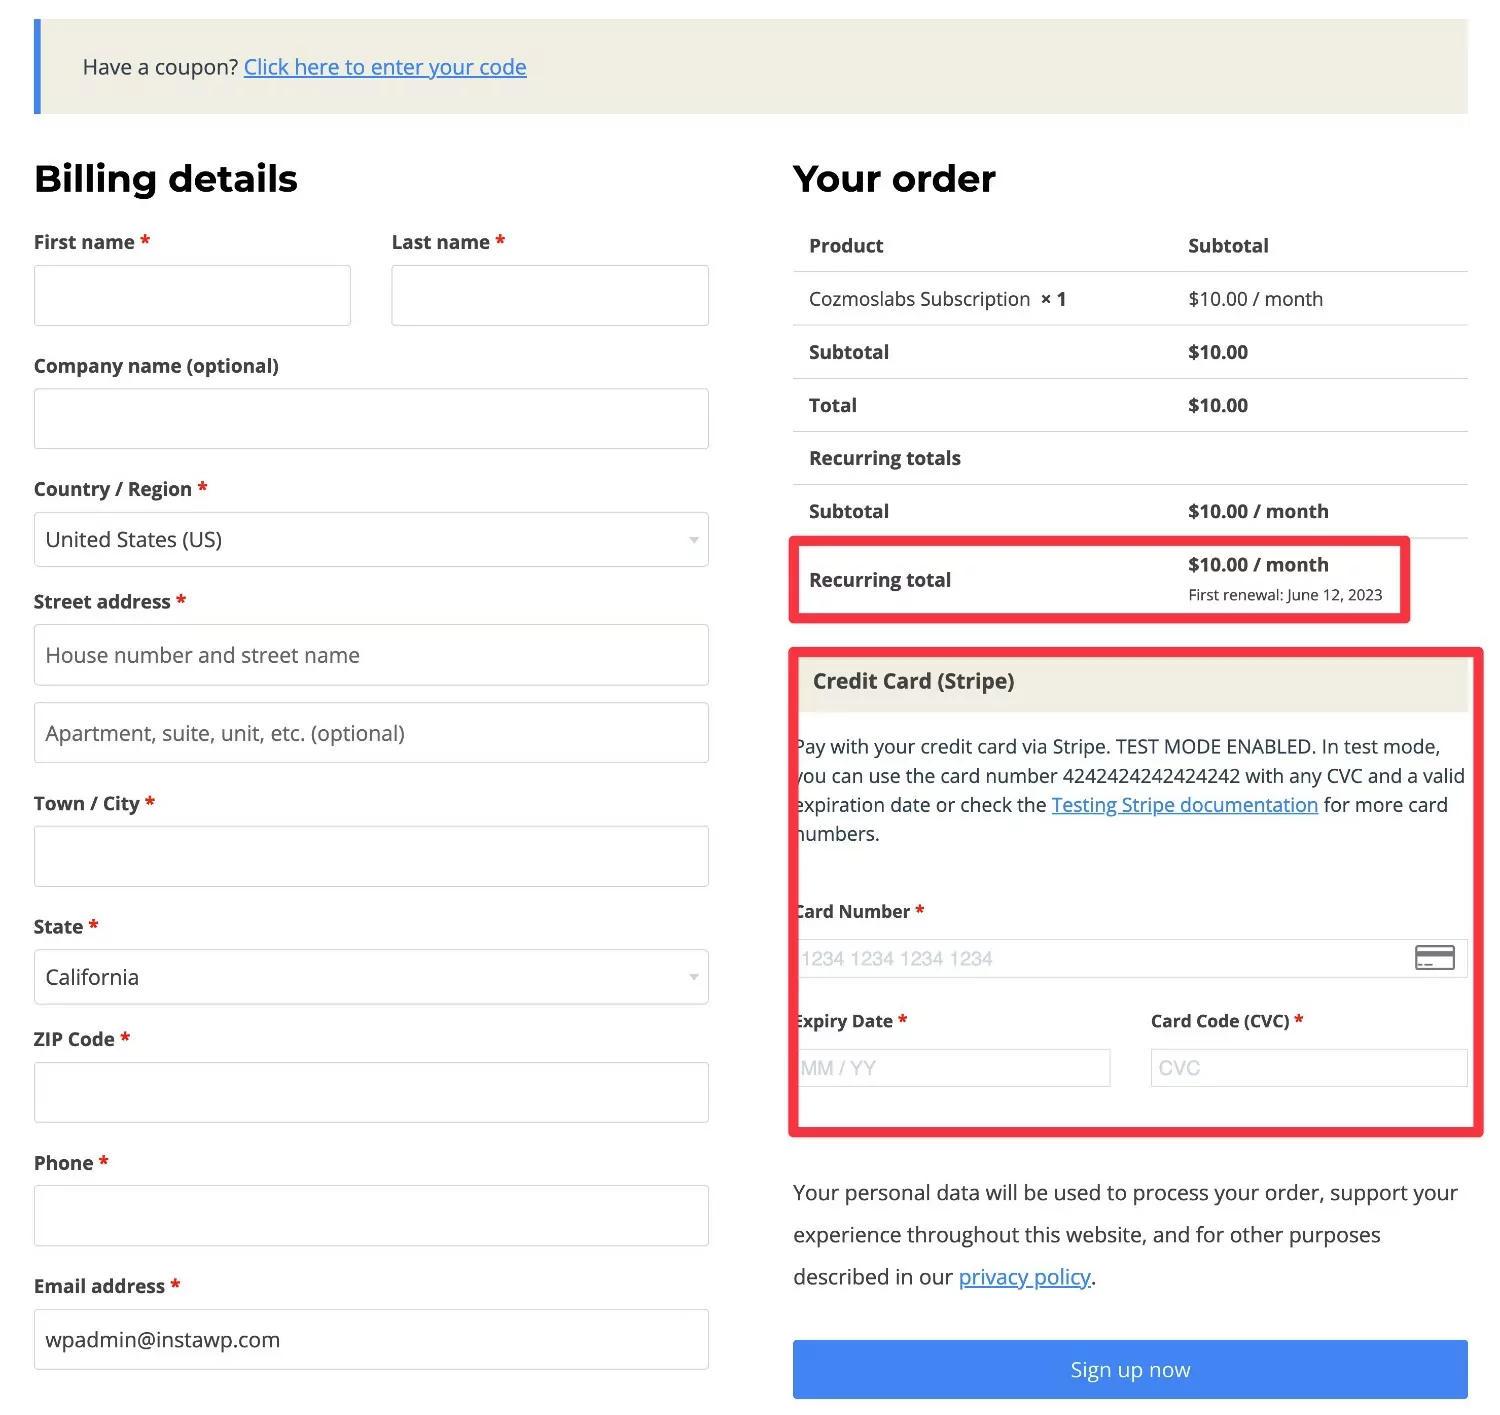
The plugin will configure Stripe to automatically bill them according to your subscription settings.
How to Enhance WooCommerce Stripe Subscriptions With Paid Member Subscriptions (5 Steps)
If you want to create more flexible WooCommerce subscriptions, you can add the Paid Member Subscriptions plugin to the mix:
Paid Member Subscriptions Pro
The best WooCommerce membership plugin to enhance your Stripe recurring subscriptions with content restriction, members-only stores, discounts for subscribers, and more.
Get Paid Member SubscriptionsPaid Member Subscriptions is a full-service WordPress/WooCommerce membership plugin. This means that you’ll get access to additional helpful functionality beyond just WooCommerce Stripe subscriptions.
Here are some key membership features that you can add to your subscriptions:
- Content restriction. You can use your WooCommerce subscription to restrict access to content on your site. You can bulk-restrict content, restrict access to individual pieces of content, or partially restrict pieces of content.
- Product restriction. You can create a members-only store by requiring shoppers to have an active subscription in order to view and/or purchase products.
- Discounts for active subscribers. You can offer special discounts on some/all of your products to users who have an active Stripe subscription. For example, you could give users with an active subscription 15 percent off all products in the “Merch” category.
You can access most of this functionality with just the free version of Paid Member Subscriptions at WordPress.org. However, the paid version will give you even more flexibility and features.
If you don’t need automatic recurring billing, Paid Member Subscriptions can also help you set up WooCommerce Stripe subscriptions in a cheaper way. This makes it a great WooCommerce Subscriptions alternative – more on that in the next section.
For this tutorial, we’re assuming that you want to automatically bill customers every cycle. So in the next section, we’ll show you the full steps to add these features to your WooCommerce Stripe subscriptions.
1. Create Your WooCommerce Subscription Product (Per Previous Section)
To start, you’ll need to create a WooCommerce subscription product. We’ll assume that you’ve already set up your Stripe subscription product as we showed you in the previous section.
Again, Paid Member Subscriptions is adding its functionality on top of your existing subscription product. Therefore, you’ll want to have that set up before you move to the next step.
2. Create a New Subscription Plan
Next, you’ll need to install and activate the Paid Member Subscriptions plugin on your store. Then, go to Paid Member Subscriptions → Subscription Plans → Add New to create your first subscription.
Give your plan a name and fill out the rest of the details. Make sure that your subscription plan details match the price of your WooCommerce subscription product (that you created earlier).
Our example subscription product costs $10 per month, so that’s how we’ll configure the Paid Member Subscriptions plan:
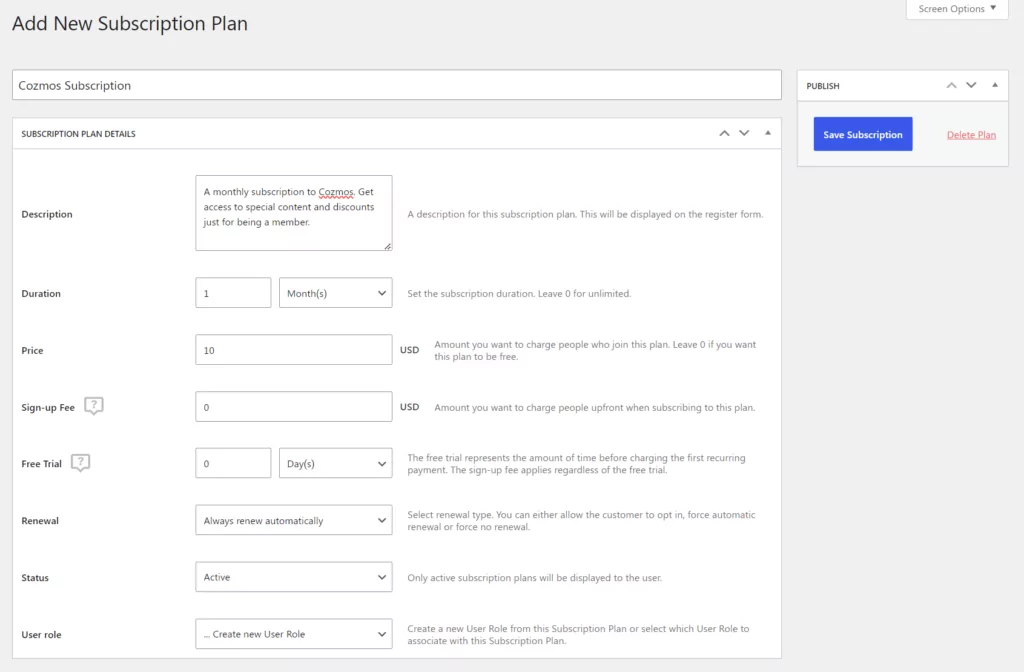
When you’ve filled everything out, make sure to click on the Save Subscription button.
3. Link Your Subscription Plan to the WooCommerce Subscription Product
Once you’ve created your subscription plan in Paid Member Subscriptions, you need to link that plan to the WooCommerce subscription product that you’ve already created.
By linking the two together, Paid Member Subscriptions will automatically enroll users in this subscription plan when they purchase that product. It will also keep them enrolled each time the automatic subscription renewal is processed (or remind/suspend them if the automatic payment fails).
To do this, you’ll need to open the product editor for your WooCommerce subscription product. Return to the Product data box and click on the Subscription Plan tab.
Then, use the Subscription Plan drop-down to choose the Paid Member Subscriptions plan that you created in the previous step:
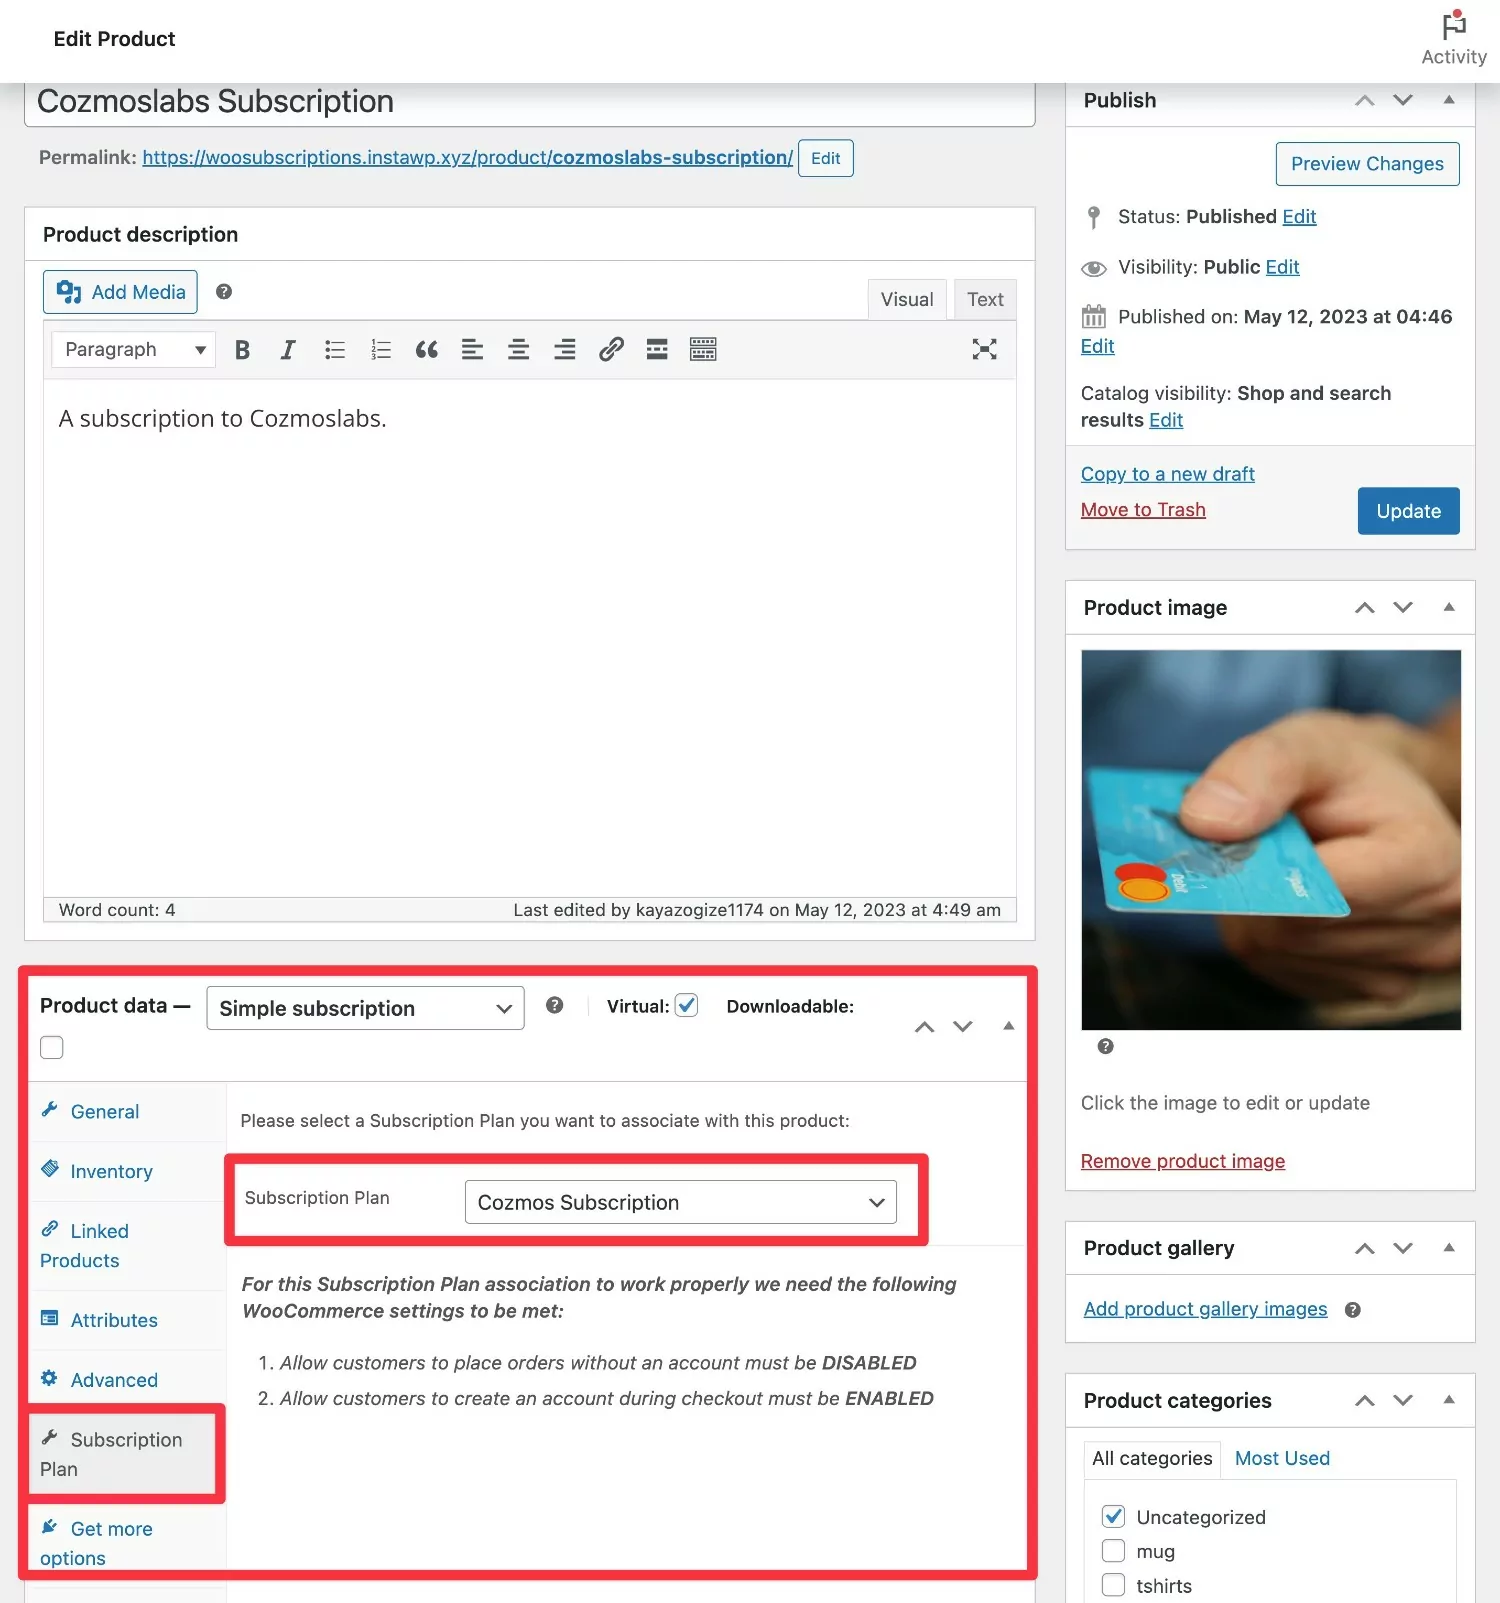
Make sure to click on the Update button to save your settings.
And that’s it! When a shopper purchases this product, they’ll automatically be enrolled into your Paid Member Subscriptions plan. You can check this by going to Paid Member Subscriptions → Members.
If you’re experiencing any issues, make sure that you’ve configured your store to have these two options:
- Make sure to DISABLE the option to “Allow customers to place orders without an account”.
- Make sure to ENABLE the option to “Allow customers to create an account during checkout”.
You can access these settings by going to WooCommerce → Settings → Accounts & Privacy.
4. Start Using Your Subscription Plan
Now that you’ve set up your WooCommerce Stripe subscriptions to work with Paid Member Subscriptions, you’re ready to take advantage of all the new functionality that the plugin provides.
Here’s a quick rundown of some of the main things you can do.
Restrict Access to Content
To restrict access to individual pieces of content, look for the Content Restriction box when you edit a piece of content (like posts and pages) in WordPress and select your preferences:
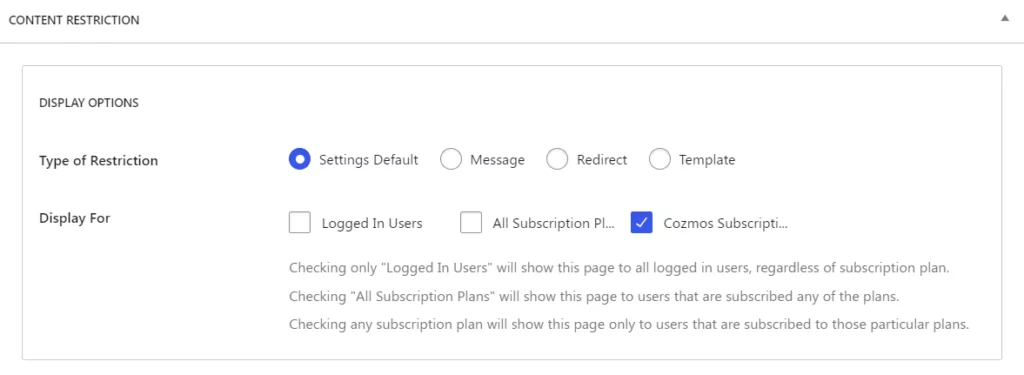
You can also partially restrict pieces of content using shortcodes or set up bulk content restriction rules using the Global Content Restriction add-on, which is available with the Paid Member Subscriptions Basic license.
Restrict Access to WooCommerce Products
To restrict who can view and/or purchase individual products, you’ll get a new Content Restriction box at the bottom of the product editor:
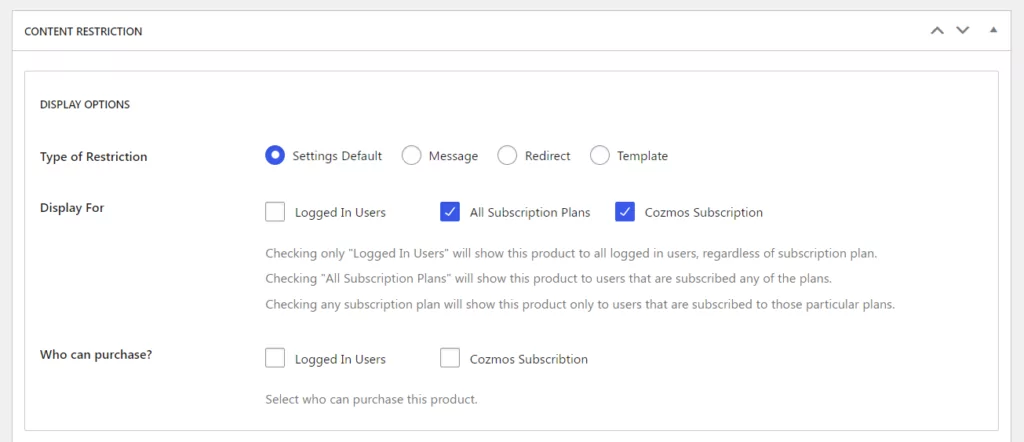
You can also set up bulk product restriction rules using the Global Content Restriction add-on, which is available with the Paid Member Subscriptions Basic license.
Offer Members-Only Discounts
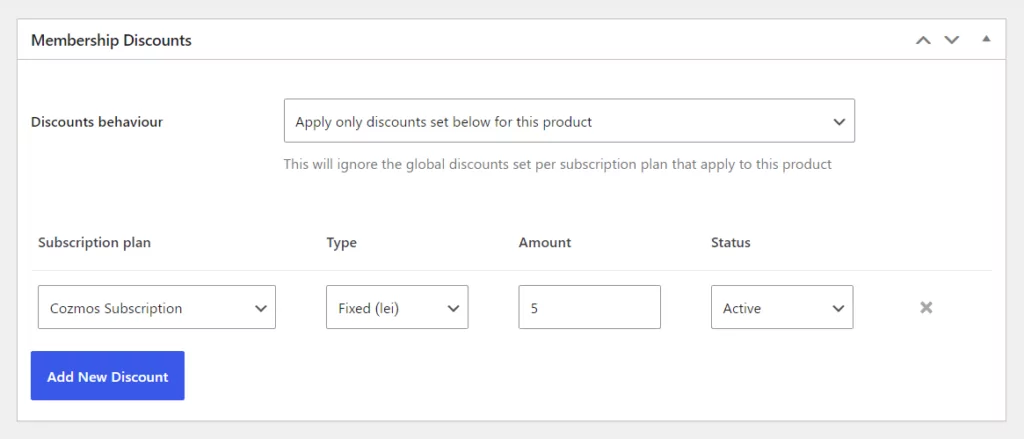
To set up members-only discounts, you can create global rules and also set up product-specific rules.
To create global rules, go to Paid Member Subscriptions → Subscription Plans and edit your subscription plan. Scroll down to the Product Discounts box and click on Add New Discount:
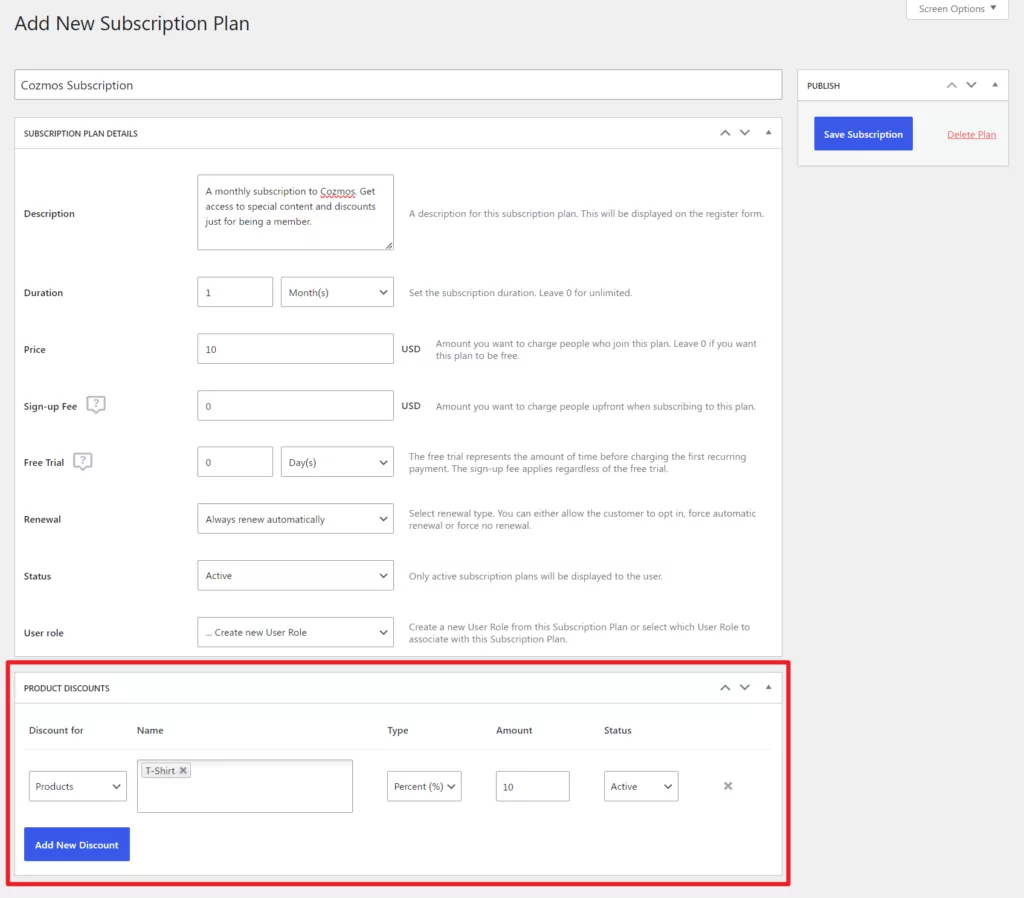
To set up product-specific discounts, you’ll find a new Membership Discounts box when you open a product for editing.
Manage Members
Whenever someone purchases your WooCommerce subscription product, Paid Member Subscriptions will automatically enroll them as a member.
To view/manage all of the members on your store, go to Paid Member Subscriptions → Members:
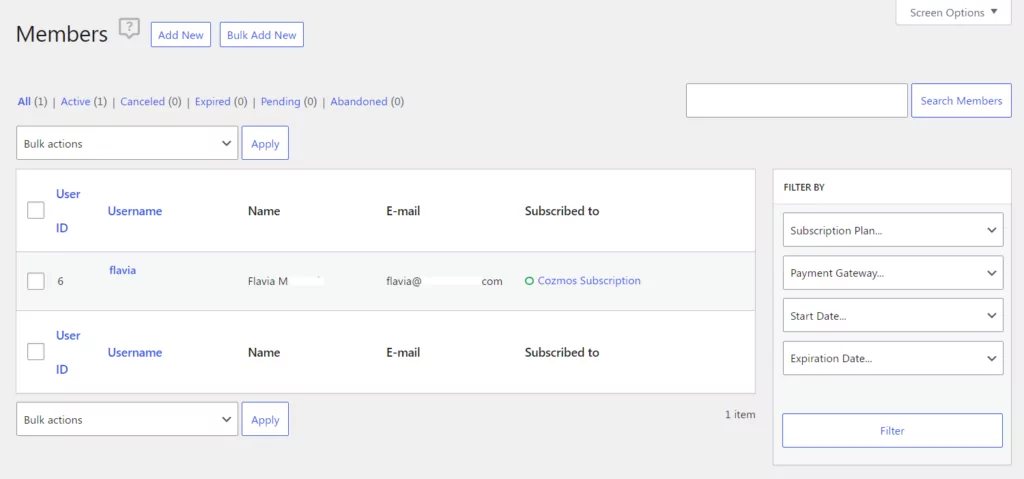
Here, you can add new members manually or edit existing ones. You can also find members using the filter settings to the right of the page.
5. Repeat As Needed for Additional Subscriptions
If you want to create additional subscriptions, you can repeat these steps as needed to create as many subscriptions as your store needs.
And that’s it! Within just a few minutes, you can turbocharge your WooCommerce Stripe subscriptions to utilize them in all kinds of helpful ways.
Cheaper Alternative: Set Up Manual WooCommerce Stripe Subscriptions With Paid Member Subscriptions
For the method above, we were assuming that automatic recurring billing is an essential functionality for your store. This means that members will automatically be billed by Stripe every billing cycle according to their existing payment method.
Essentially, members don’t need to return to your store to manually make a payment (after the first payment is made). However, if you don’t need automatic recurring payments, you can also use Paid Member Subscriptions to set up WooCommerce Stripe subscriptions in a more affordable way.
In this instance, a user will purchase a WooCommerce product and pay using Stripe. This product gives them access to a subscription plan for your chosen billing cycle (e.g. one month).
The difference is that near the end of the billing cycle, users will have to manually make another Stripe payment to continue their subscription. You can automatically send emails to encourage renewals. But, if the user doesn’t make the payment, the subscription will expire.
The main advantage of this method is that it eliminates the need to purchase the WooCommerce Subscriptions plugin, which saves you $279 per year. However, users will need to manually renew their subscriptions each month (or whatever billing cycle you choose).
That said, there are some benefits to having customers manually pay their Stripe subscriptions each month. For example, shoppers can use a different credit card, or choose a different billing option that’s supported by Stripe, such as Apple Pay or Google Pay.
How to Set Up Manual Stripe Subscriptions Using Paid Member Subscriptions
If you are interested in this approach, many of the basic steps are the same as what we’ve already shown you. You’ll first need to install the Paid Member Subscriptions plugin on your store.
Then, you can set up the official Stripe WooCommerce Payment Gateway plugin, if you haven’t done so already. After that, you’ll need to create at least one subscription plan in Paid Member Subscriptions.
To do this, go to Paid Member Subscriptions → Subscription Plans → Add New:
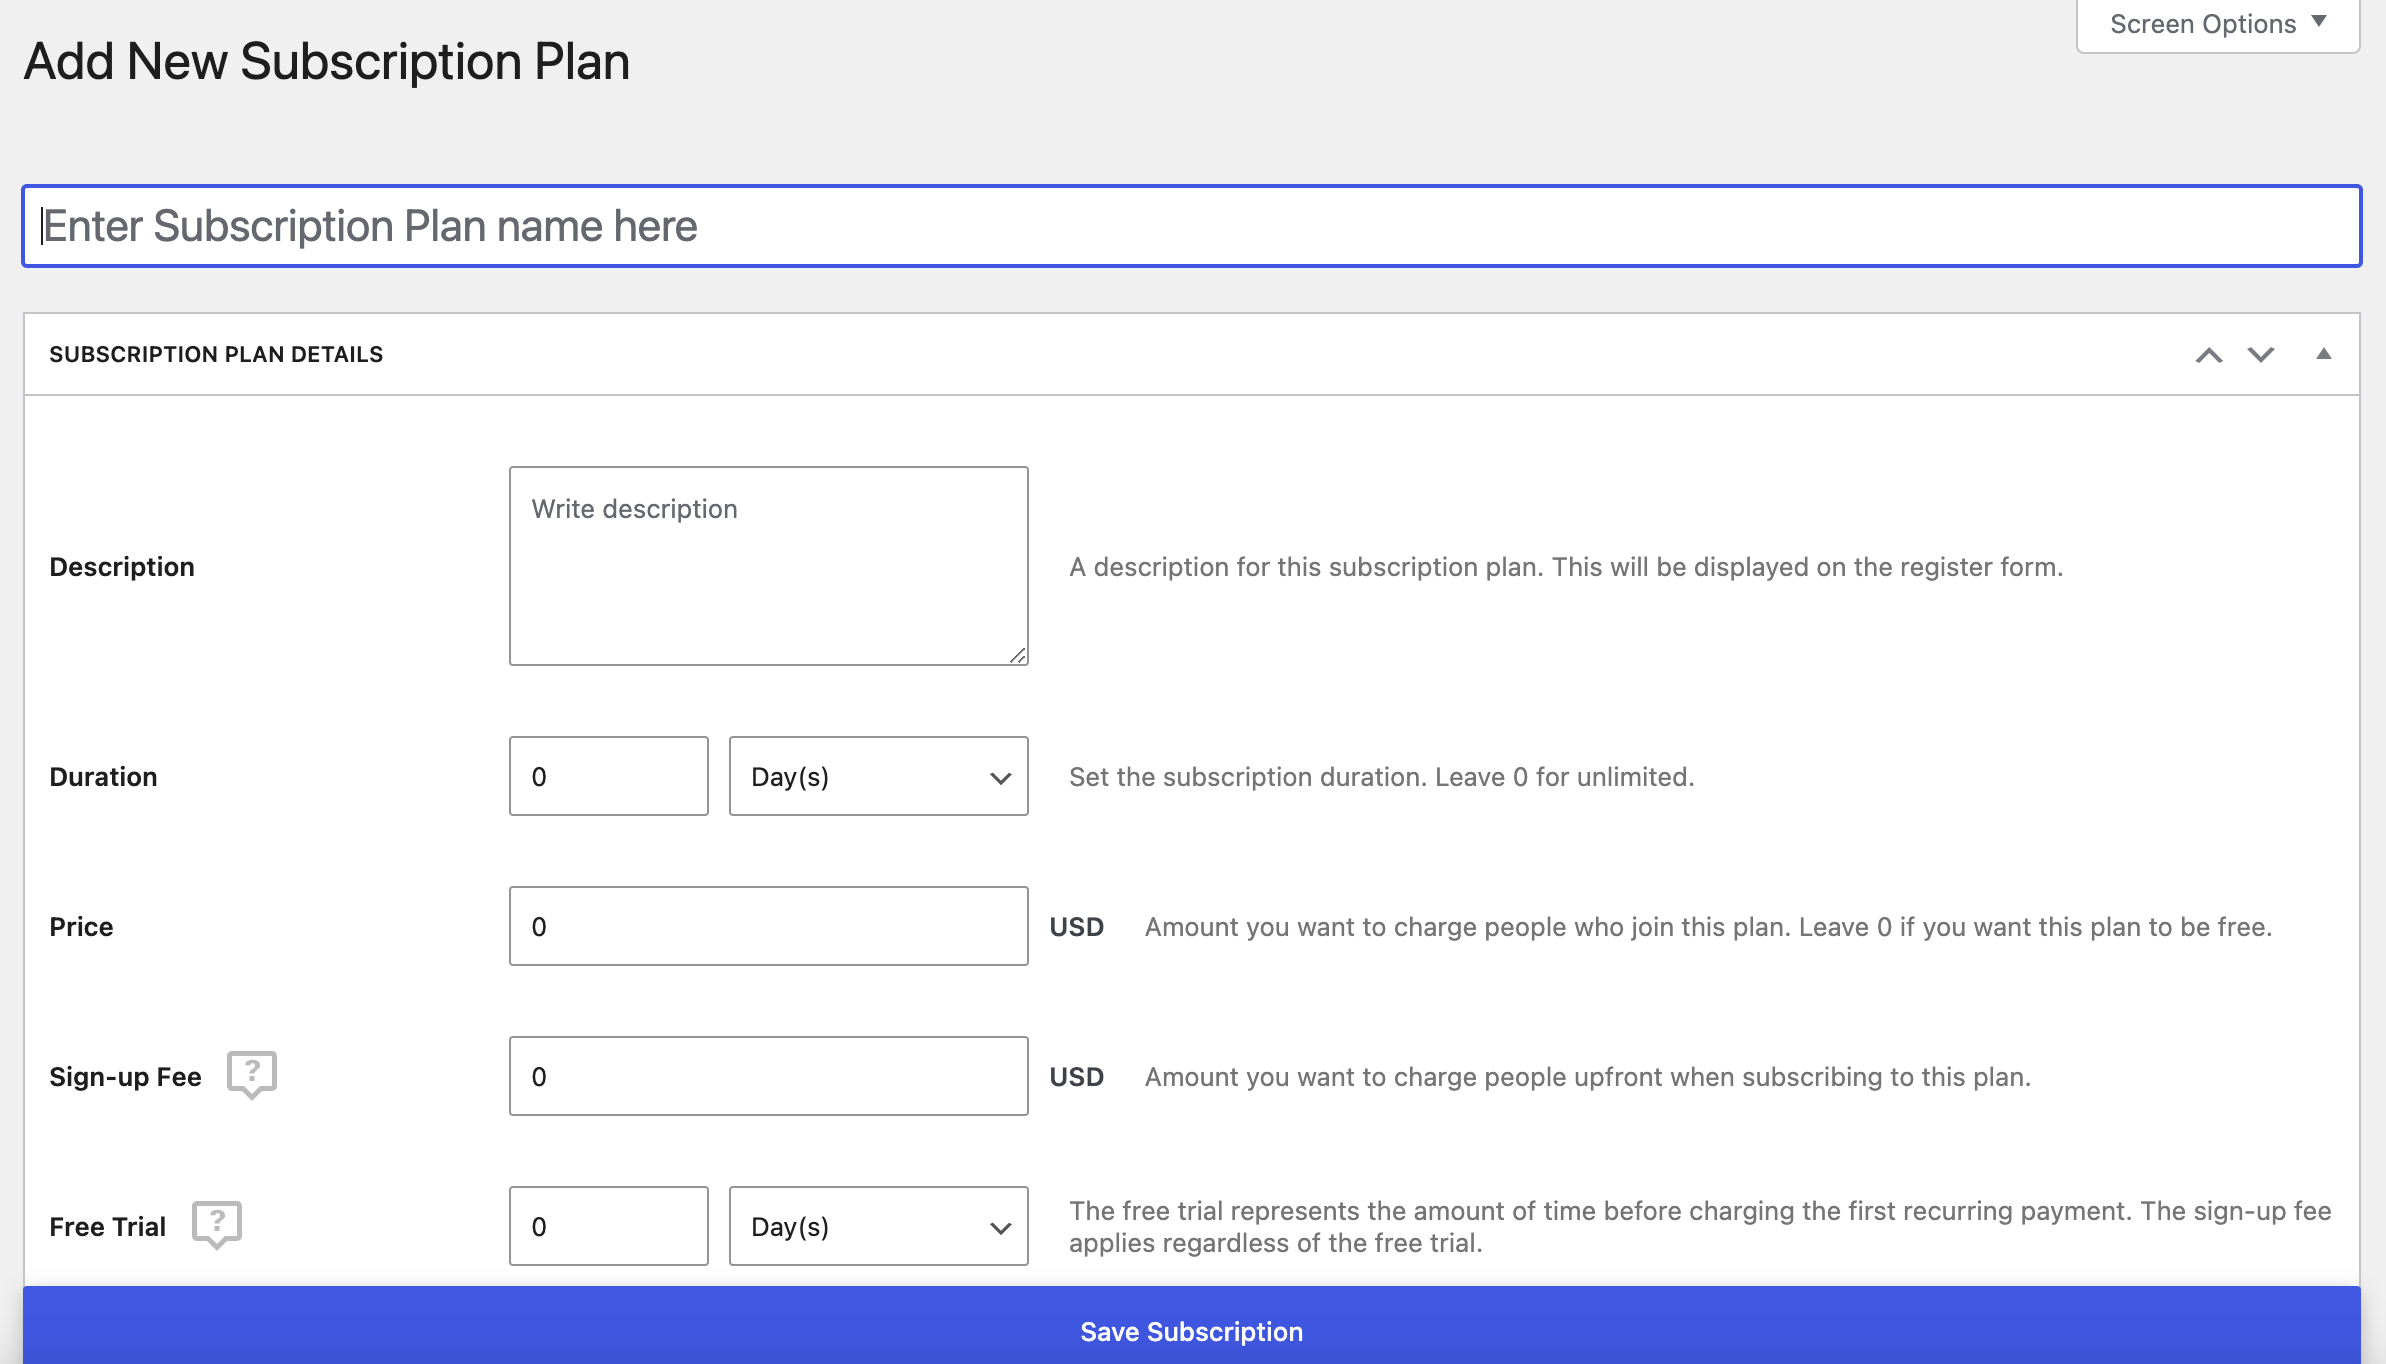
Next, you can create a WooCommerce product which users will need to purchase to unlock access to the subscription. They can use the normal WooCommerce checkout and pay using Stripe.
The final step is to link your WooCommerce product to the subscription plan that you created with Paid Member Subscriptions. So, you’ll need to edit your product and scroll down to the Product data box:
Move to the Subscription Plan tab and select the plan you just created with PMS. Then, repeat the process as needed to create additional subscription plans (optional).
Set Up WooCommerce Stripe Subscriptions Today
Offering subscriptions is a great way to build a recurring revenue stream for your WooCommerce store. And when it comes to recurring subscriptions, Stripe is one of the best payment processors to use. Better yet, there are multiple ways to set this up in WooCommerce.
To recap, here are three methods to set up WooCommerce Stripe subscriptions:
- The most basic option is to use the official WooCommerce Stripe Payment Gateway plugin and the official WooCommerce Subscriptions plugin.
- Or, you can enhance your WooCommerce Stripe Subscriptions by adding Paid Member Subscriptions to the mix. This lets you restrict access to content or products and offer members-only discounts.
- If you don’t need automatic recurring billing, Paid Member Subscriptions can also help you set up manual WooCommerce Stripe Subscriptions. This is a much cheaper option since you won’t need the official WooCommerce Subscriptions plugin.
Do you have any questions about how to set up recurring payments with Stripe? Let us know in the comments below!
Related Articles

How to Automate WordPress with a Workflow Automation Tool
Interested in WordPress automation but not sure where to begin? In this post, we're going to cover everything that you need to know about automating WordPress. We'll start with some of the different reasons to consider using automations. After that, we'll give you a generalized tutorial on how to use a WordPress automation plugin named […]
Continue Reading
How to Create a Website for Affiliate Marketing
If you’re looking for a side hustle or want to create a passive income stream, affiliate marketing can be a good option. This involves promoting products by other companies, which can lead to commissions on sales and leads. But to get started, you’ll need to set up a website. Thanks to WordPress, creating a website […]
Continue Reading
Roundup of WordPress ecosystem #1 – January 2017
After writing the article "Overview of the WordPress Community in 2016" and getting feedback for the article on various platforms, I decided to continue writing them, but I changed its name into "Roundup of WordPress ecosystem". This is the first article from a monthly series that will showcase what happened around the whole ecosystem in […]
Continue Reading

